Multimeter Manual
version 1.1.2
Table of contents
- Introduction
- Definitions and compliance
- Installation
- Usage
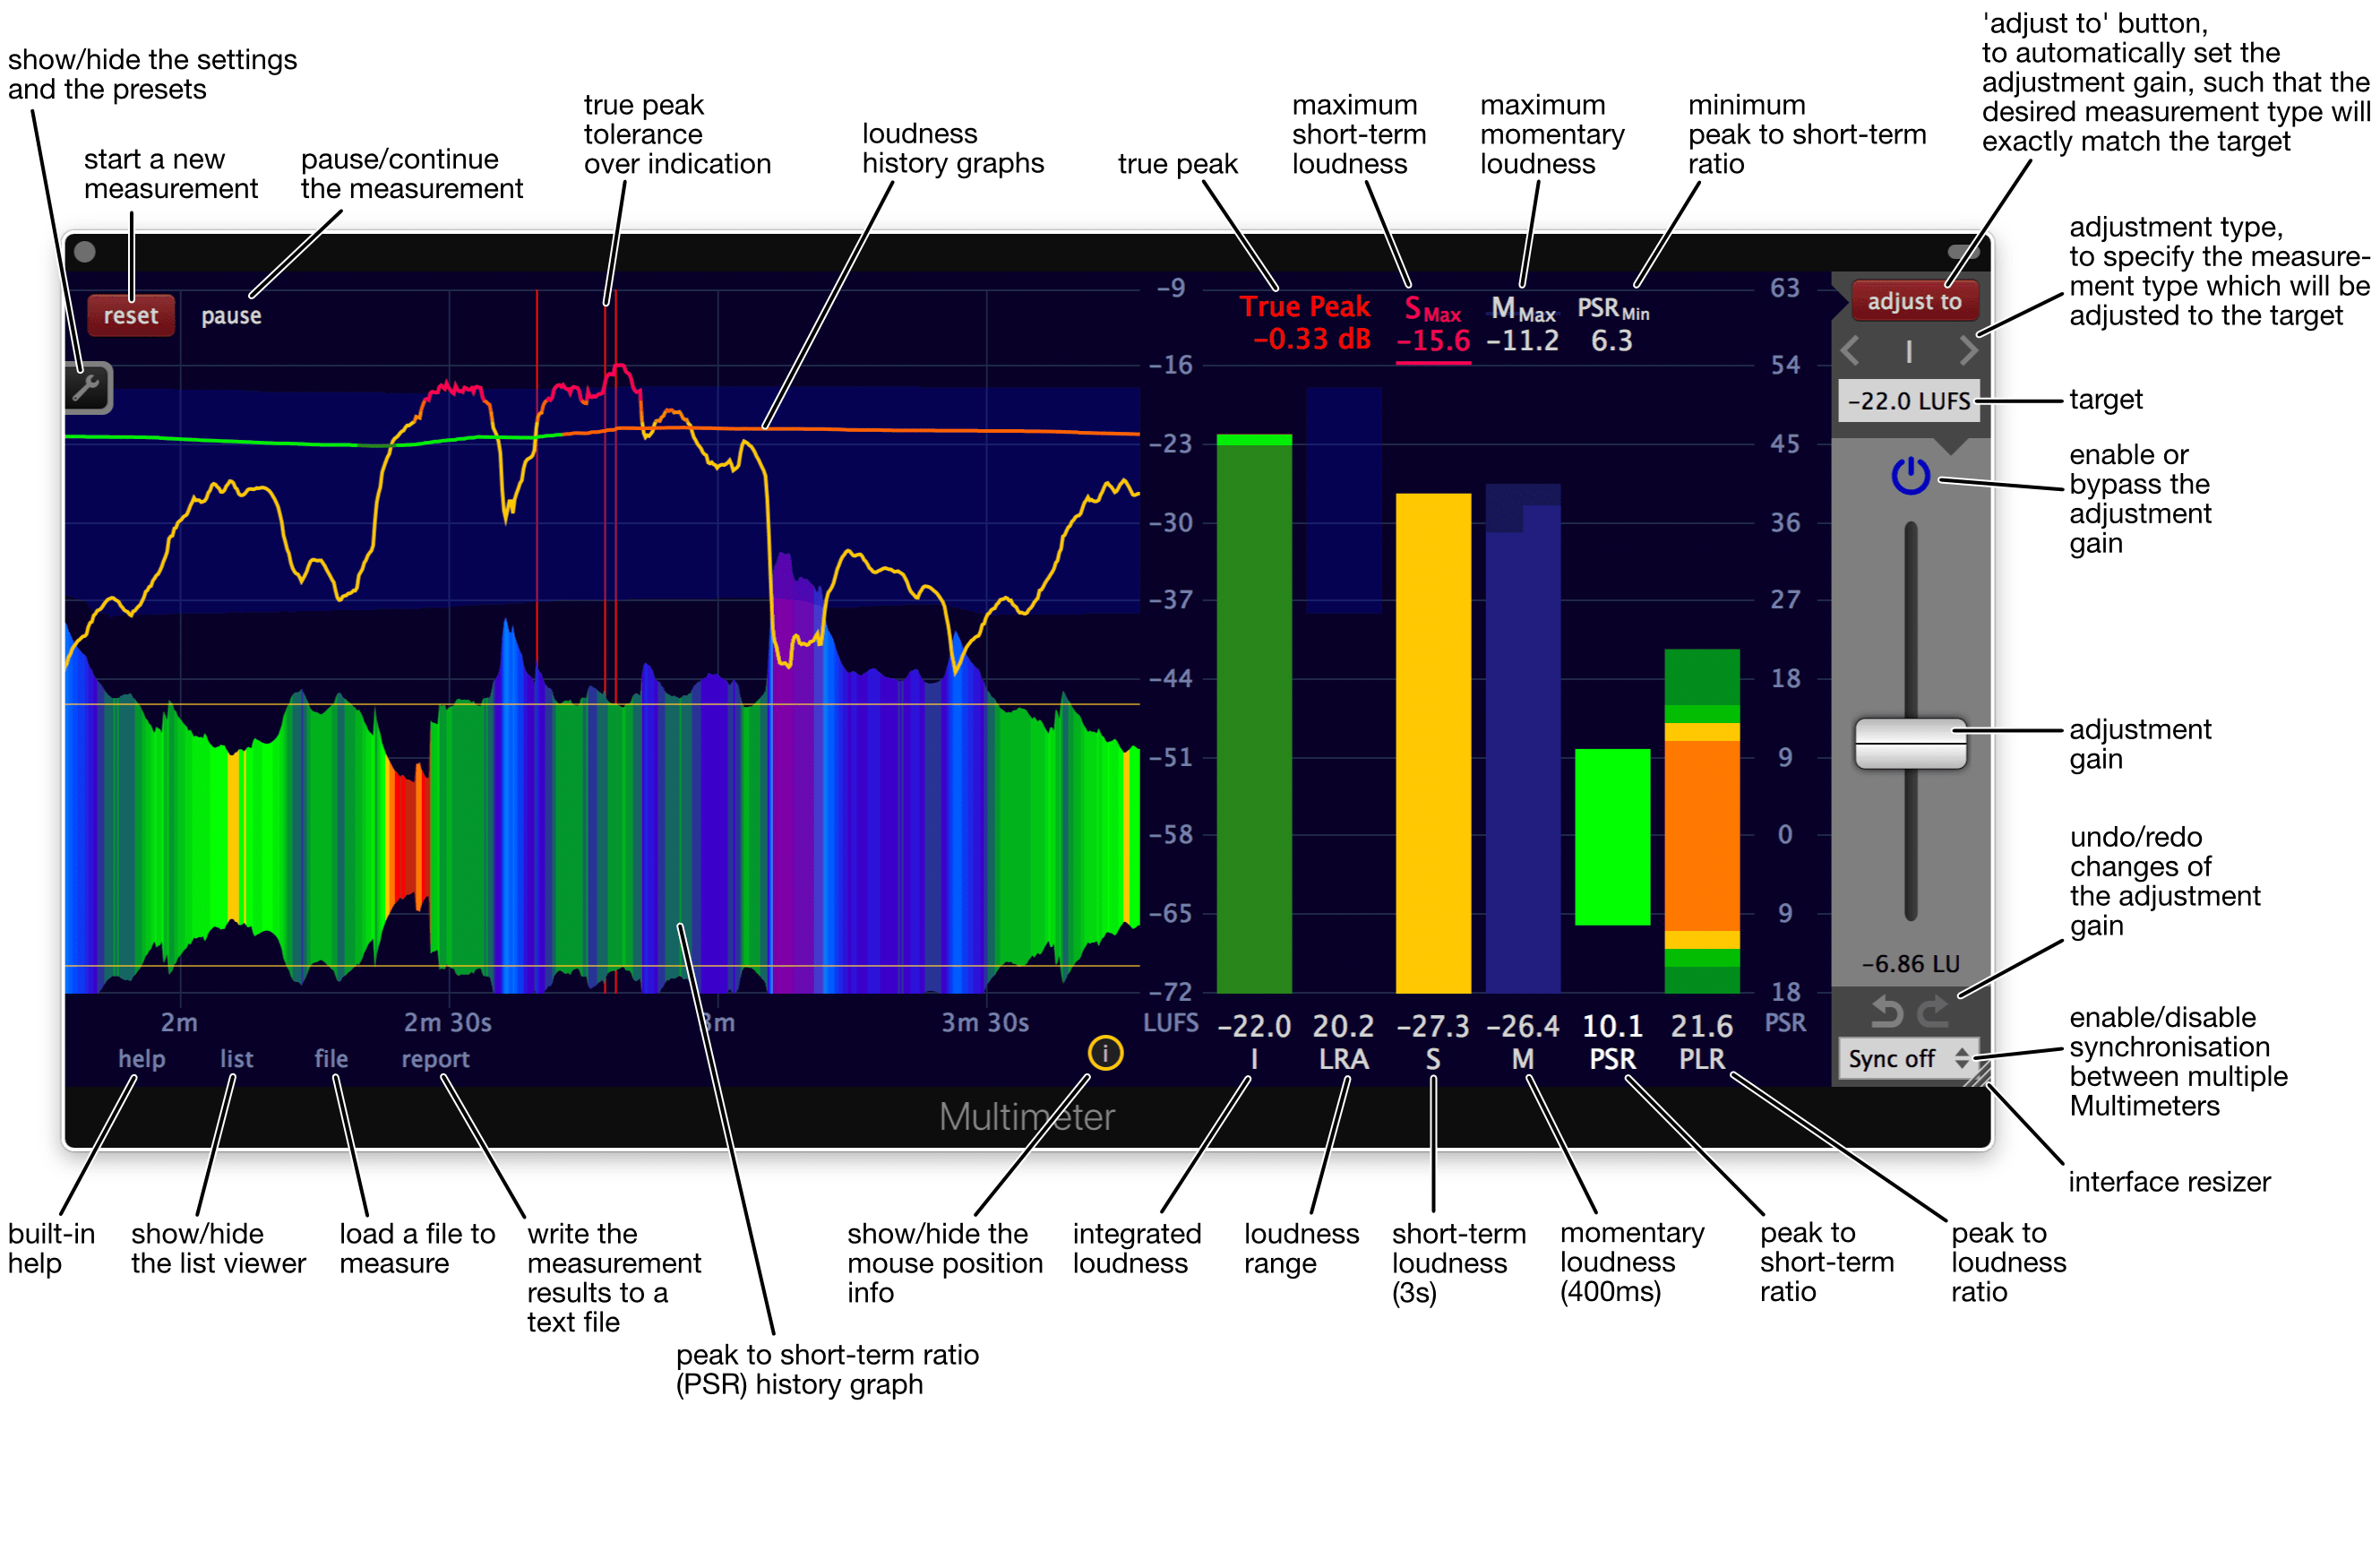
- Interface - Overview
- Interface - Built-in help
- Interface - Move and scale with the mouse
- Interface - List viewer
- Interface - Mouse position info
- Measure the loudness of a single track
- Measure the loudness of an entire multitrack project
- Adjust the loudness
- Measure and adjust as fast as possible in a DAW (offline processing)
- Measure a file
- Save a measurement report
- Synchronisation
- Create a faders up mix
- Judge effects effectively
- Compare your work with reference tracks
- Comply with a high loudness target
- Loudness compliance for broadcast
- Daisychained Multimeters
- Multiple sync groups
- Settings and presets
- Appendix
Introduction
About the Multimeter
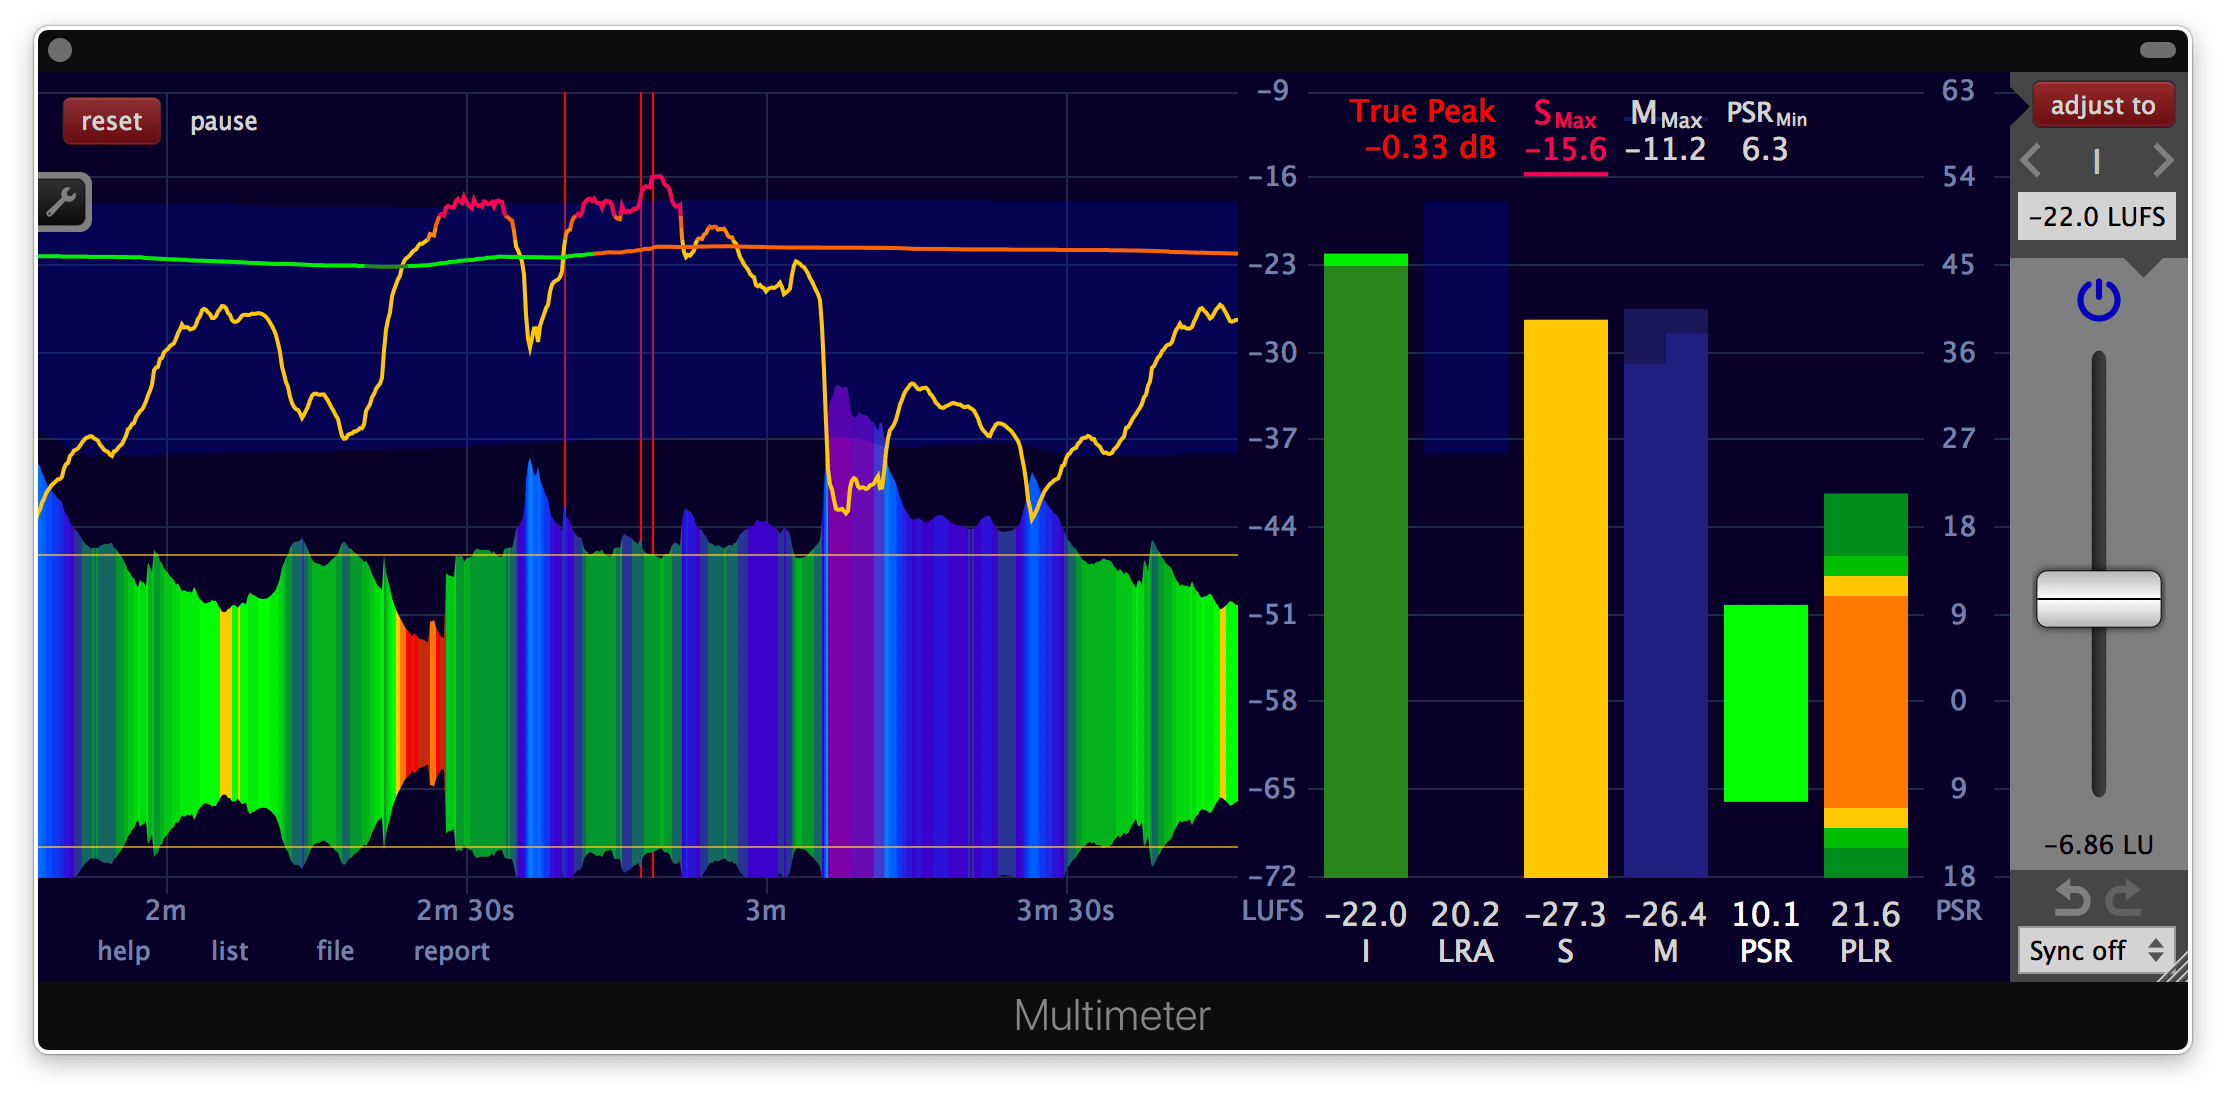
The Multimeter is a software audio plug-in and standalone application that measures the integrated loudness (program loudness), the short-term and the momentary loudness, long- and short-term dynamics (LRA, PLR and PSR), the peak and the true peak. The automatic gain adjustment of the plug-in simplifies the process of creating loudness and true peak compliant material. The Multimeter is compliant with a multitude of international loudness specifications and recommendations.
Because the integrated loudness is close to the human perception of loudness, the automatic gain adjustment of the Multimeter makes it easy to match the loudness of multiple songs for an album, a movie or a show. It also enables you to compare your work with reference tracks at the same loudness. And to objectively judge if a given audio effect really yields an improvement.
On top of that, the Multimeter contains a unique synchronisation mechanism to make each track of a project equally loud - a so called 'faders up mix'. A perfect starting point for the creative mixing process.
Ins and Outs
The Multimeter is capable of measuring an audio stream within a host (as a plug-in), the audio input of your audio interface (standalone application) or a supported audio or video file (plug-in and standalone application). Fast measurements via AudioSuite in Pro Tools are also supported.
Surround channel layouts with up to 64 channels are supported. The Multimeter determines the channel weighting needed for the loudness measurement automatically. The weighting can be set manually as well.
Measurement results can be written to a text file (.csv format).
Open source at heart
The loudness measurement algorithm used in the Multimeter has been made available for free by Klangfreund (with a permissive MIT license). So a curious user can take a look at the inner workings of the Multimeter. Or build his own software on top of that.
Definitions and compliance
Loudness
In contrast to earlier approaches, modern loudness measurement is quite close to the human perception of loudness.
Loudness measures
| I | Integrated loudness | The actual loudness, measured since the last reset. Also called the program loudness. |
| S | Short-term loudness | The loudness of the past 3 seconds. |
| M | Momentary loudness | The loudness of the past 400 milliseconds. |
| LRA | Loudness range | Quantifies the variation of the short-term loudness since the last reset. Or described differently: A big loudness range indicates that there is a big difference between the loudest and the most quiet sections. For the first 60 seconds, the LRA value in the Multimeter is blinking to point out that the loudness range is not considered stable yet. |
LUFS = LKFS = K-weighted loudness units with reference to digital full scale.
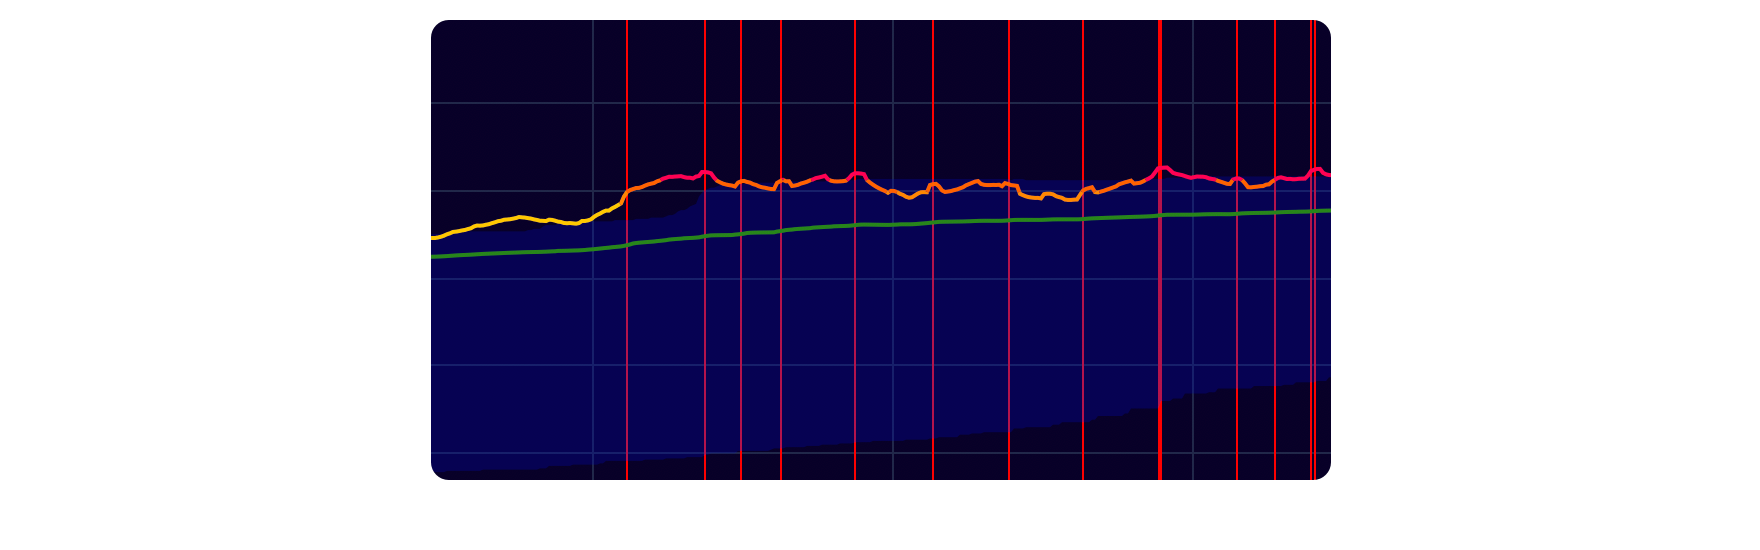
The numerical loudness measurement values are displayed at the bottom right of the Multimeter. Above the numbers, bars visualize the measurements graphically. On the left side, graphs show the measurement values over time.
The Multimeter has been built according to the specifications ITU-R BS.1770 revision 1 to 4, EBU R128, EBU R128 s1 v2.0, EBU Tech 3341 v3.0 and EBU Tech 3342 v3.0.
Note about LUFS and dB
It is not possible to measure the loudness (According to the specifications of ITU-R BS.1770) with a traditional peak or RMS measurement device. A loudness meter like the LUFS Meter or the Multimeter is needed for this task.
Nevertheless, there is a certain connection. A change in volume by x dB in your DAW will result in a change of exactly x LU of the integrated loudness in the Multimeter.
Example: A piece gets measured with the Multimeter and it has an integrated loudness of -26 LUFS. Now a gain plug-in is inserted in front of the Multimeter and it is set to +3 dB. For a second time the loudness gets measured with the Multimeter. This time the integrated loudness is -23 LUFS (-26 LUFS + 3 LU).
True peak
| True-peak | The maximum (positive or negative) value of a signal in the continuous time domain. |
| True peak | The estimate of the true-peak of a discrete time signal. |
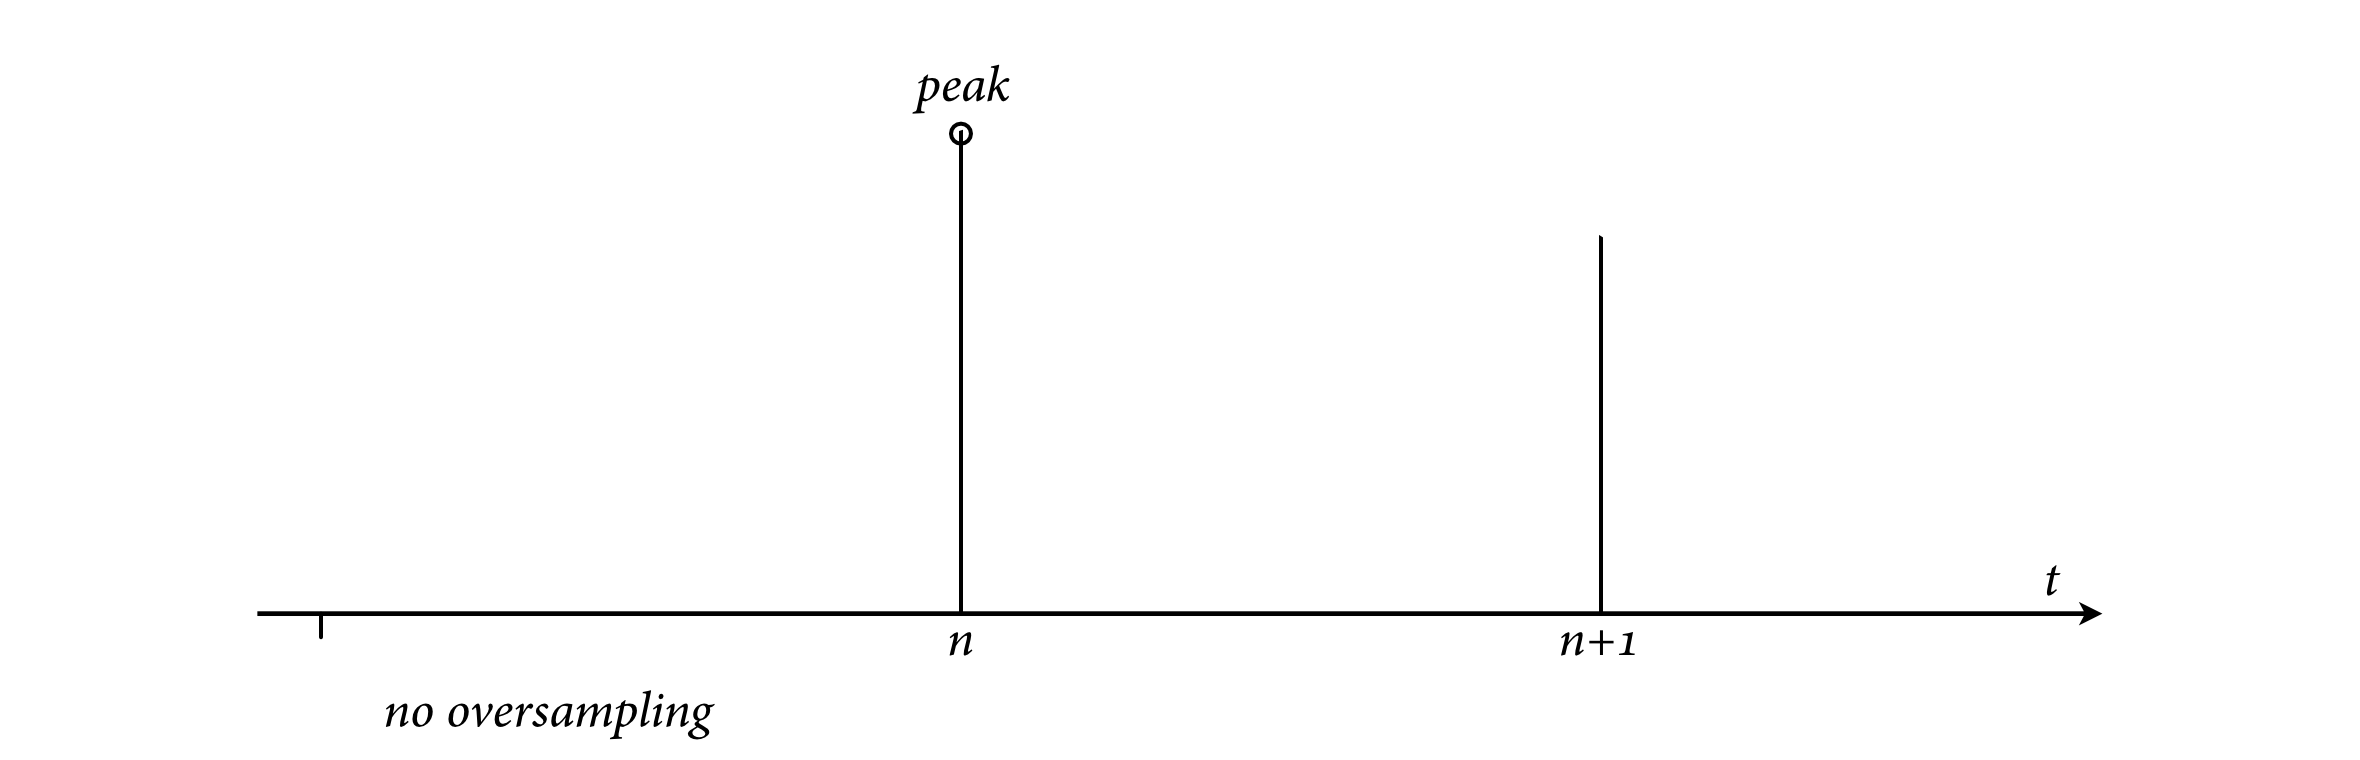
The definition of 'true-peak' - as stated above - is provided in ITU-R BS.1770-4, Annex 2. In the same document it is suggested to estimate the true-peak of a band-limited signal given in the discrete time domain with a sample rate of 48kHz by applying 4 times oversampling and to take the absolute maximum of the oversampled signal.
Many implementations and documents use the same term 'true-peak' for the 'estimate of the true-peak'. To clearly distinguish between these two different things, the estimate of the true-peak is called 'true peak' (without the '-' between 'true' and 'peak') by Klangfreund. This is not a generally approved terminology.
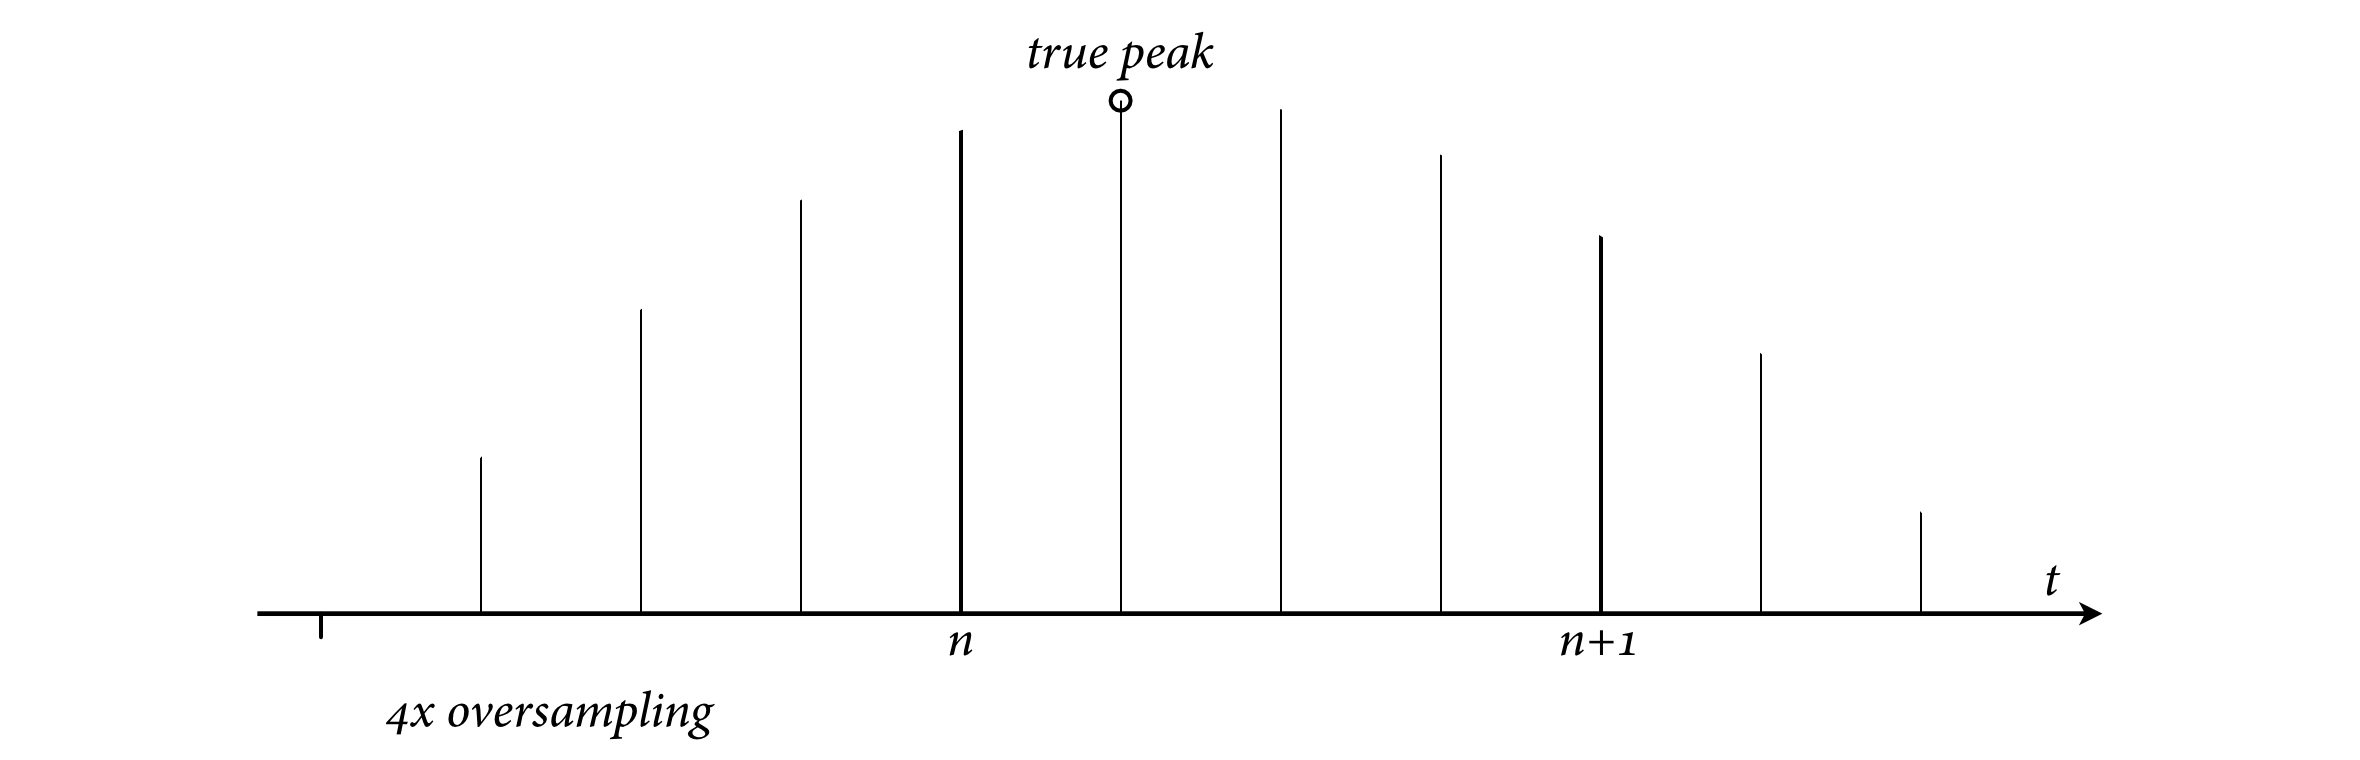
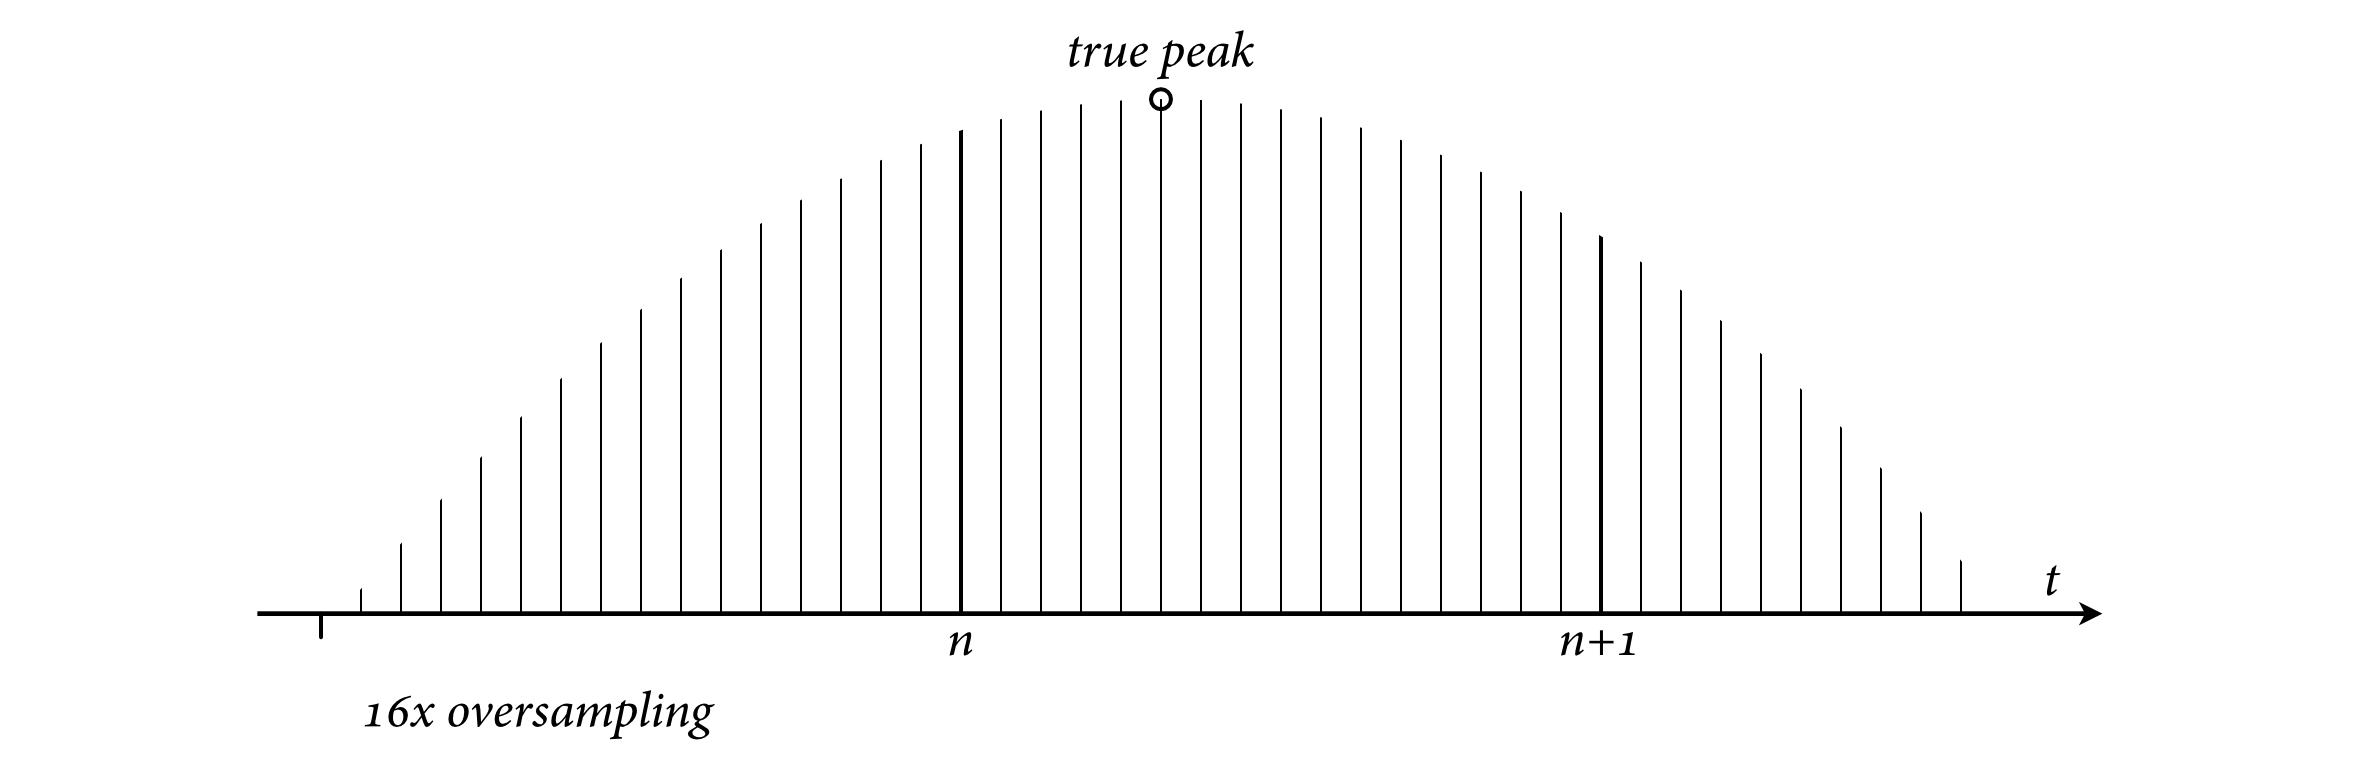
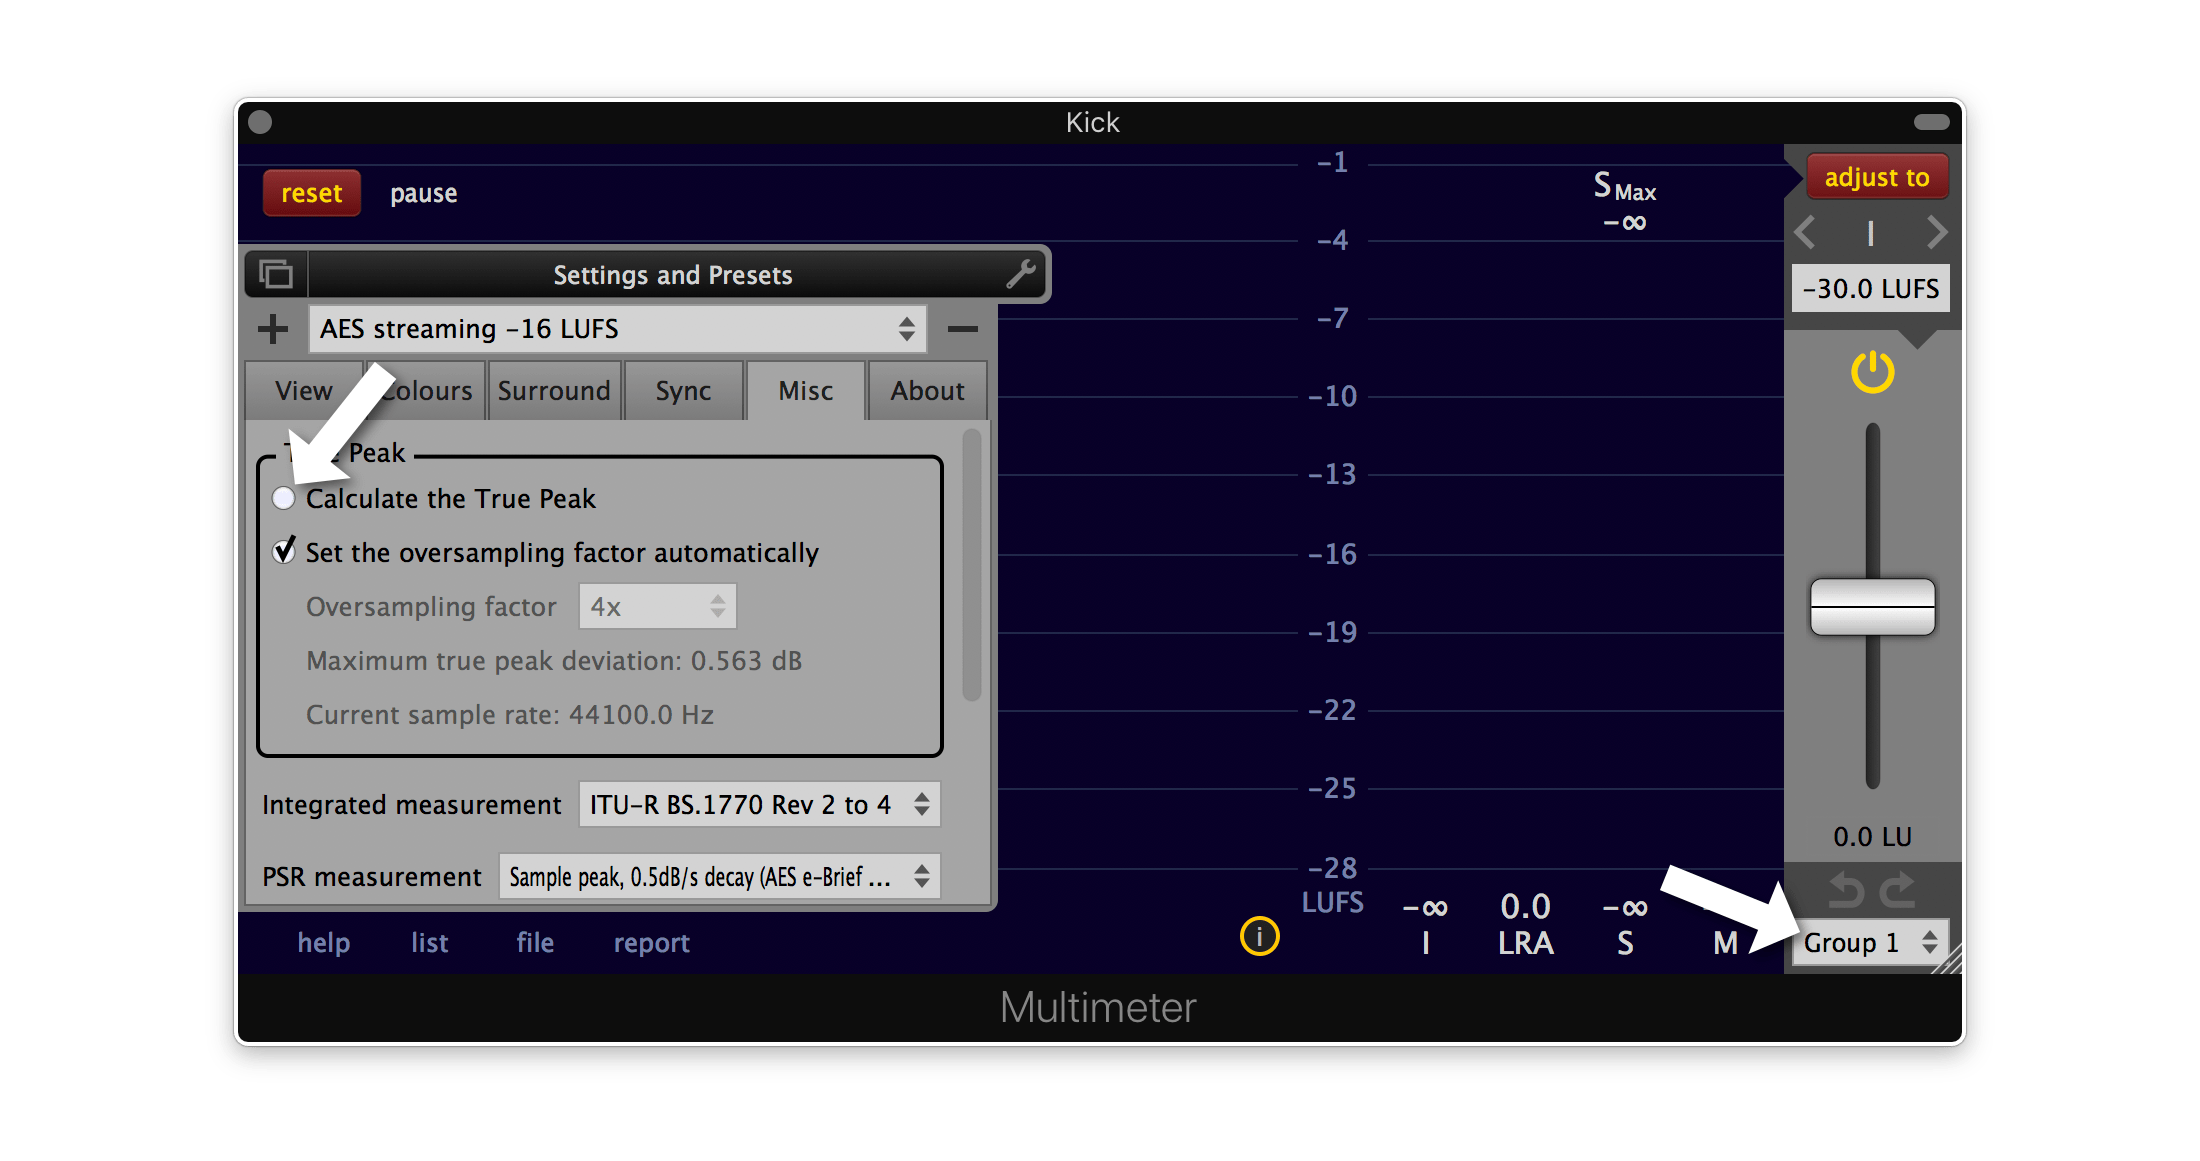
In the Multimeter, the oversampling factor for the true peak calculation can be set manually or automatically. With up to 16 times oversampling.
The maximum true peak deviation - the maximal possible difference between the true-peak and the estimate of the true-peak - is provided in the Misc settings.

A vertical red line is drawn whenever the absolute oversampled signal exceeds a user-adjustable true peak tolerance.
PLR and PSR (micro dynamics)
| PLR | Peak to Loudness Ratio | The true peak level of the measured audio (in dB(TP)) minus the integrated loudness of the measured audio (in LUFS). |
| PSR | Peak to Short-term loudness Ratio | The maximum peak minus the short-term loudness. |
| micro dynamics | Very short term audio qualities like peak headroom and transient detail that affect the perception of "life" and space in the sound, of depth and clarity. |
The PLR can be seen as a summary of the micro dynamics for a given piece of audio. A high PLR is an indicator for high dynamics, whereas a low PLR corresponds to a monotone or strongly limited or clipped piece of audio. The PLR is defined in AES TD-1004.
The PSR at time t is a measure for the micro dynamics over the time interval [t-3s, t]. For example the PSR at 30 seconds of a measurement describes the micro dynamics between the time 27s and the time 30s. The PSR at 31 seconds of a measurement describes the micro dynamics between the time 28s and the time 31s.
There isn't a generally agreed definition of the PSR yet. The unclear bit is about which 'maximum peak' to use. That's why the Multimeter offers 4 different options to choose from (Settings -> Misc -> PSR Measurement):
- Sample peak of the last 3s - The peak (the biggest absolute sample value) that occurred in the previous 3 seconds.
- True peak of the last 3s - The true peak that occurred in the previous 3 seconds.
- Sample peak, 0.5dB/s decay (AES e-Brief 373) - The continuously updated peak with an instant rise and a 0.5dB/s decay. The AES e-Brief 373 (October 18-21 2017) recommends this method to detetermine the PSR. Be aware that peaks occurring prior to 3 seconds in the past can have an influence on the current PSR value.
- True peak, 0.5dB/s decay - The continuously updated true peak with an instant rise and a 0.5dB/s decay. Be aware that true peaks that occurred prior to 3 seconds in the past can have an influence on the current PSR value.
The AES e-Brief 373 argues in favour of using the sample peak instead of the true peak for the PSR. The rational is that distortion can cause high true peaks. So if a true peak calculation is used to determine the PSR, the PSR can become high when distortion was applied to the audio. A high value of a true peak based PSR therefore isn't always caused by genuine musical micro dynamics.
Compliance with international loudness specifications
The Multimeter is compliant with international loudness specifications and recommendations:
- AES e-Brief 373 (PSR)
- AES TD1004.1.15-10 (streaming, PLR)
- AGCOM 219/09/CSP (Italy)
- ARIB TR-B32 (Japan)
- ATSC A/85 / PRSS / CALM Act (US)
- EBU R 128 (Europe)
- EBU R 128 s1 (short content, v2.0 Jan 2016)
- EBU Tech Doc 3341 (EBU Mode, v3.0 Jan 2016)
- EBU Tech Doc 3342 (Loudness range, v3.0 Jan 2016)
- ITU-R BS.1770 revisions 1 to 4 (Oct 2015)
- OP-59 (Australia)
Presets for these standards and recommendations are included. So are presets for helping to produce and deliver for popular streaming platforms:
- Apple Music
- Netflix
- Spotify
- Youtube
Further reading
The EBU Tech 3343 document written by Florian Camerer explains what loudness measurement according to EBU R128 is and provides practical guidelines for different applications. Loudness measurement has also been a cover story in Sound On Sound.
If you prefer technical papers, read Annex 1 (page 2 to 7) of ITU-R BS.1770-4 as well as the EBU – TECH 3341. This note roughly illustrates how these specifications are implemented in the Multimeter. Additional technical documents are available at ebu.ch.
The peak to loudness ratio (PLR) is defined in
AES TD1004.1.15-10.
A suggestion for the definition of the peak to short-term loudness
ratio (PSR) is provided in the
AES e-Brief 373.
Installation
System requirements
- macOS 10.7 or newer
- Windows XP or newer
- Linux Experimental
Compiled under Ubuntu 16.04 with as few dependencies as possible to make it work on as many distributions as possible. Use the demo version to see if your flavour of Linux is supported.
The Multimeter can be used as an audio plug-in within a host application that supports one of the plug-in formats listed below. It can also be launched as a standalone application.
No iLok required.
Supported plug-in formats
- macOS: AAX and AAX Audio Suite (Pro Tools 10.3.5 or later), Audio Unit, VST2 and VST3
- Windows: AAX and AAX Audio Suite (Pro Tools 10.3.5 or later), VST2 and VST3
- Linux: VST2
32 and 64 bit support for all plug-in formats and standalone applications.
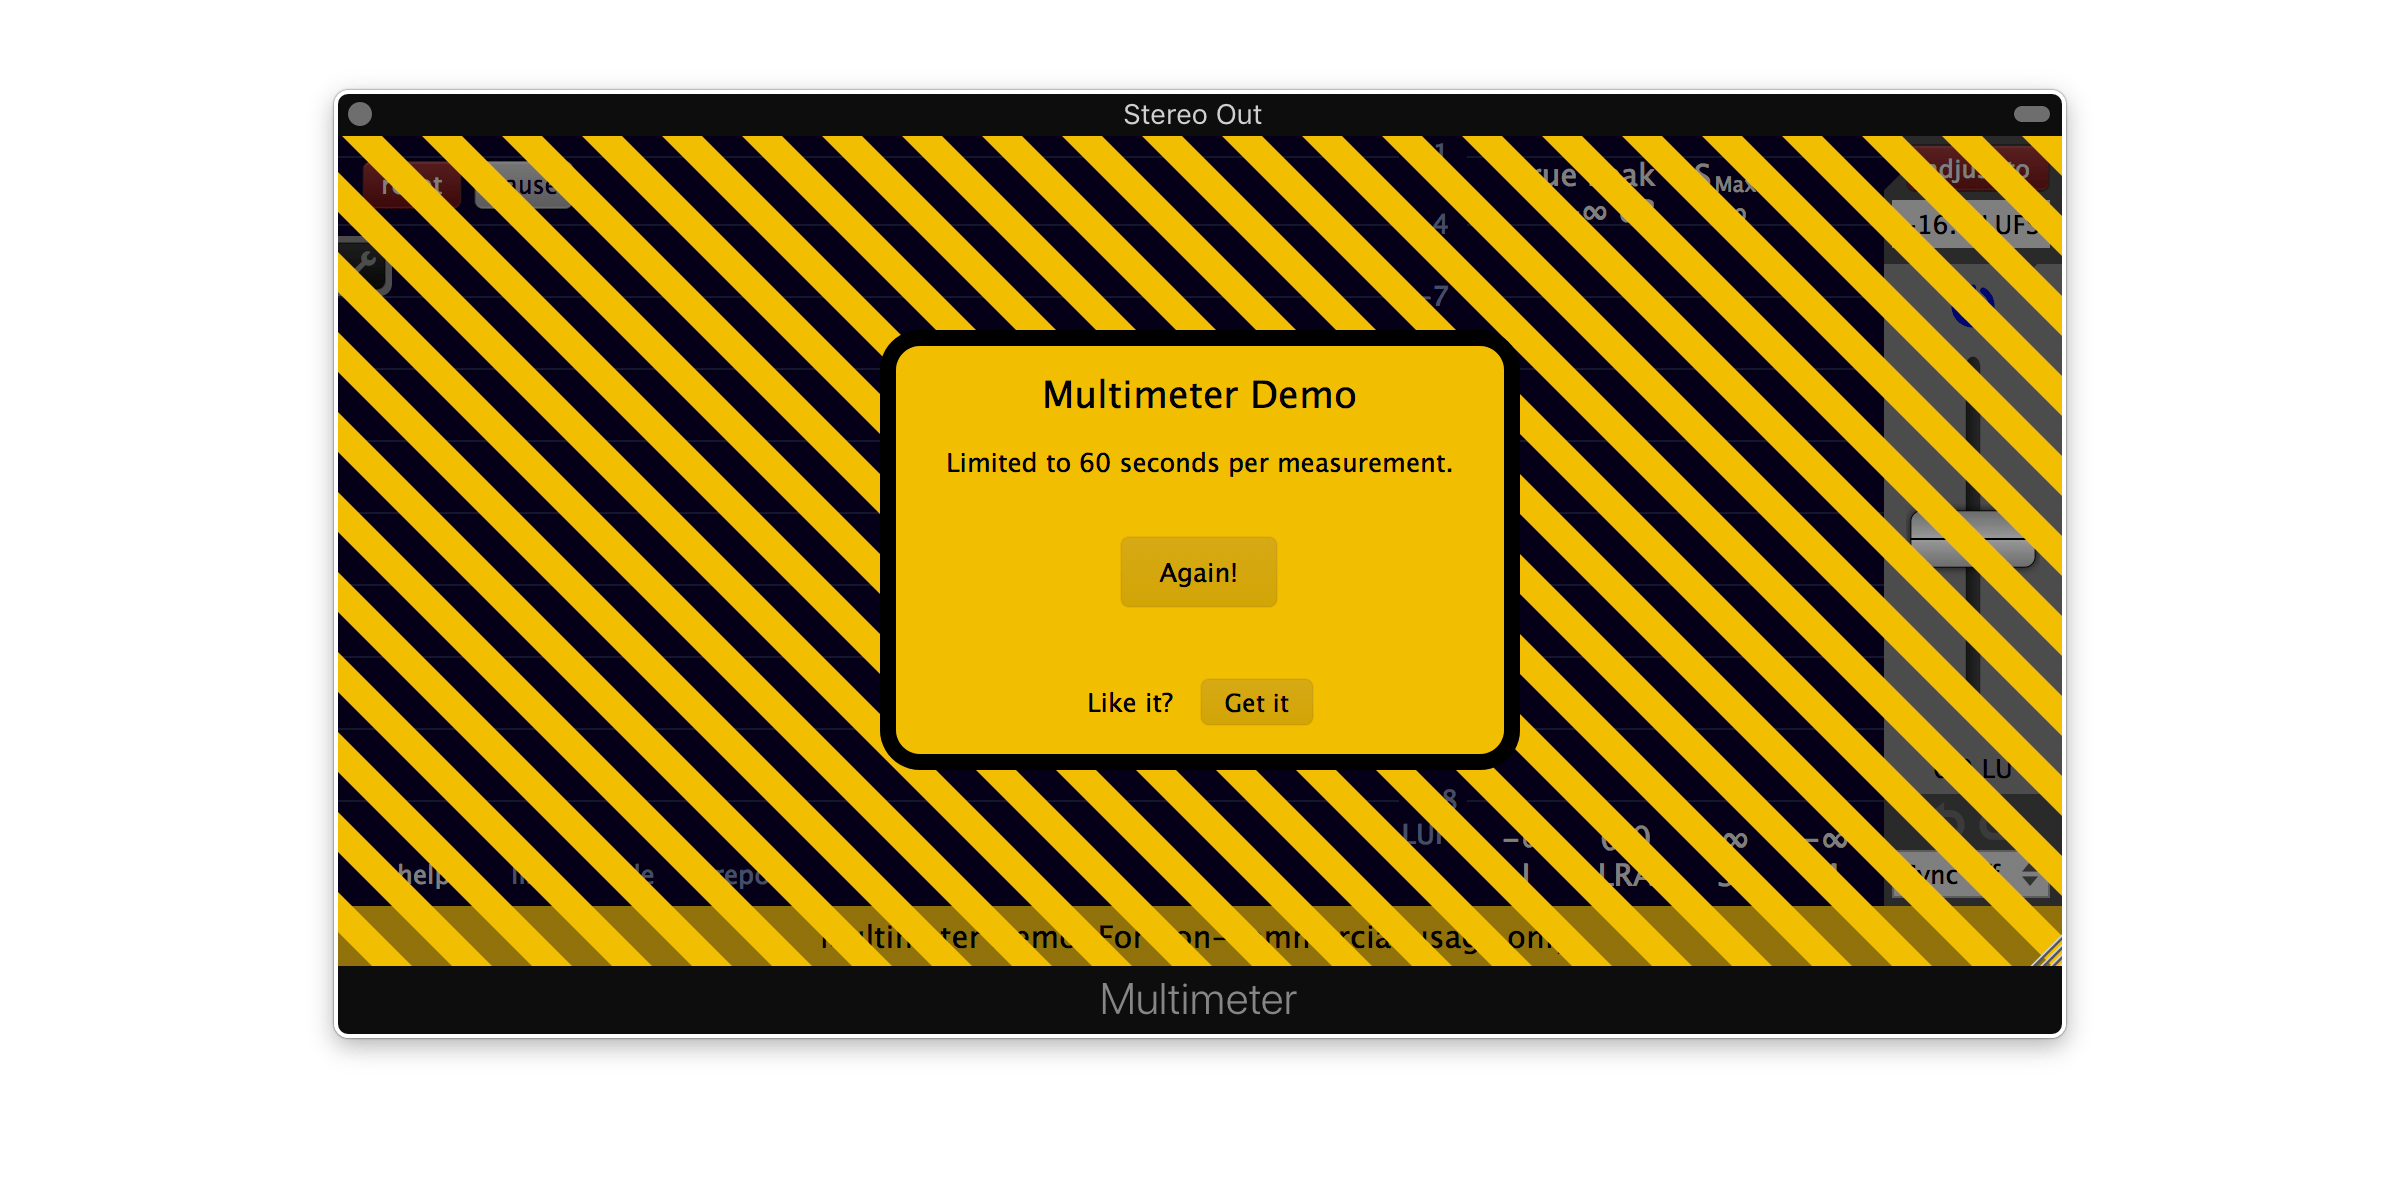
Multimeter demo
A demo version of the Multimeter is available for free at klangfreund.com. No personal data needs to be provided to get it. The demo has two limitations: The measurement time is limited to one minute and it is not allowed to use it for any commercial purpose. Otherwise it comes with all the features available in the full version.
Purchasing the Multimeter
The Multimeter can be purchased at klangfreund.com.
The Klangfreund store uses a secure connection and encryption to protect your personal information. Sensitive credit card data is furthermore directly handled by the payment processors Stripe and Braintree (by PayPal), fullfilling the highest possible PCI DSS level 1 compliance.
Right after the purchase you are automatically logged in to your newly created account, where you can set a password for your account and download the Multimeter installer. If you have previously installed the Multimeter demo, replace it with this version of the Multimeter by simply download and run the installer. Once installed and launched, use your email address and the account password to unlock the Multimeter.
Upgrade to the Multimeter and LUFS Meter bundle
- If you own a LUFS Meter 1.x license (USD 49 + EU VAT) you are entitled to upgrade to a Multimeter and LUFS Meter bundle license for USD 19 + EU VAT.
- If you own a LUFS Meter 2.x license (USD 39 + EU VAT) you are entitled to upgrade to a Multimeter and LUFS Meter bundle license for USD 29 + EU VAT.
- If you own a Discounted LUFS Meter 1.x license (USD 24 + EU VAT) you are entitled to upgrade to a Multimeter and LUFS Meter bundle license for USD 44 + EU VAT.
- If you own a Discounted LUFS Meter 2.x license (USD 19 + EU VAT) you are entitled to upgrade to a Multimeter and LUFS Meter bundle license for USD 49 + EU VAT.
- If you own a Multimeter license (USD 59 + EU VAT) you are entitled to upgrade to a Multimeter and LUFS Meter bundle license for USD 9 + EU VAT.
The upgrade price is equal to the price difference between the bundle and the previously owned license. Your upgrade options are available from your account page.
Upgrade to a single Multimeter license
If you own a license for the Discounted LUFS Meter or for the full LUFS Meter you can upgrade it to a Multimeter license by only paying the price difference of the two licenses.
You will loose your LUFS Meter license when you upgrade it to a Multimeter license. You wont be able to use the LUFS Meter in old projects of yours anymore. Therefore it is recommended to upgrade to the Multimeter and LUFS Meter bundle instead.
- If you own a LUFS Meter 1.x license (USD 49 + EU VAT) you are entitled to upgrade to a Multimeter license for USD 10 + EU VAT.
- If you own a LUFS Meter 2.x license (USD 39 + EU VAT) you are entitled to upgrade to a Multimeter license for USD 20 + EU VAT.
- If you own a Discounted LUFS Meter 1.x license (USD 24 + EU VAT) you are entitled to upgrade to a Multimeter license for USD 35 + EU VAT.
- If you own a Discounted LUFS Meter 2.x license (USD 19 + EU VAT) you are entitled to upgrade to a Multimeter license for USD 40 + EU VAT.
Your upgrade options are available from your account page.
Installation
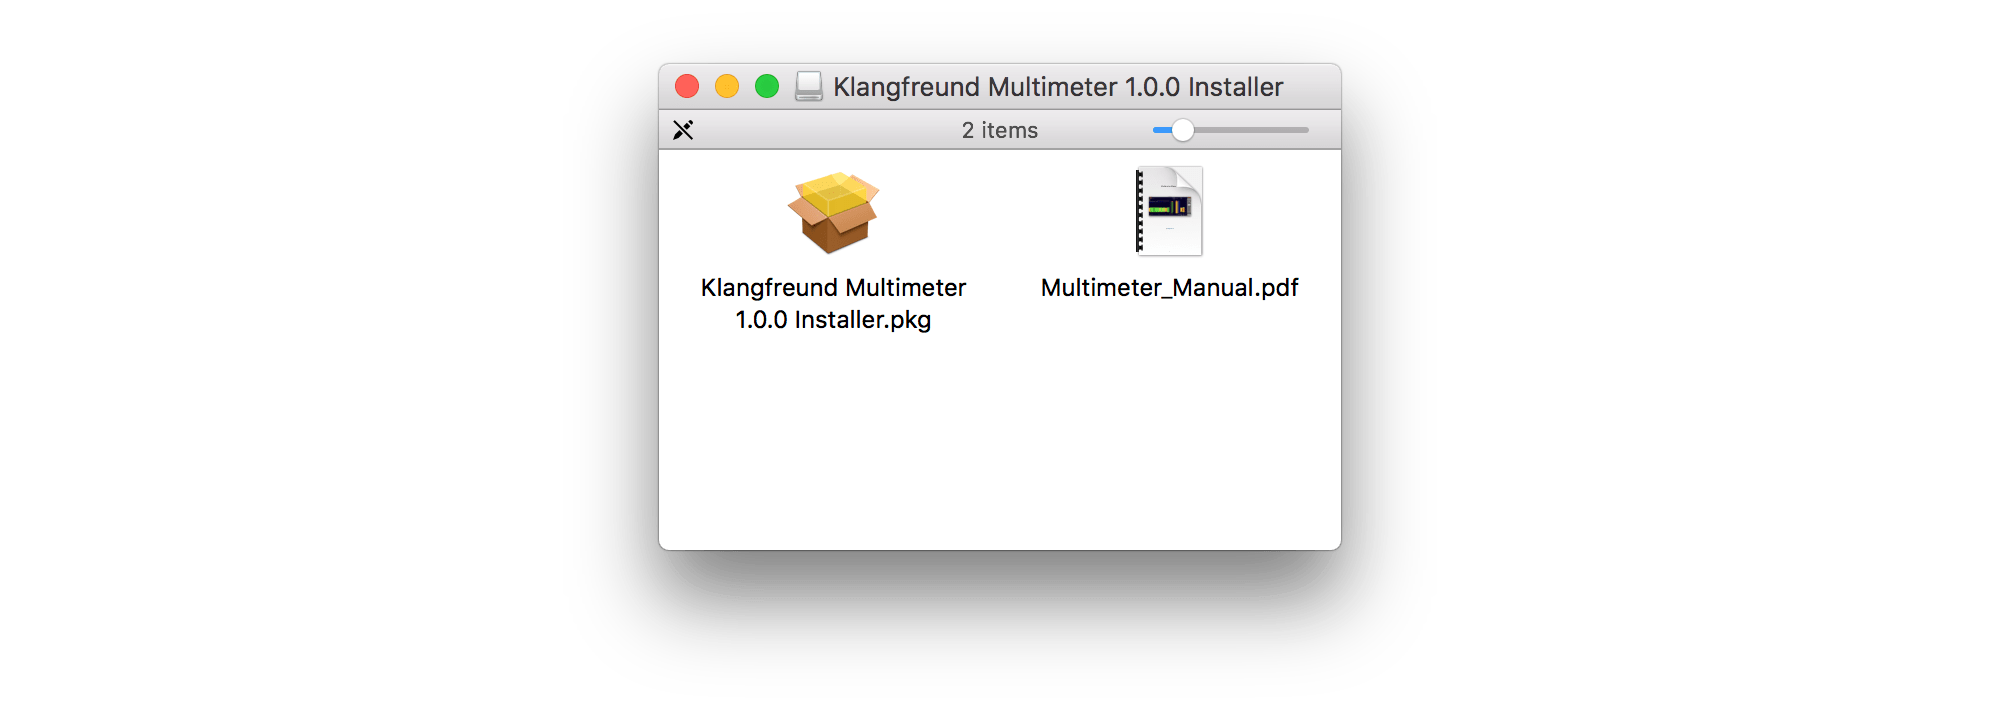
1. Right after purchasing the Multimeter you are redirected to a webpage where you can download the Multimeter installer for macOS, Windows and Linux. The installers are also available from your account page as well as from the main Multimeter page - if you are logged in. Be aware that the Multimeter demo installer is not the same as the Multimeter installer.
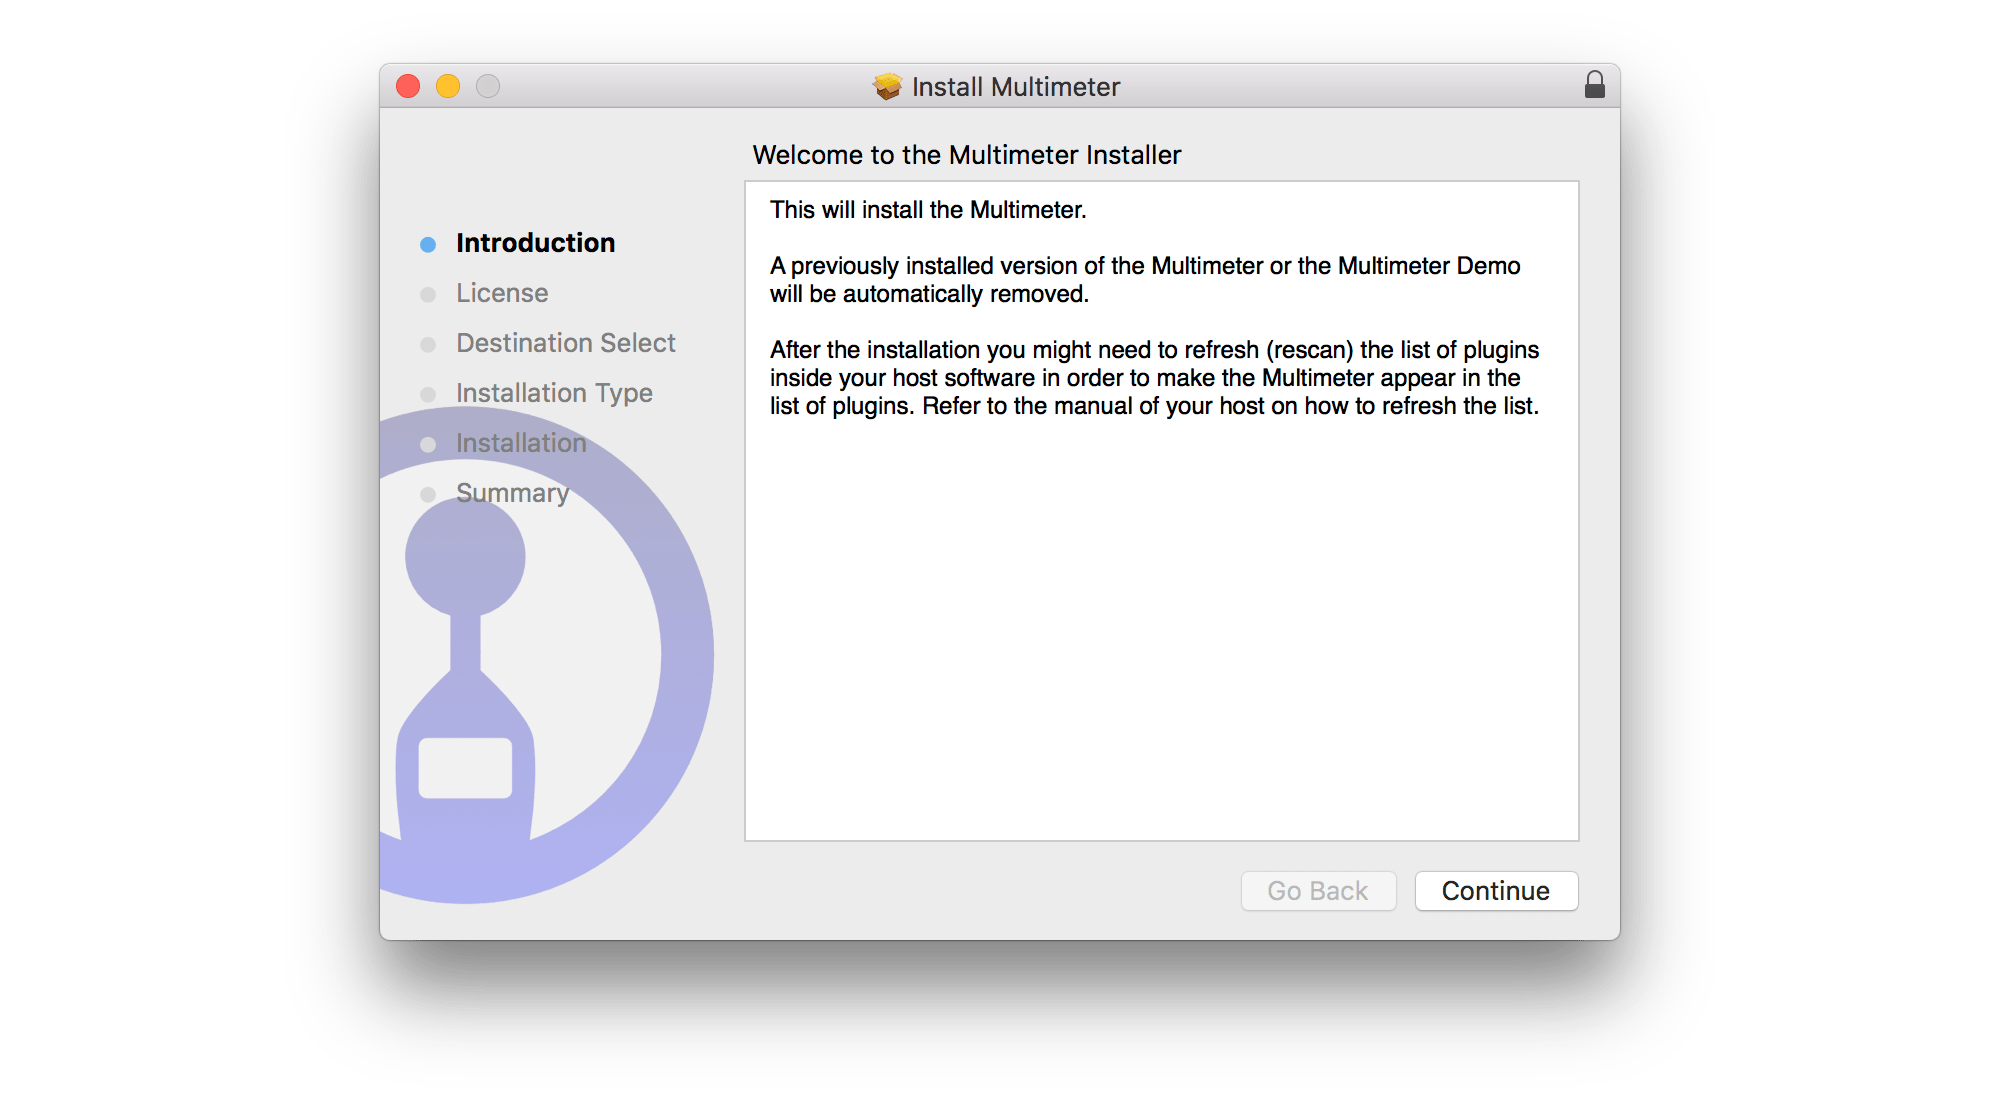
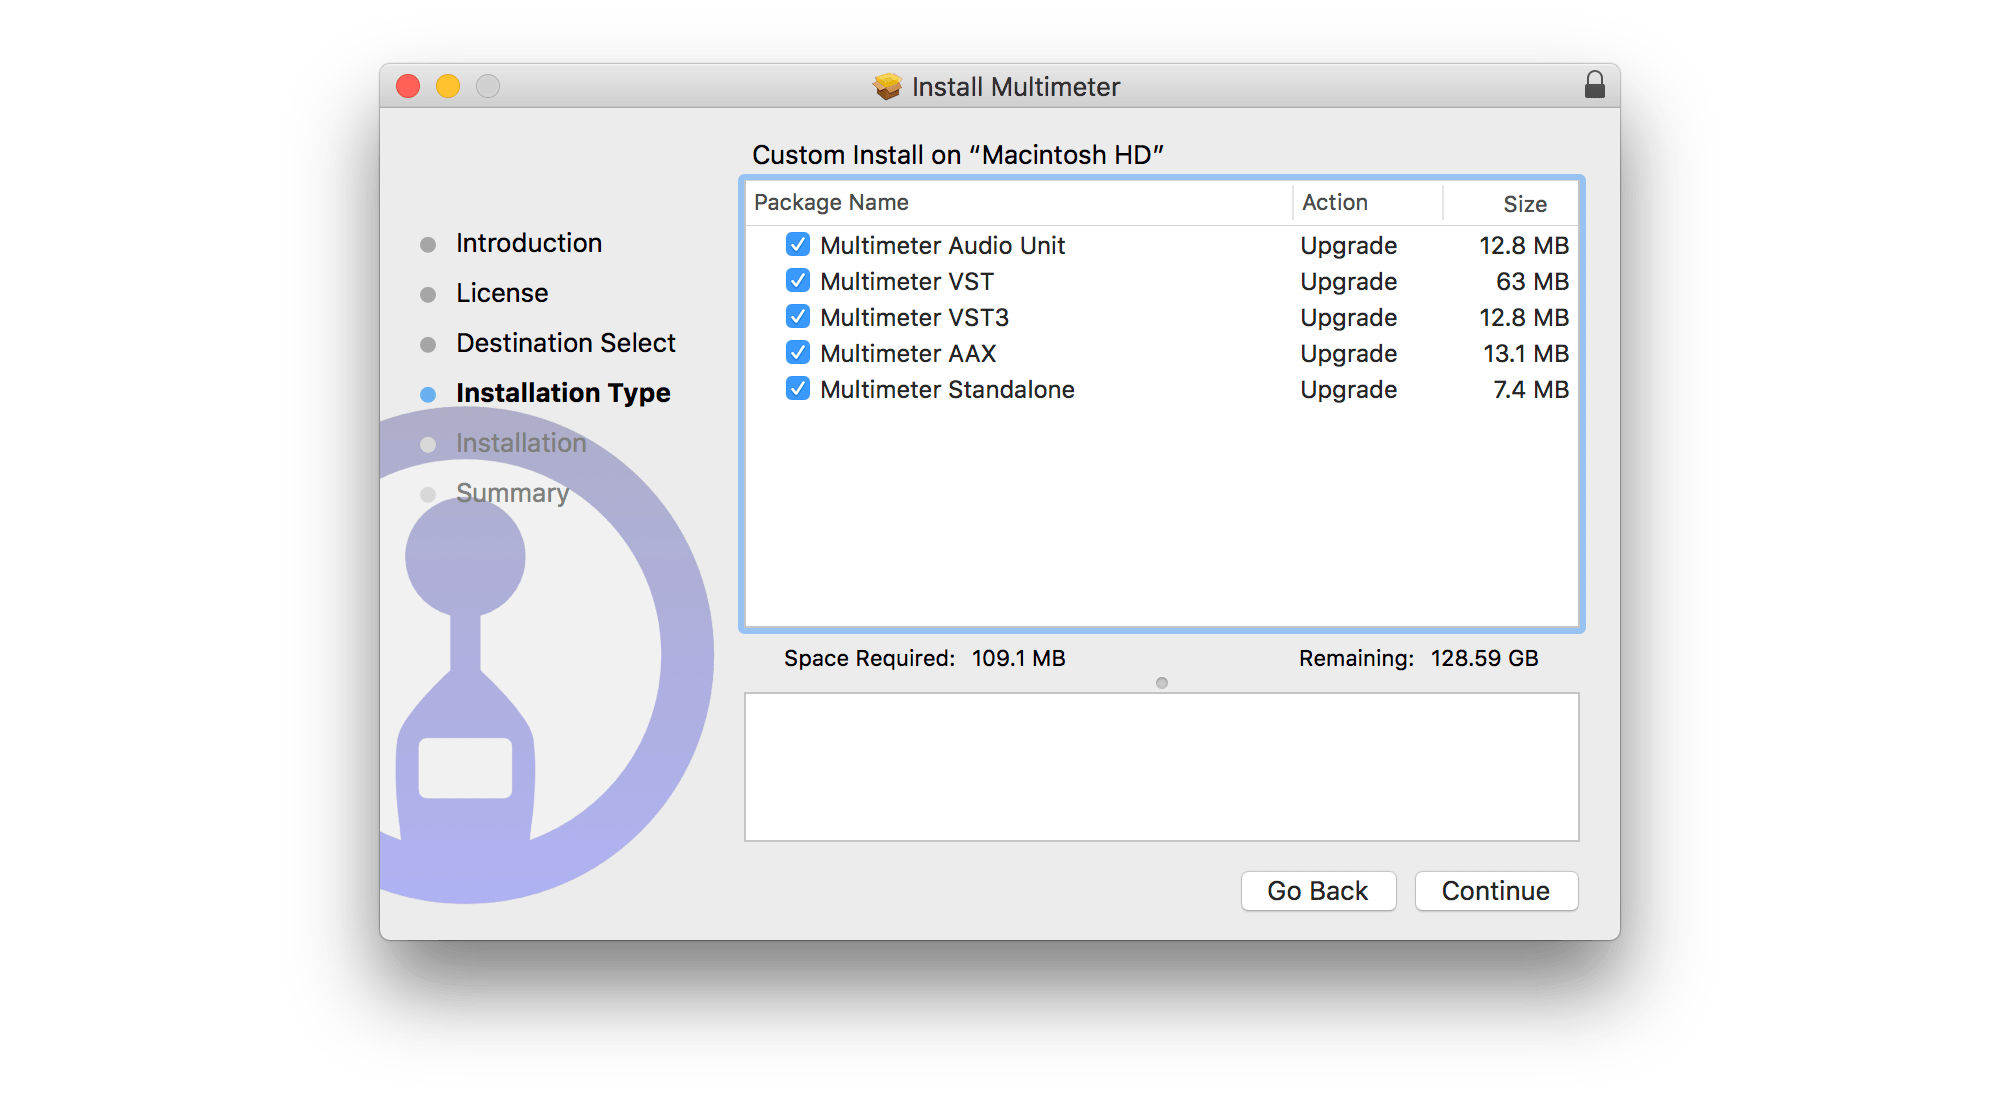
2a. On macOS, open the downloaded dmg file. It contains the installer (a pkg file) and the pdf manual. Run the installer and follow the instructions.
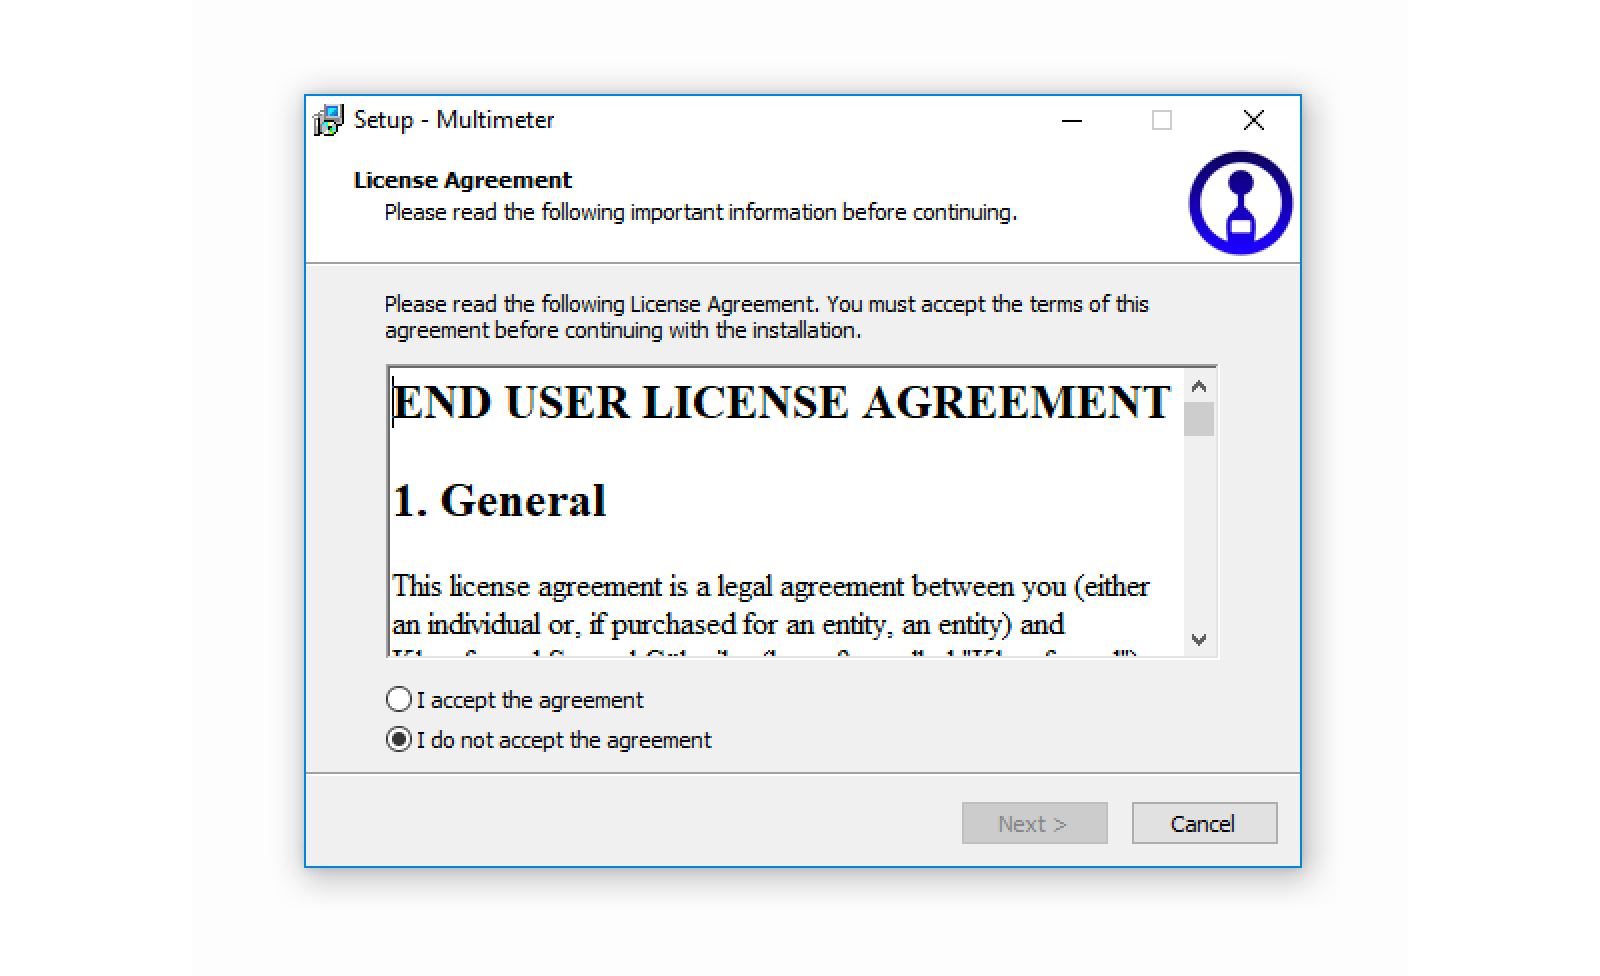
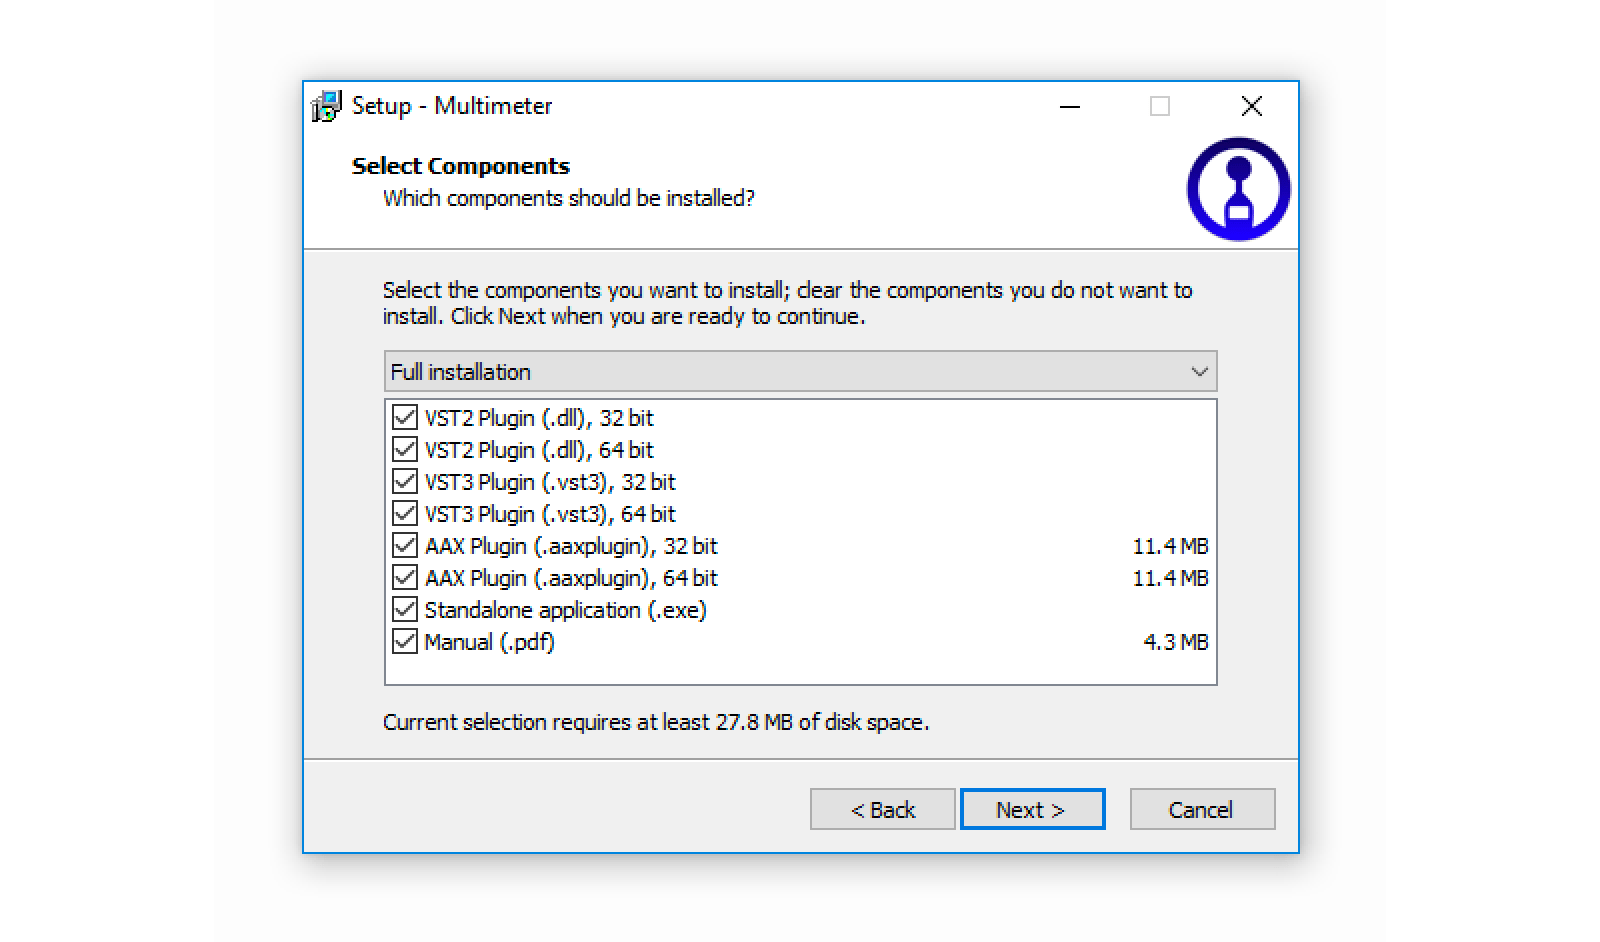
2b. On Windows, run the downloaded installer and follow the instructions.
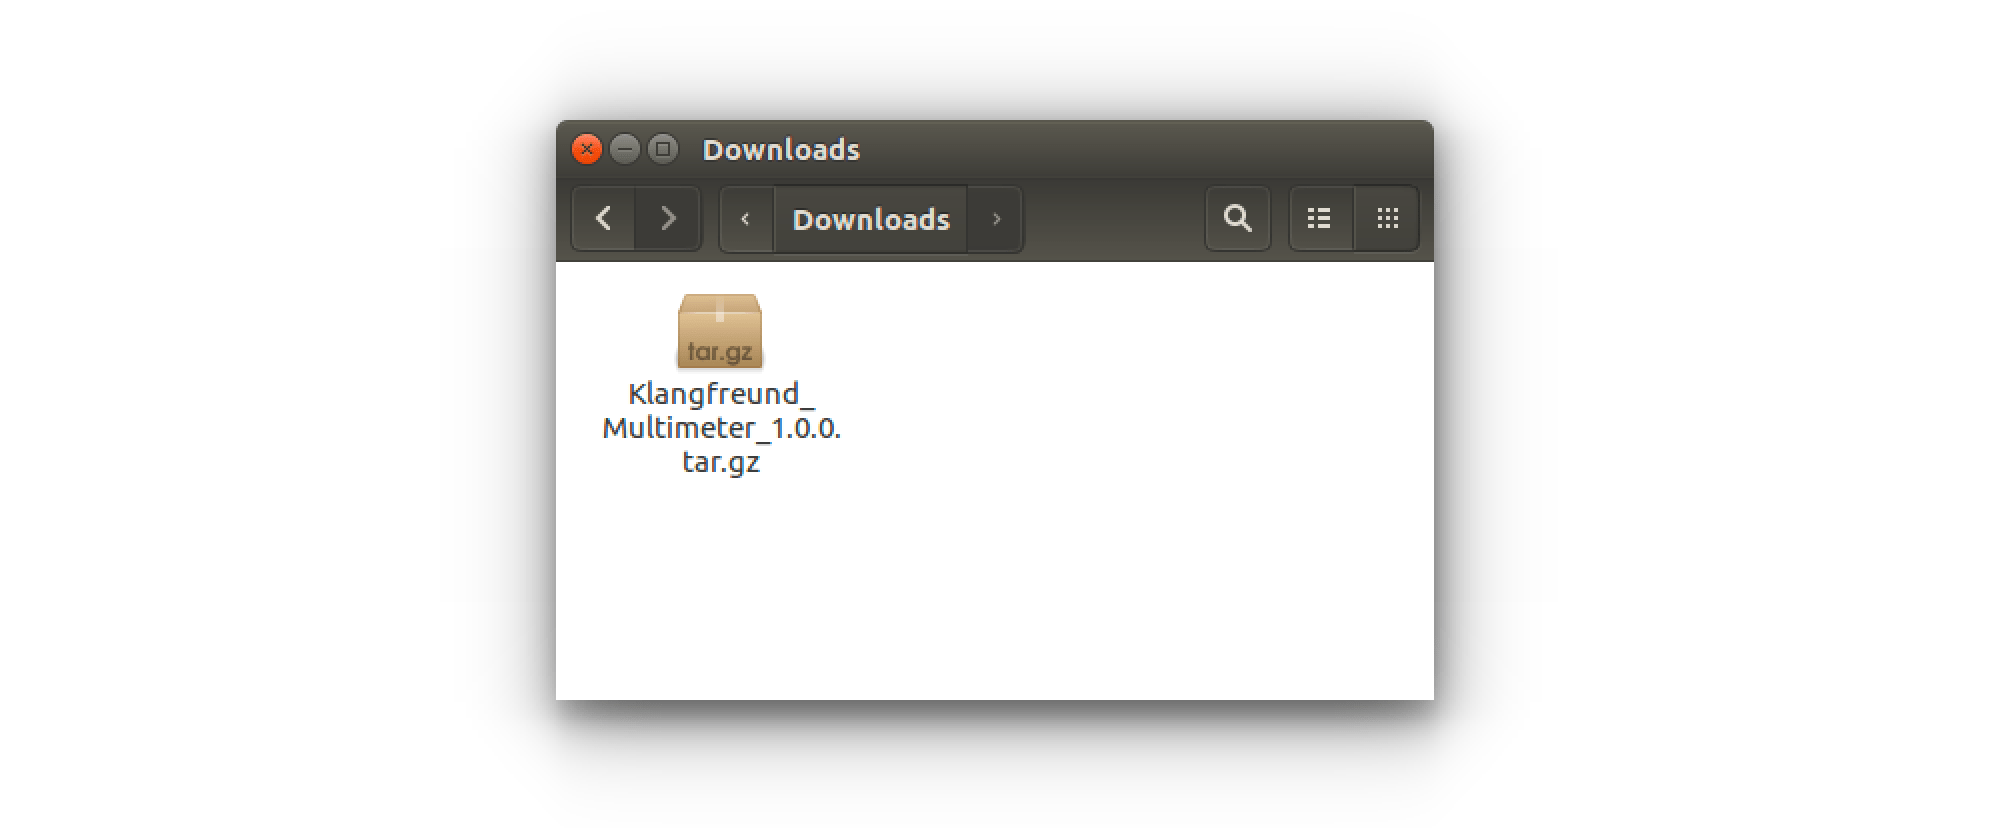
2c. On Linux, extract the downloaded tar.gz archive and move the plug-in files and the standalone binary it contains to the appropriate locations - as described in the included README text file.
3. Depending on your host (e.g. a digital audio workstation (DAW) or a video editing software supporting audio plug-ins) you might need to scan for new plug-ins before the Multimeter appears in its list of plug-ins. Refer to the manual of your host on how to do that.
Upgrade
To upgrade (or to go back to a previous version), run the installer of the Multimeter you want to upgrade to (or to go back to). Personal settings and presets won't be altered.
Previous versions of the Multimeter can be downloaded from the Multimeter all releases page .
Unlock
Unlock via the Internet
If your audio computer is running macOS or Windows and if it is connected to the Internet, the unlocking can be done from within the Multimeter. Under Linux, use the offline unlock method instead.
Start the Multimeter application or open your host application and add the Multimeter plug-in to a track.
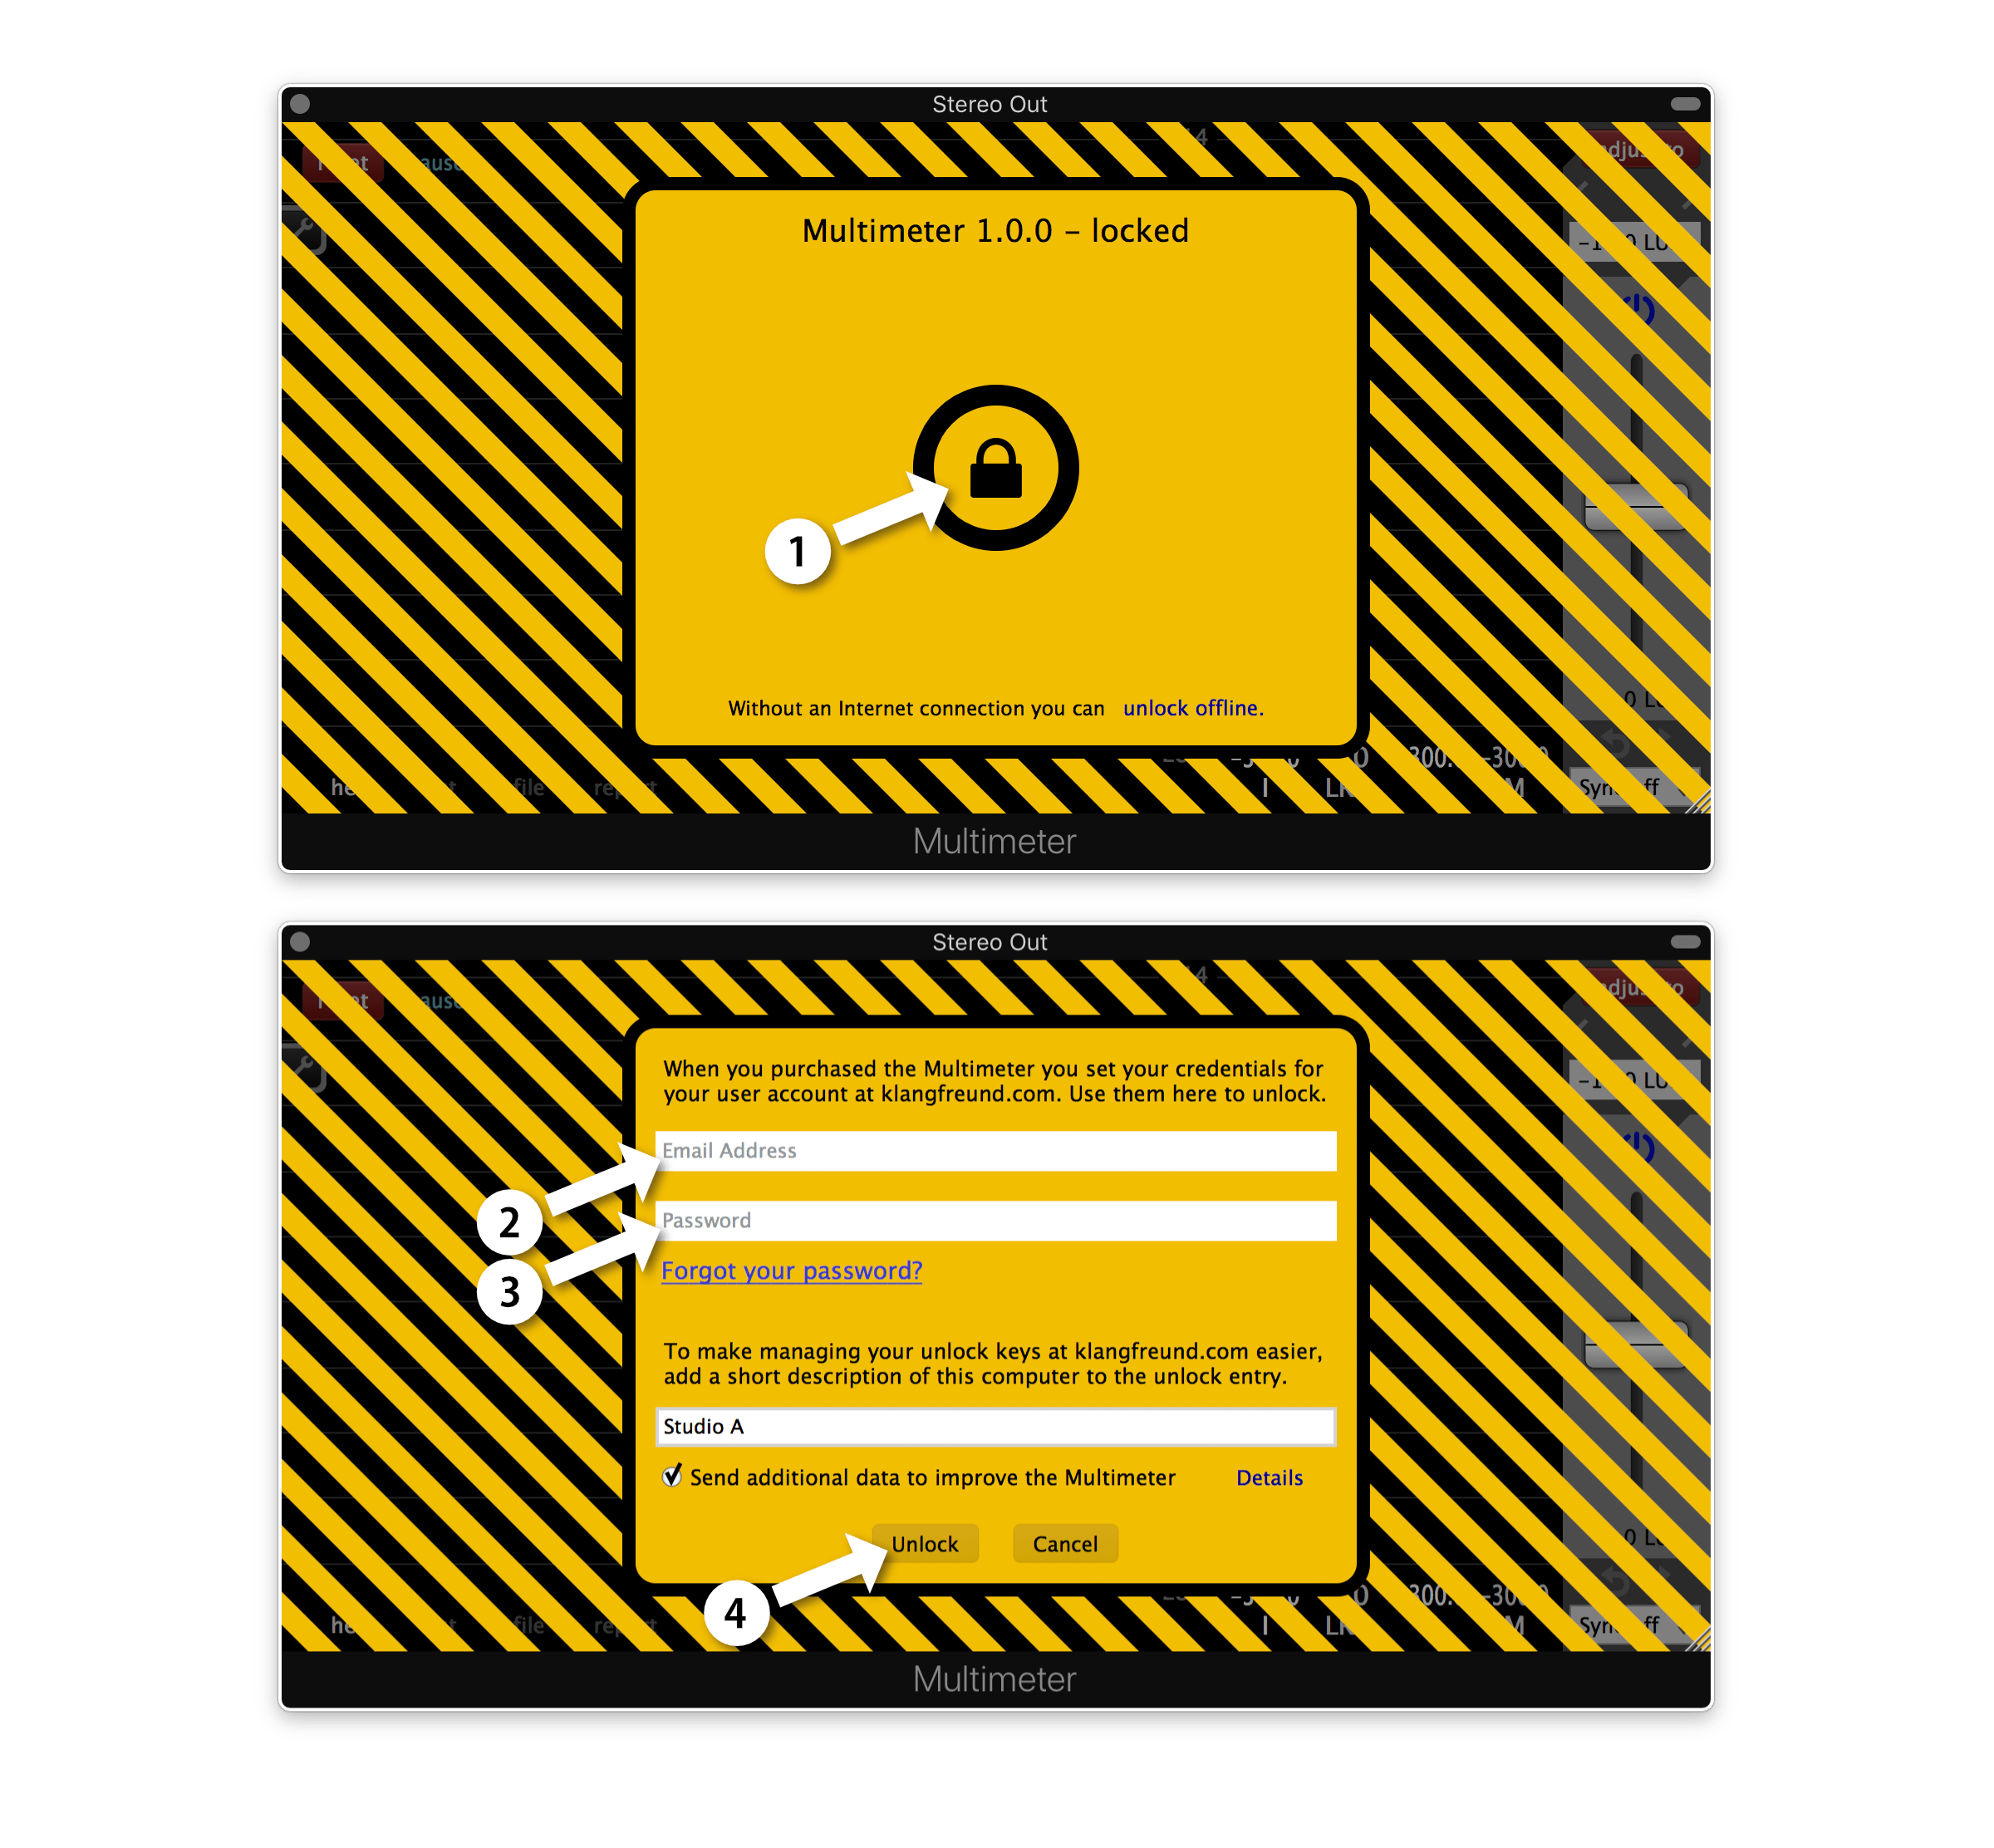
1. Click the lock icon.
2. - 3. Enter your email address and the password you set when you've created your user account at klangfreund.com. To make managing your unlock keys at klangfreund.com easier, it is recommended to provide a short description for this computer as well.
4. Click the 'Unlock' button. After a few seconds your Multimeter is unlocked.
Unlock on an offline computer
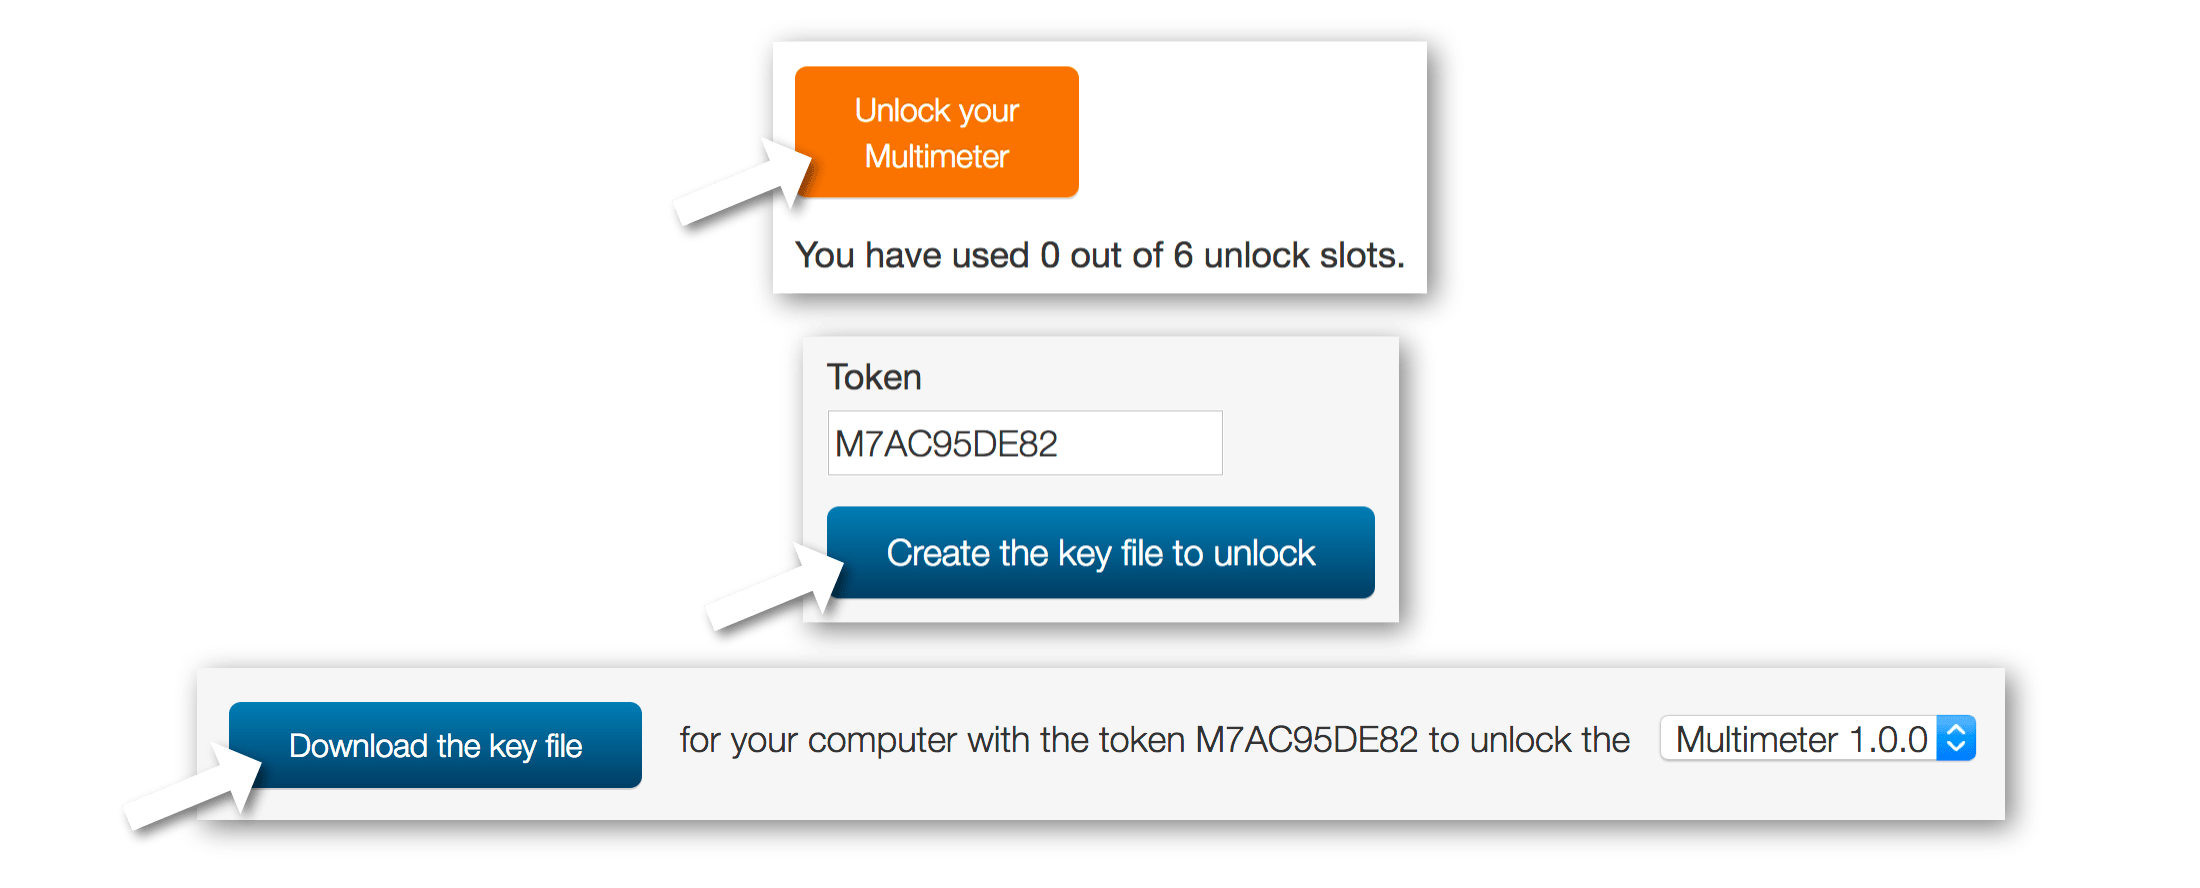
Step 1: On your audio computer, start the Multimeter application or open your host application and add the Multimeter plug-in to a track. Click on the 'unlock offline' text in order to see the token for your audio computer. This token is unique for each computer.
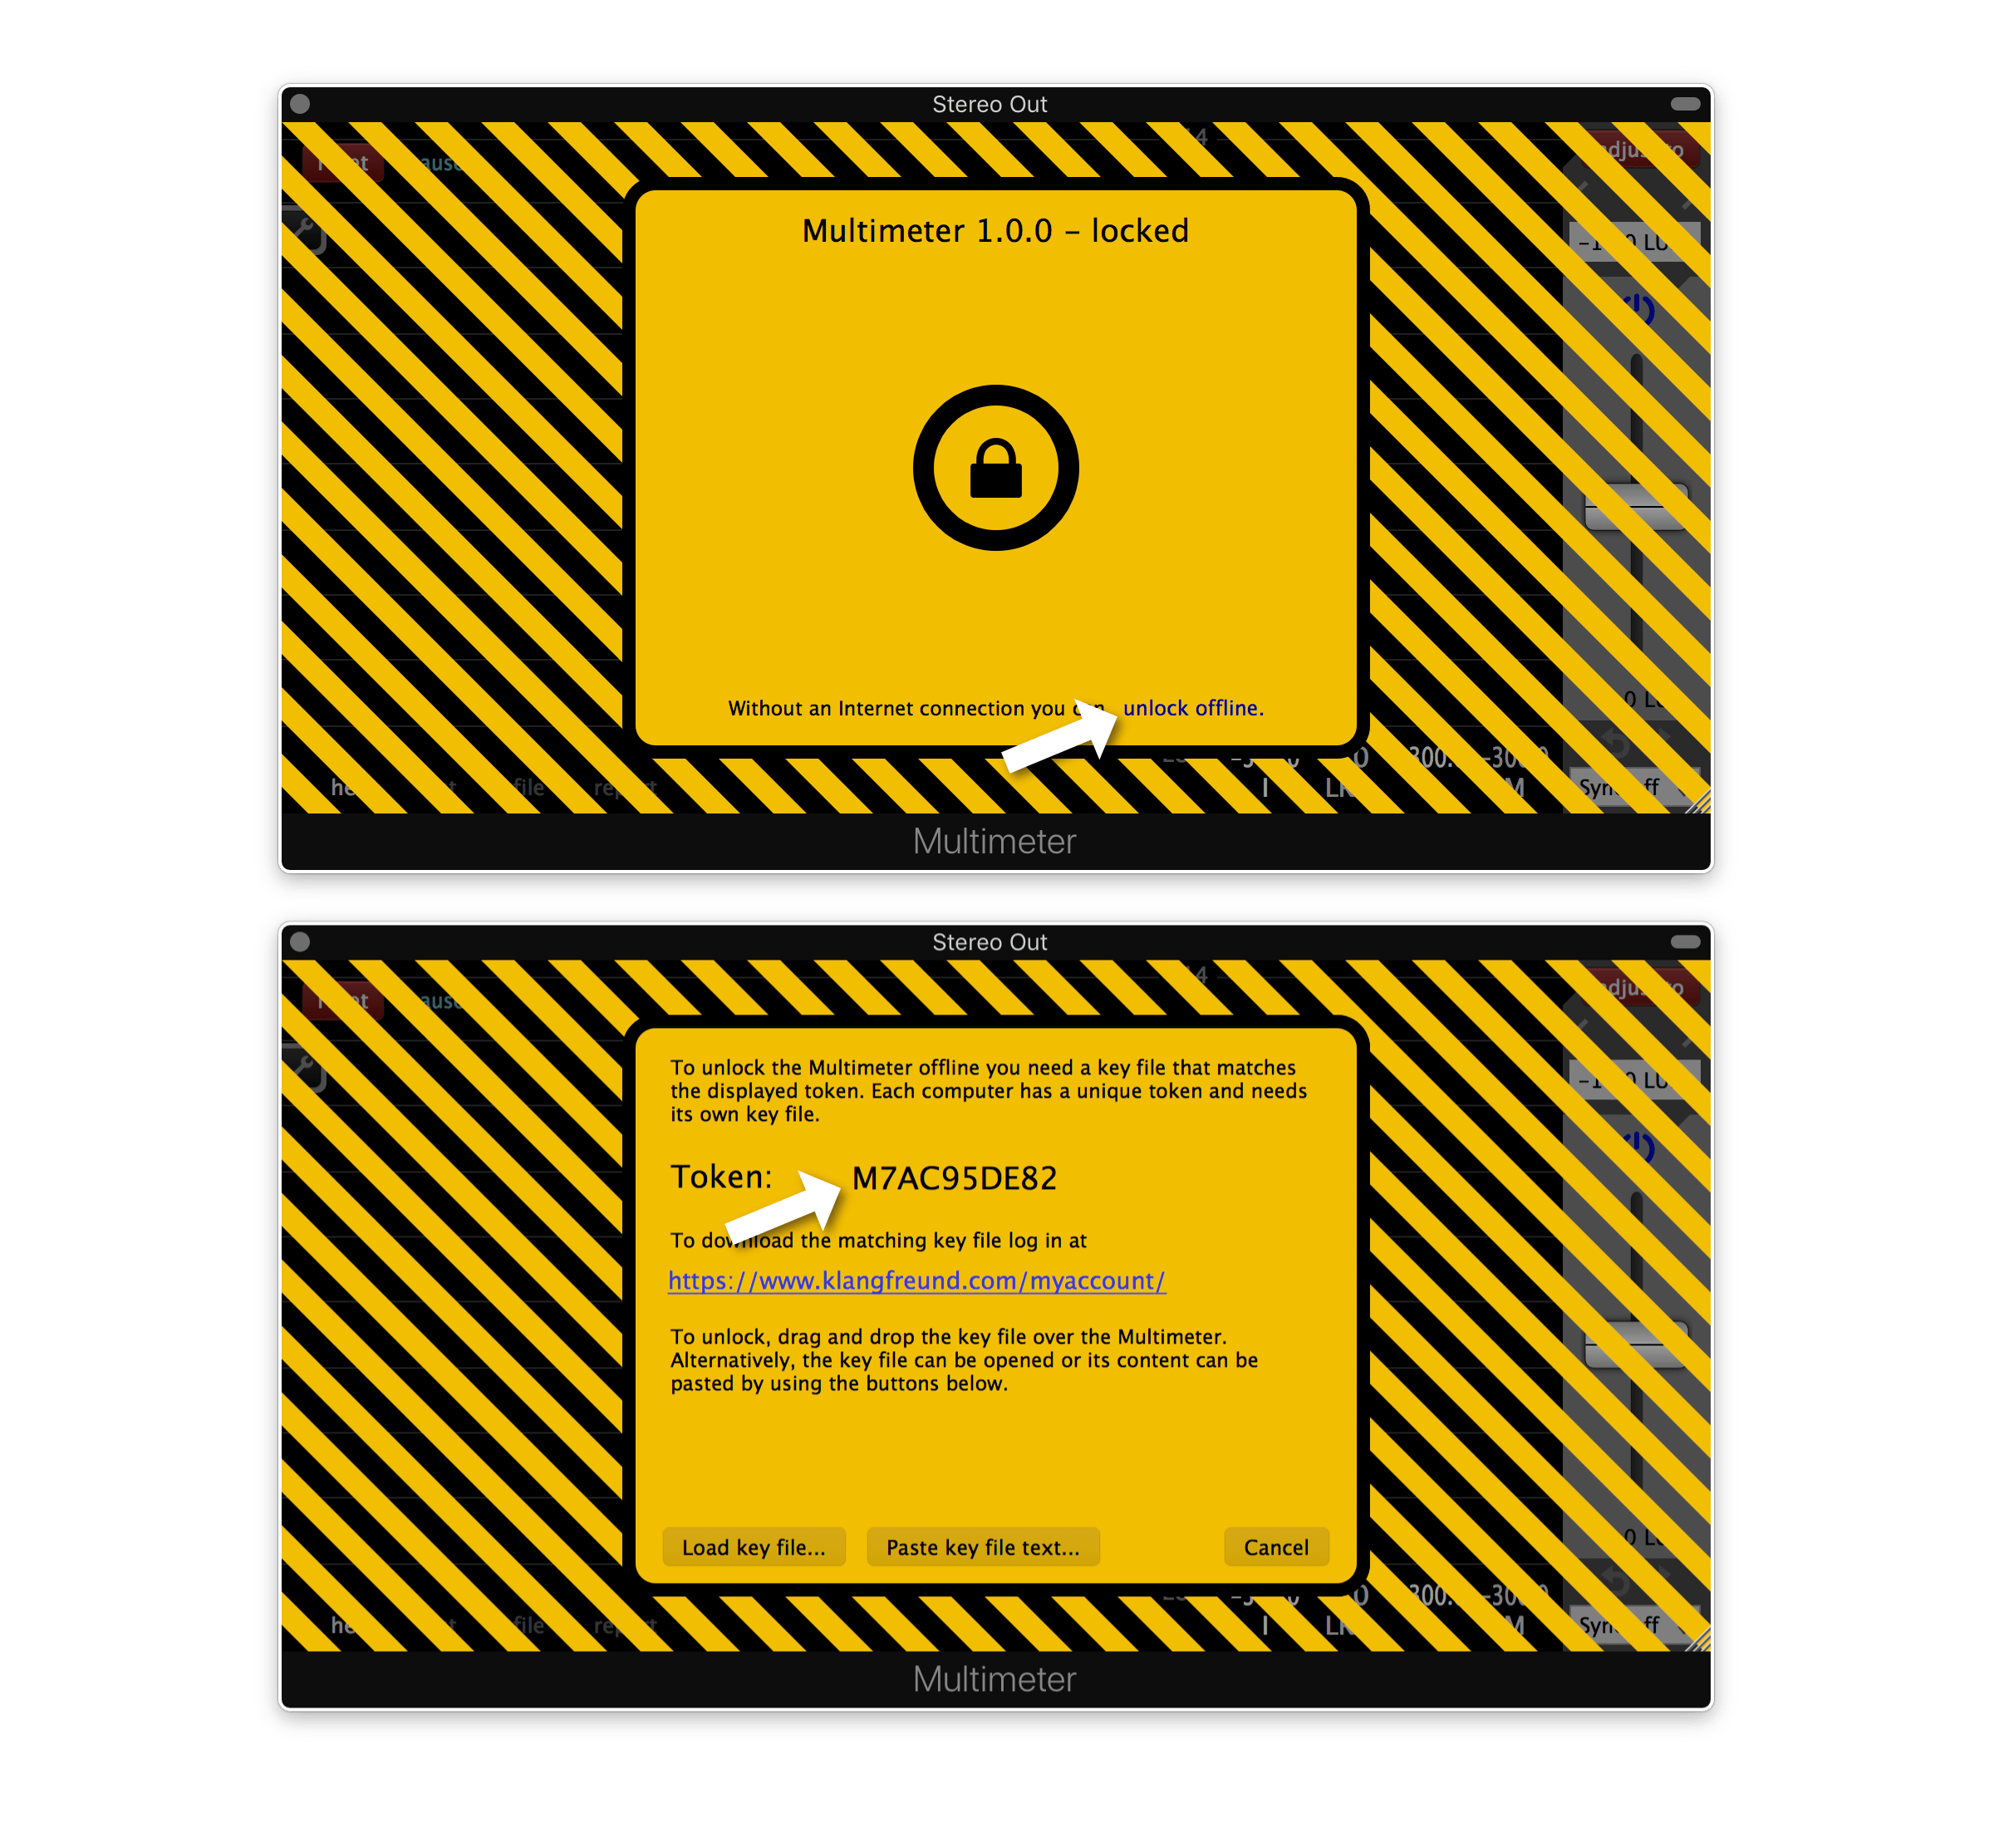
Step 2: To unlock the Multimeter a key file is needed which matches this token. To get the key file, use a computer which has Internet access, go to your personal account and follow the illustrated steps.
Step 3: Move the key file to your audio computer and drag and drop it over the interface of the Multimeter to unlock it.
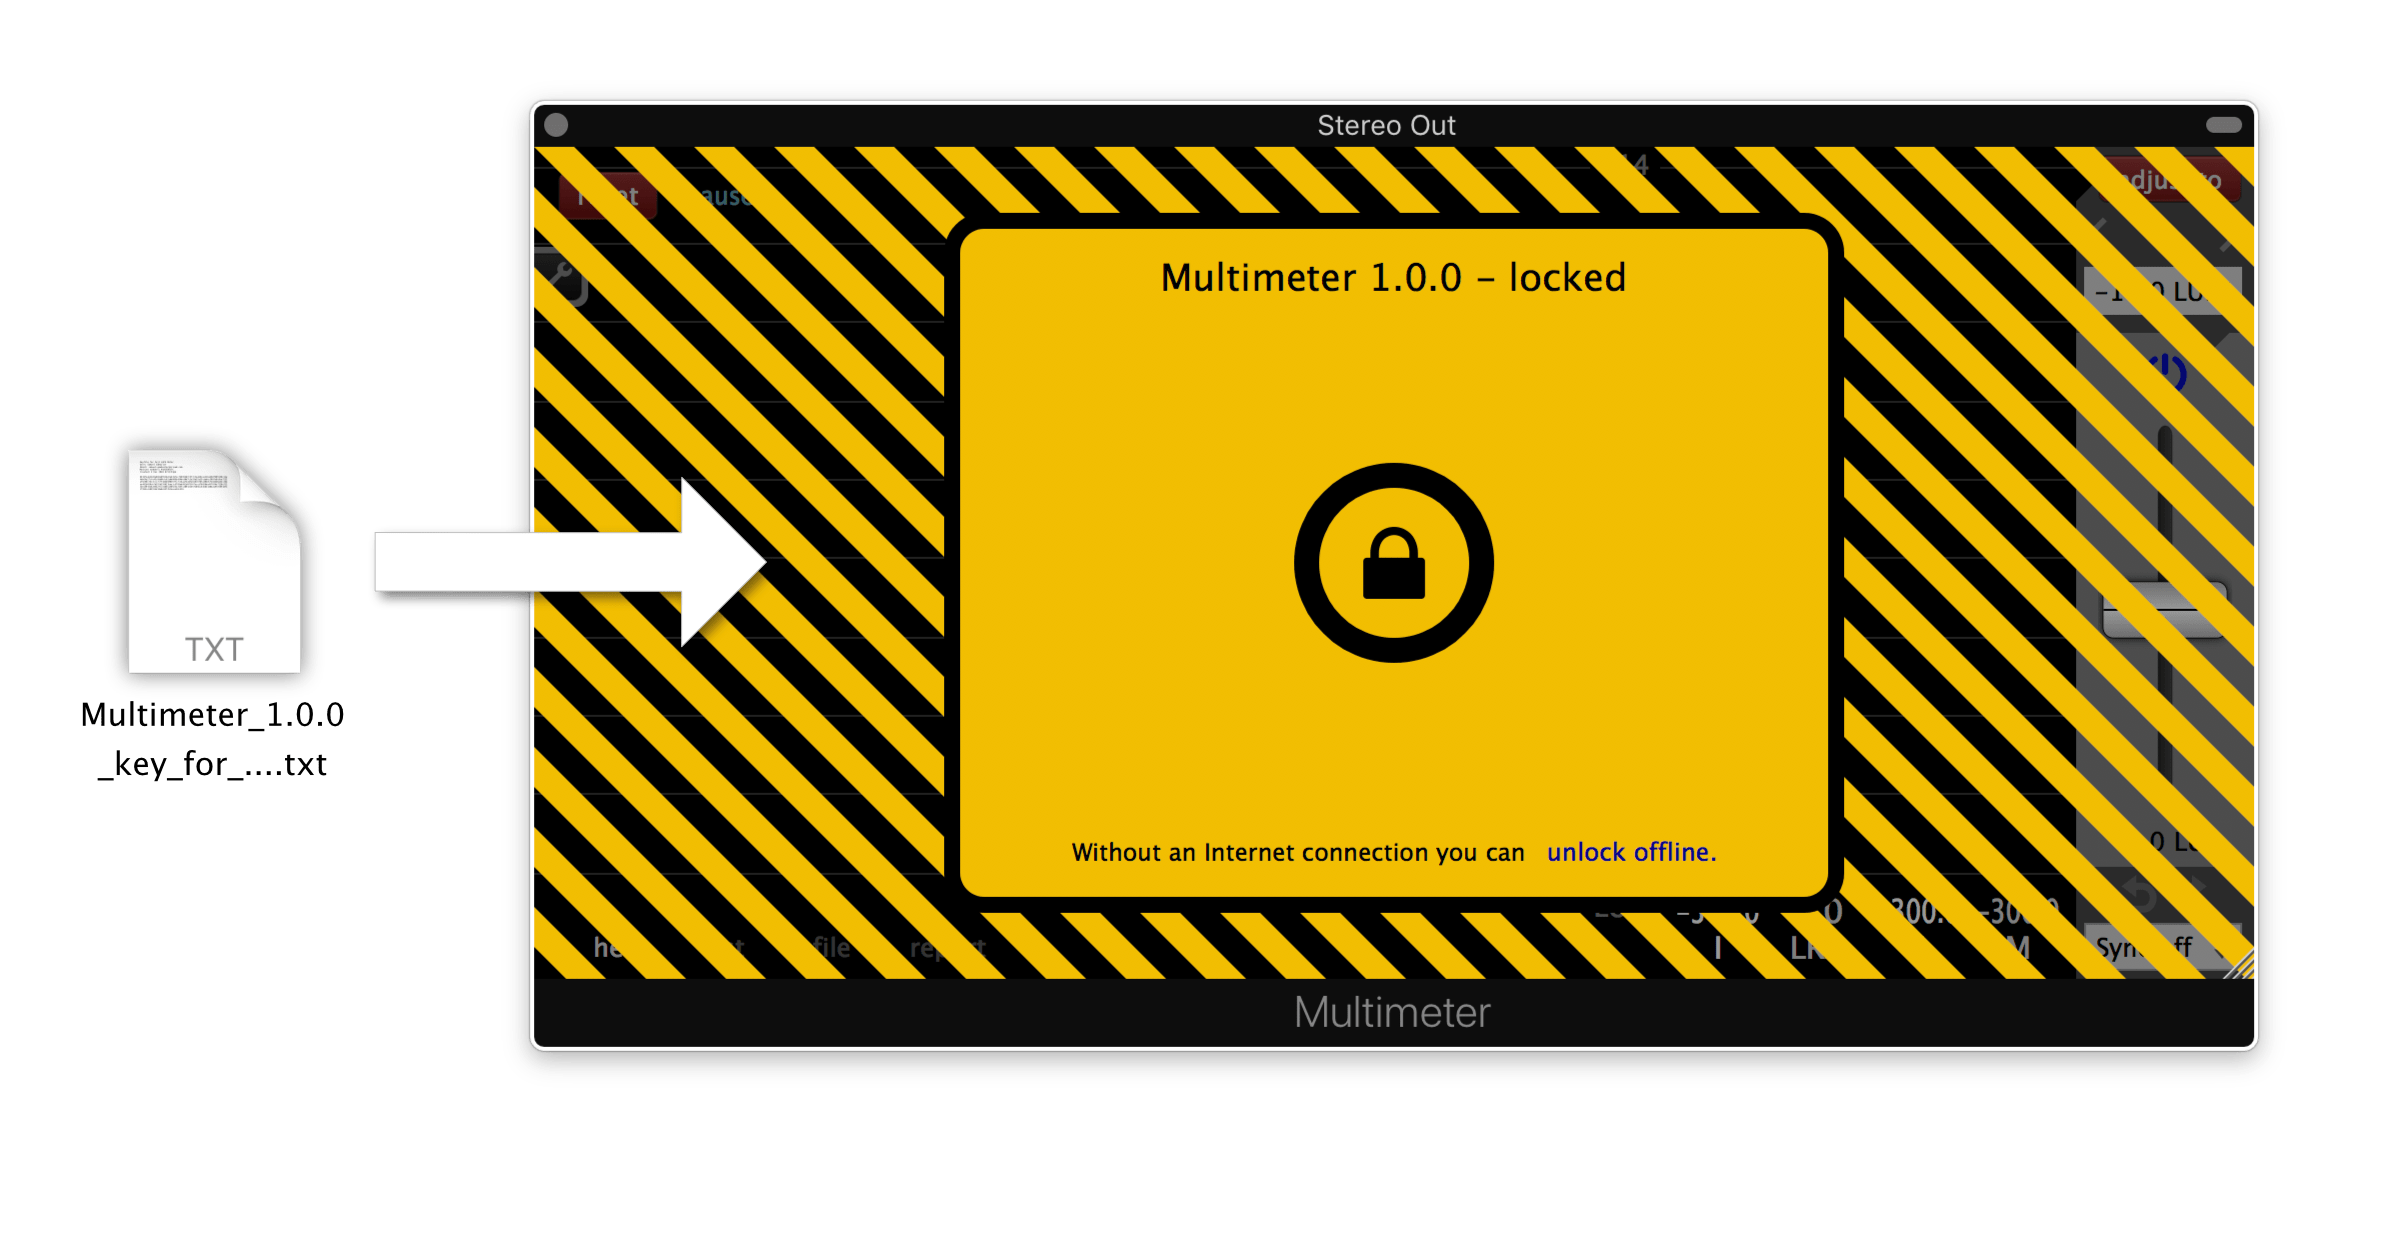
Alternatively you can load the key file via 'unlock offline' -> 'Load key file...' or paste the content of the key file via 'unlock offline' -> 'Paste key file text...'.
Usage
Interface - Overview
Detailed descriptions of the individual elements are provided by the built-in help.
Interface - Built-in help
The Multimeter is equipped with an interactive help system. To enable or disable it, click the help text at the bottom left. If enabled, moving the mouse over an area of the Multimeter will display the appropriate description.
Interface - Move and scale with the mouse
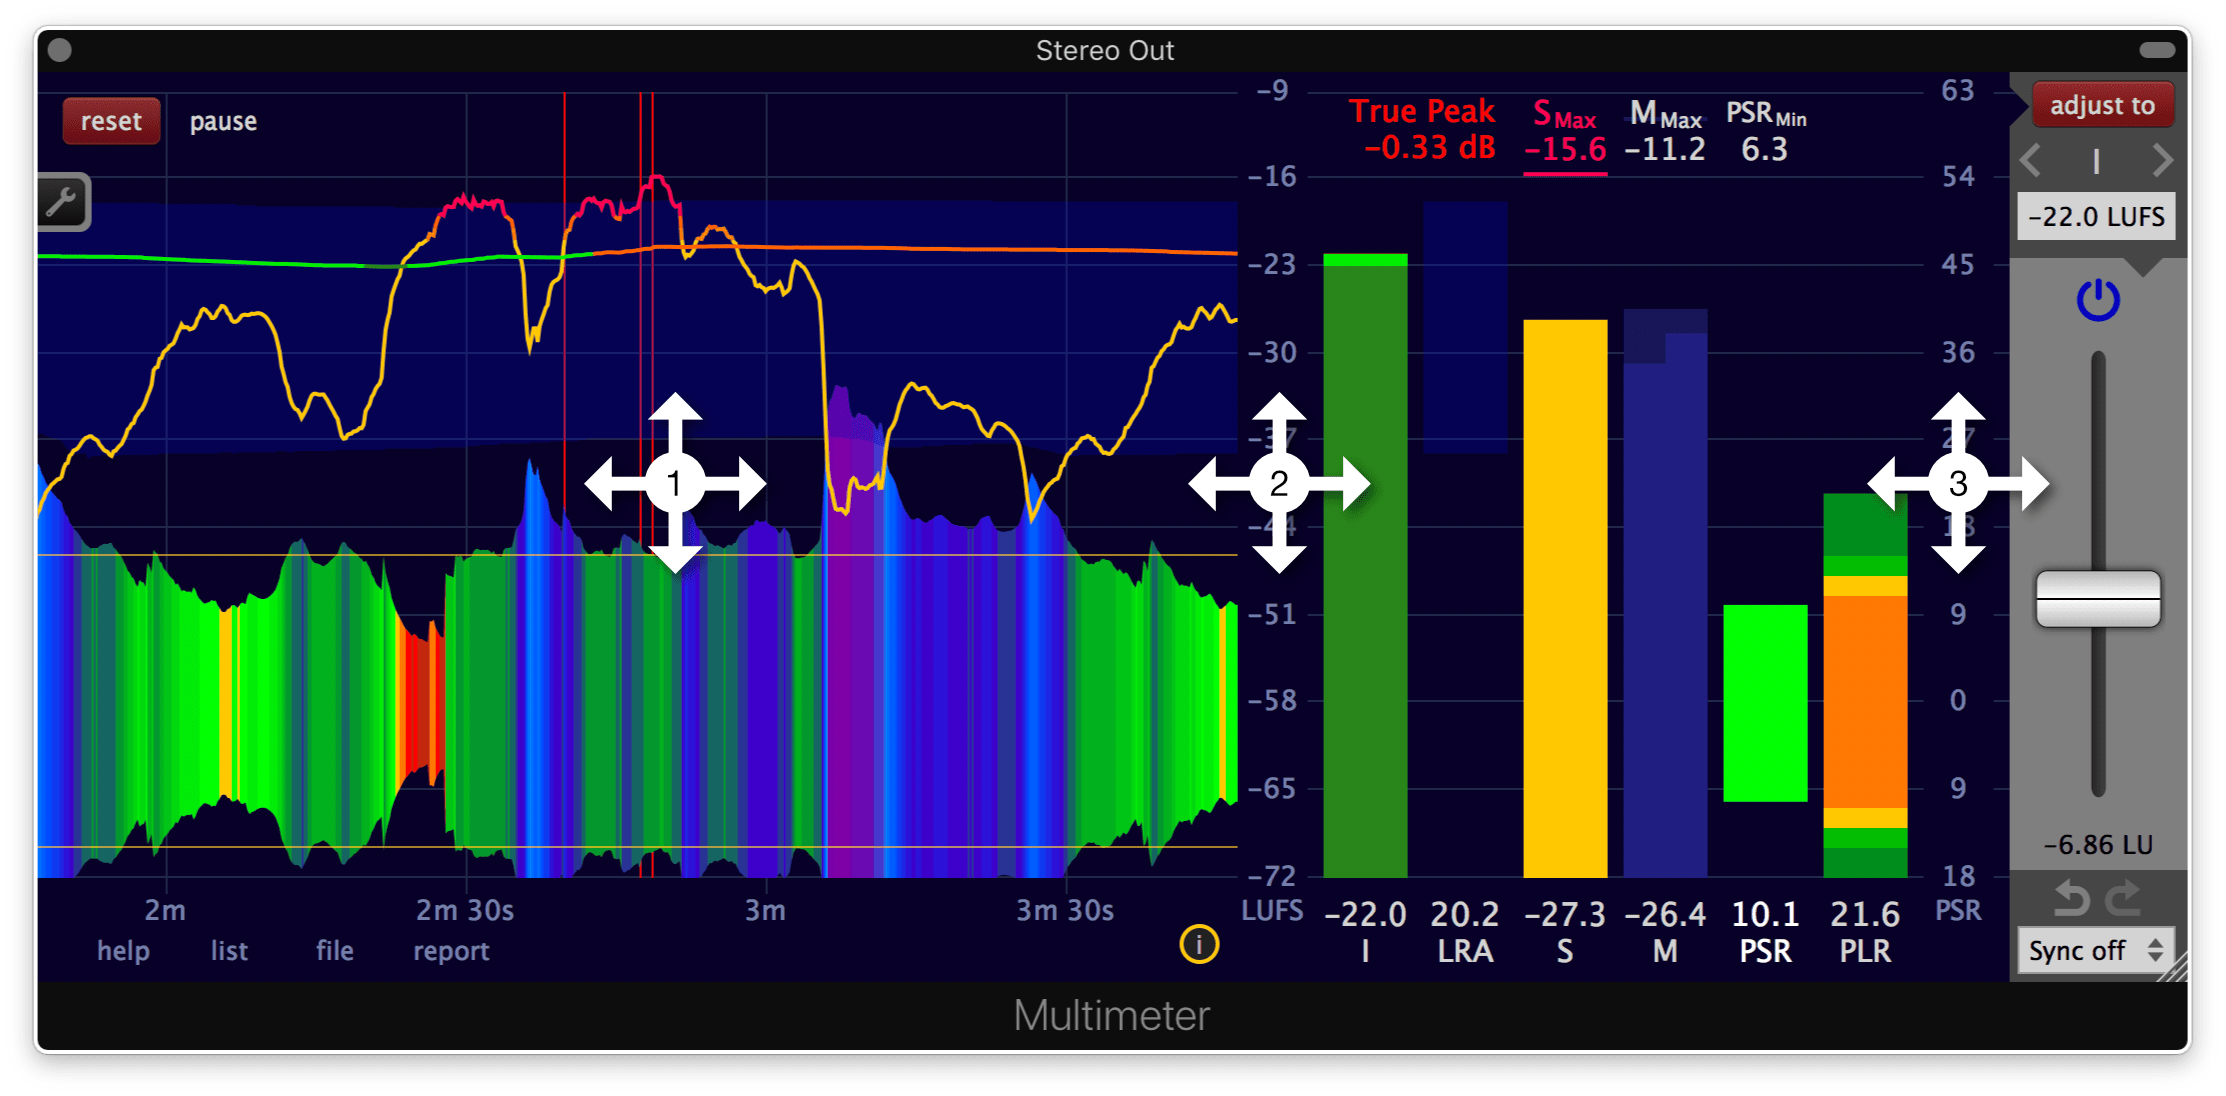
- To zoom in on the history graph, move the mouse cursor over
the area you want to inspect and click and drag the mouse
downwards. Or scroll down with the mouse wheel. To zoom
out, click and drag upwards with the mouse. Or scroll
upwards with the mouse wheel.
To change the visible time interval on the history graph, click and drag horizontally or move the mouse wheel horizontally. A measurement period of up to one week can be revisited on the history graph. One week is only the limit of the visible data in the history graph, a single measurement can be as long as 163 years. - Click and drag vertically on the loudness caption to move
the visible loudness range up and down. The graphs and
bars will move accordingly.
Click and drag horizontally to zoom in or out on the loudness scale. - Click and drag vertically on the PSR and PLR caption to
move the PSR and PLR zero position up and down.
Click and drag horizontally to zoom in or or out on the PSR and PLR scale.
Interface - List viewer
Click the list button at the bottom left to show or hide the list viewer. The top of the list viewer can be dragged with the mouse to resize it.
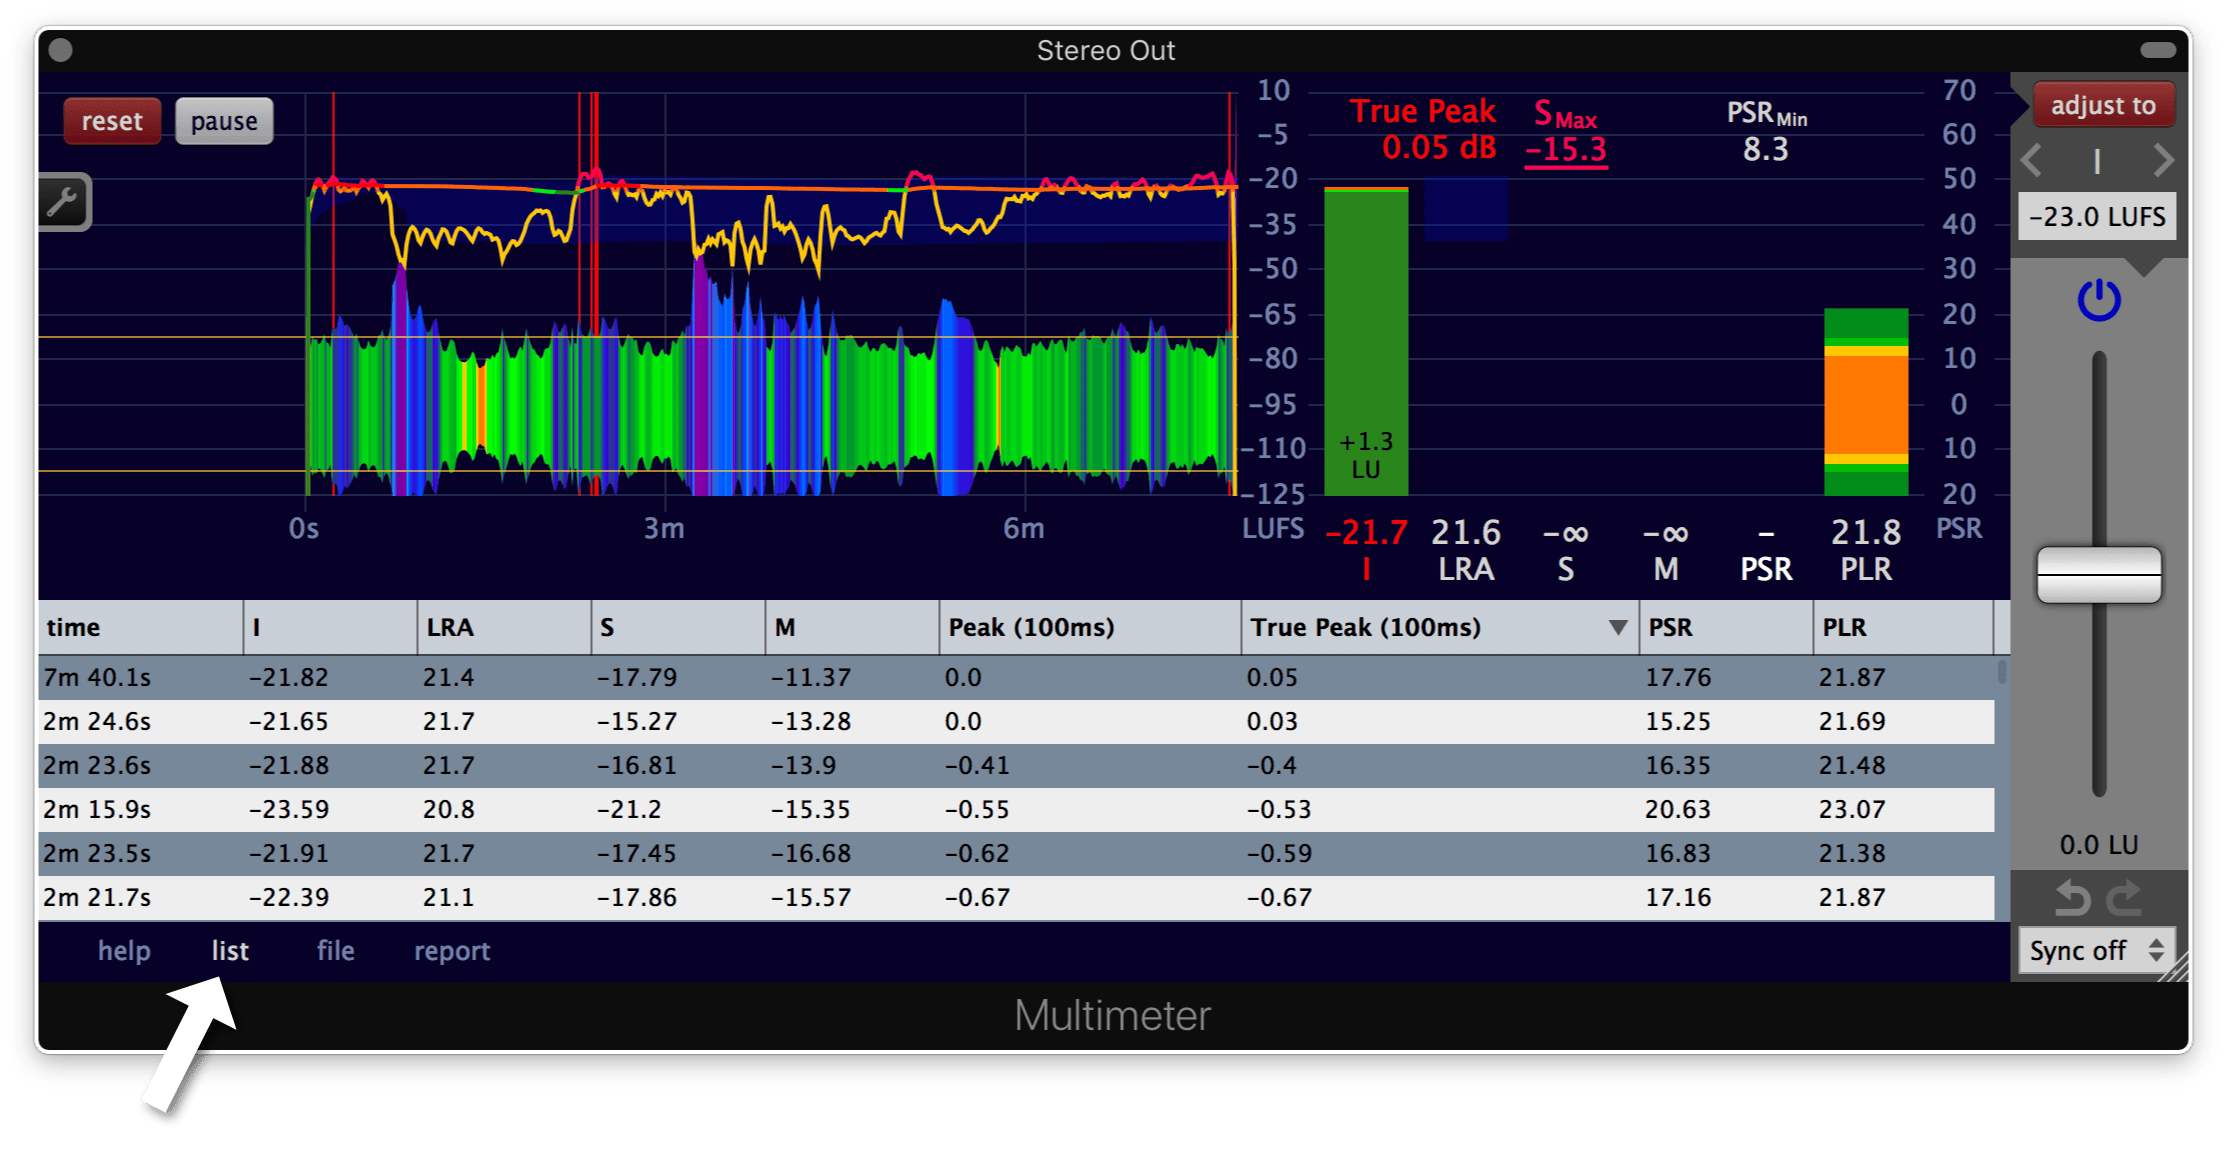
The list viewer provides the measurement results in a tabular representation, updated in realtime. The sort order can be changed by clicking on a column header on the top. The order of the columns can be changed by dragging a column header to the left or to the right. To show or hide a column, select or deselect it in the menu that appears when right-clicking on the column header.
For every 100ms time interval, the peak and the true peak gets calculated by the Multimeter. These measurements can be found in the list viewers Peak (100ms) and True Peak (100ms) columns. They are helpful to find the areas where the peaks and true peaks are the highest.
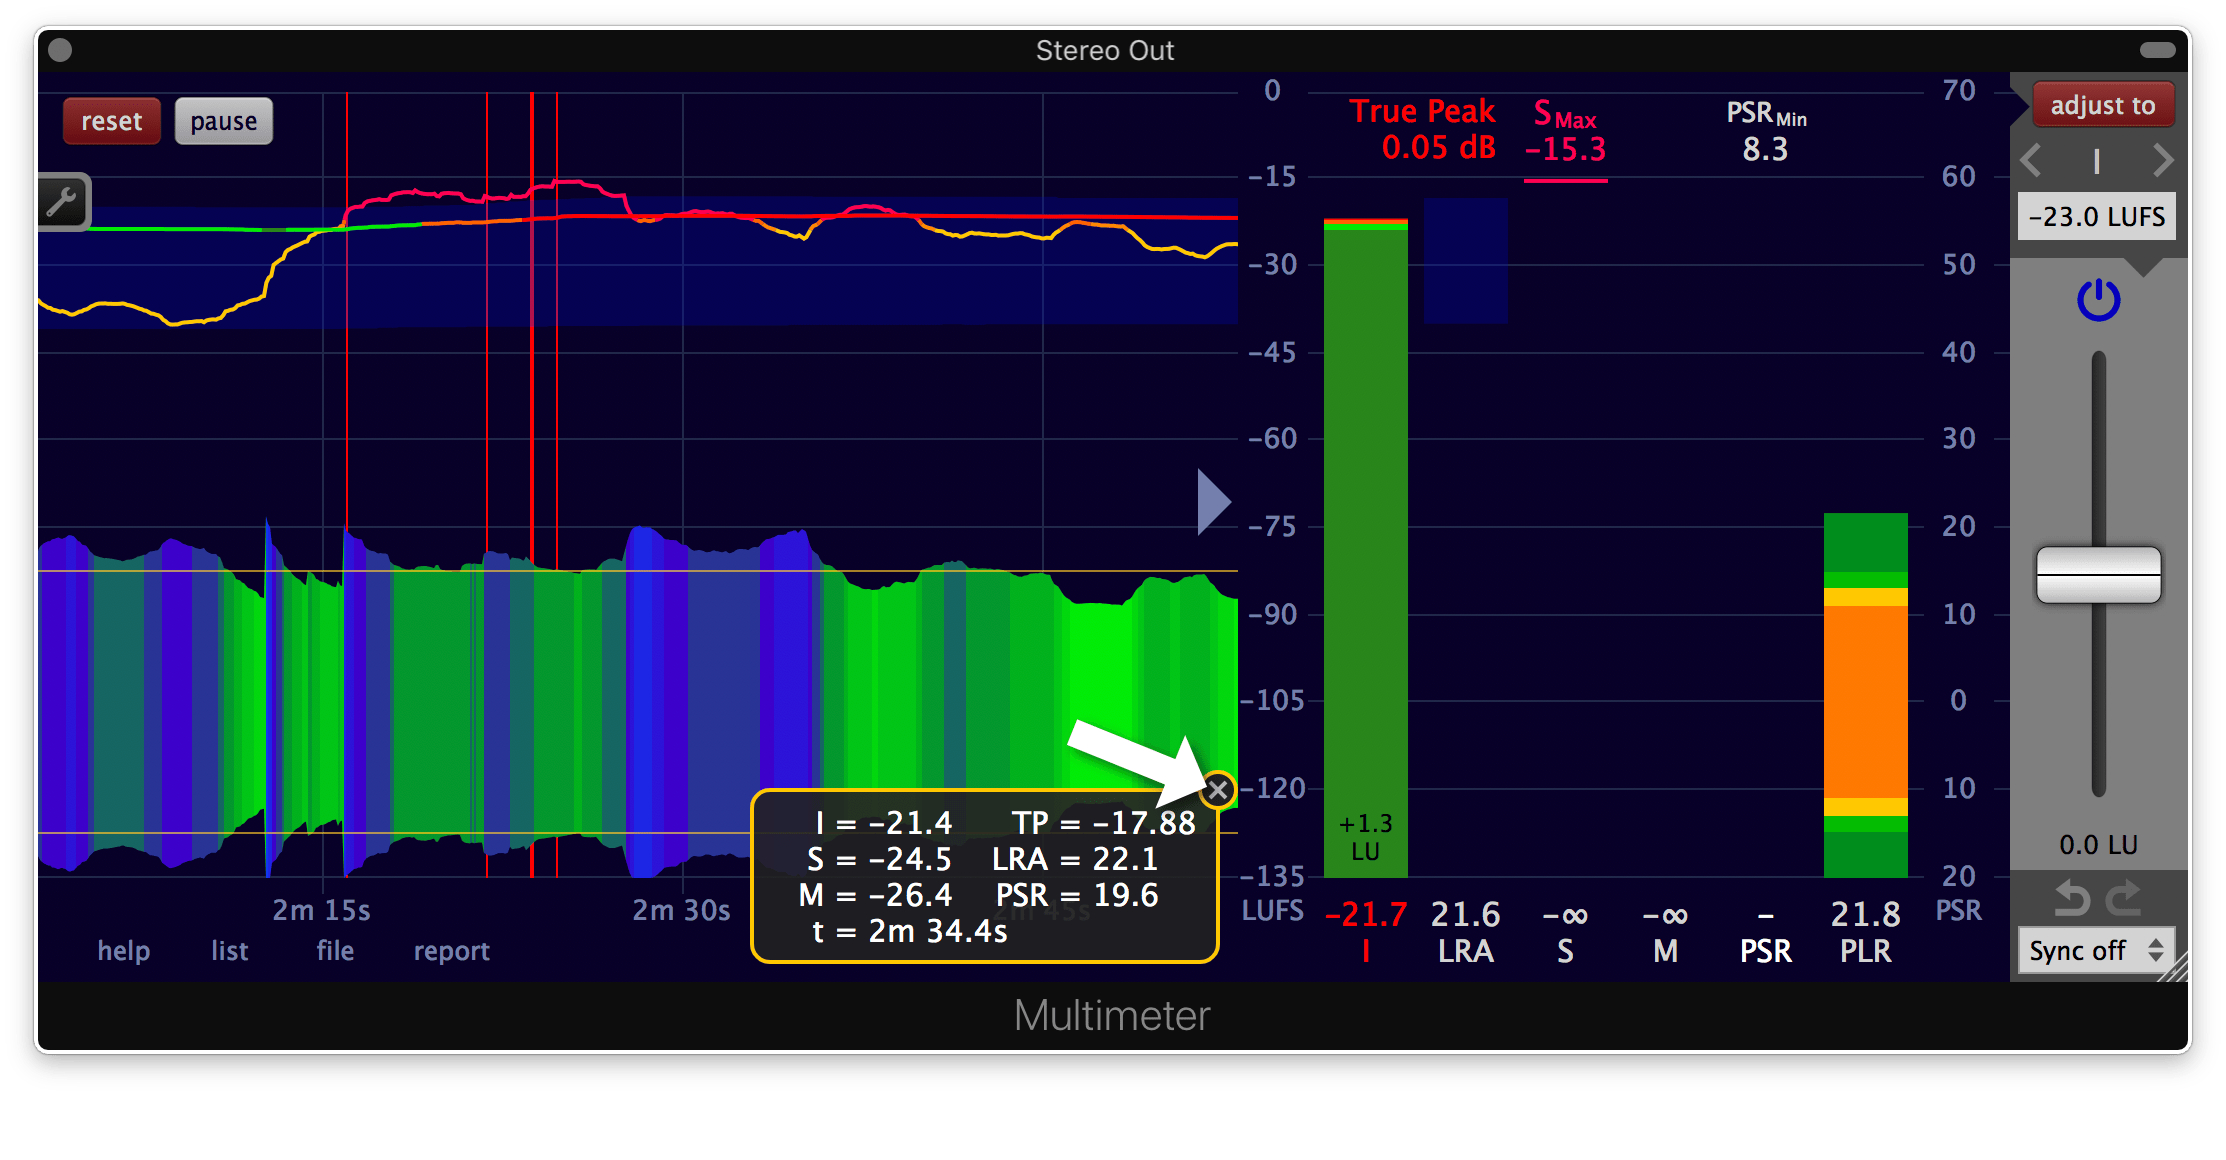
Interface - Mouse position info
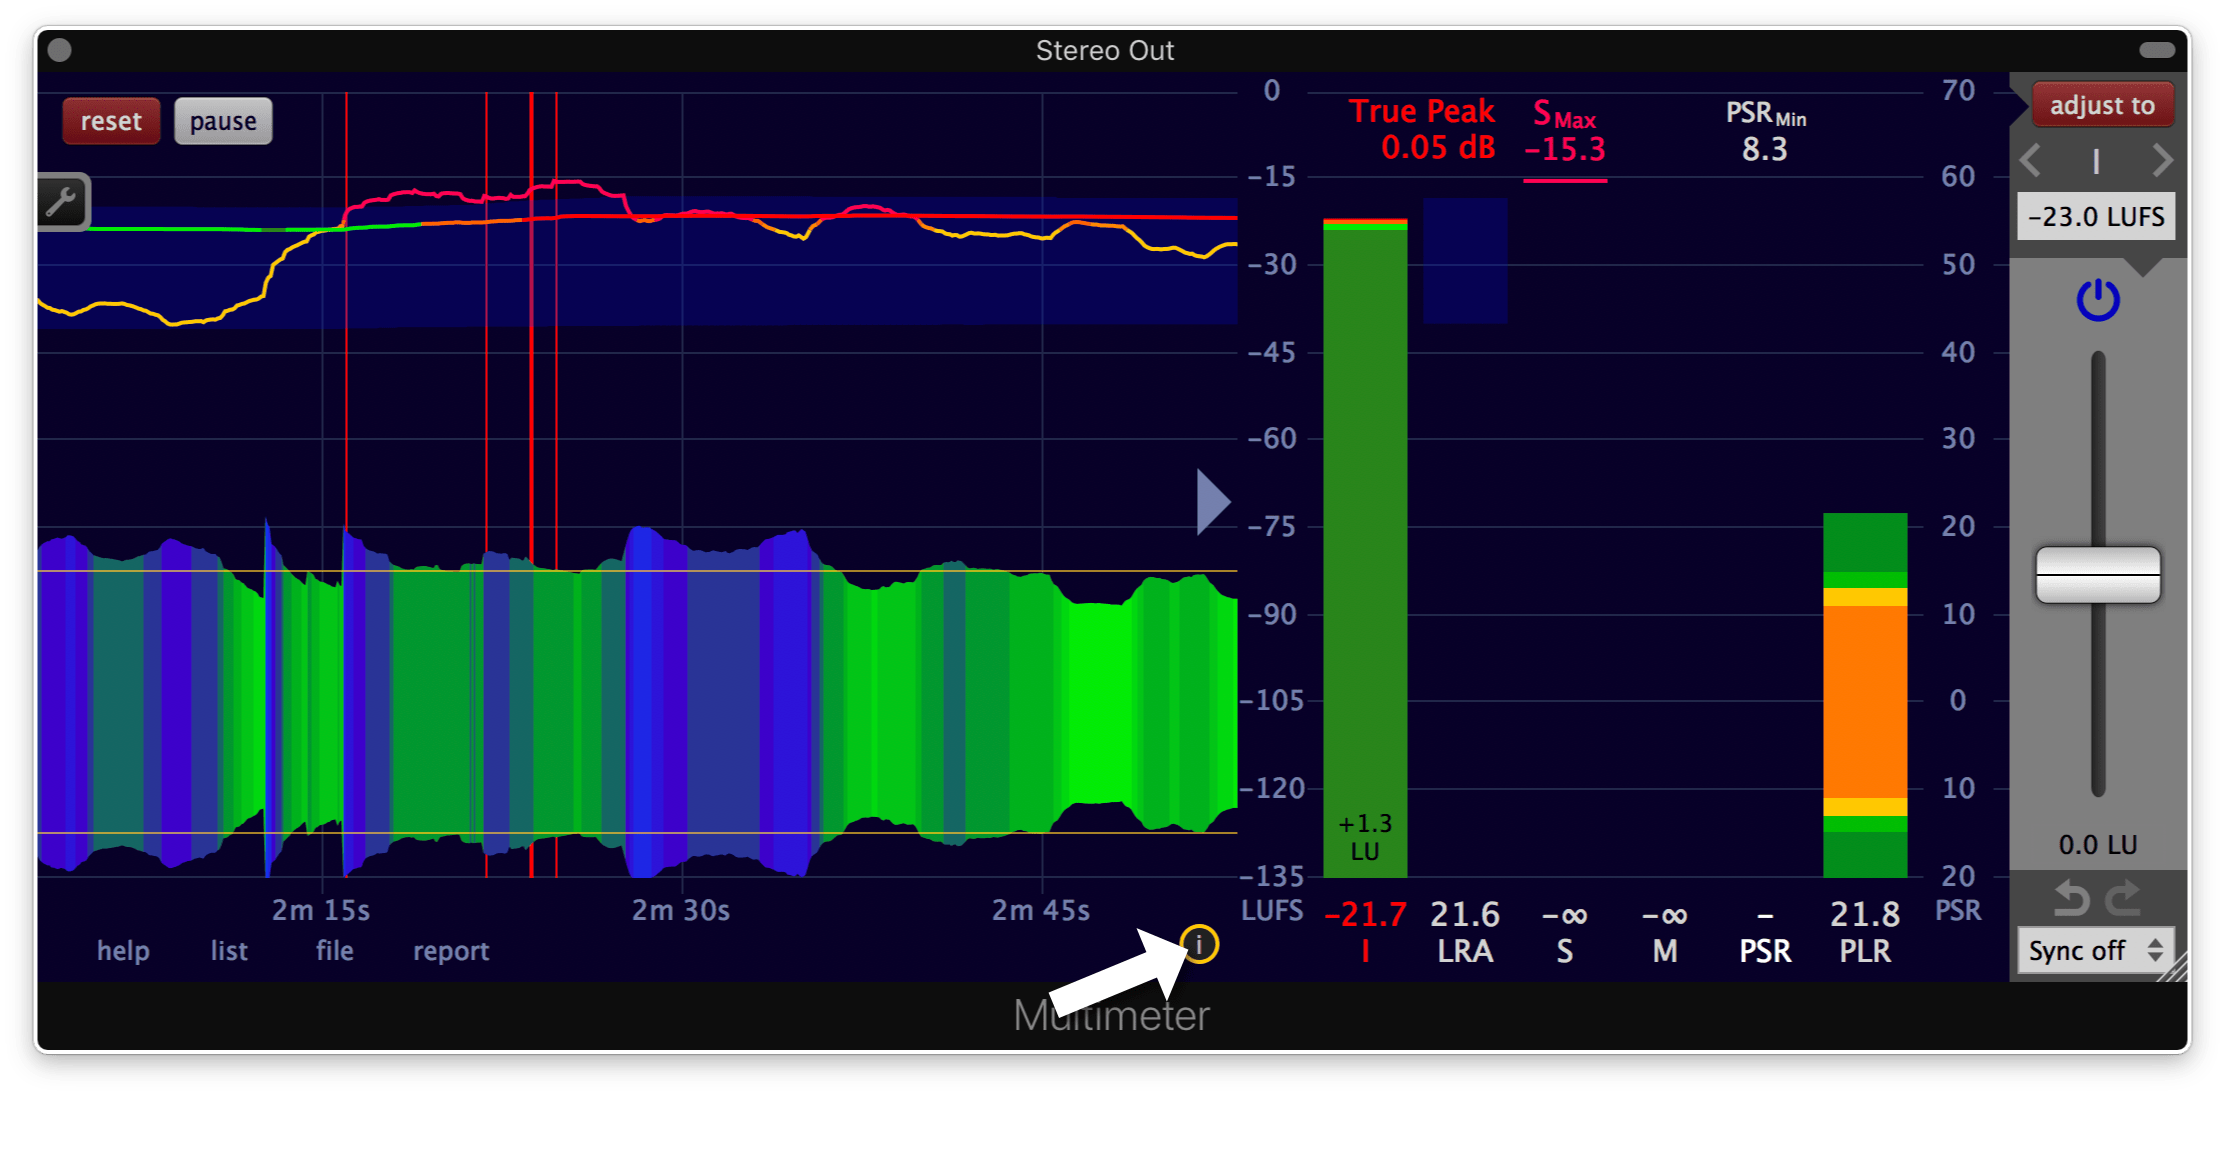
The mouse position info displays the measurement values corresponding to the time where the mouse cursor is hovering over the history graphs. It is only shown when the mouse cursor is over the area of the history graphs.

Measure the loudness of a single track
Insert the Multimeter
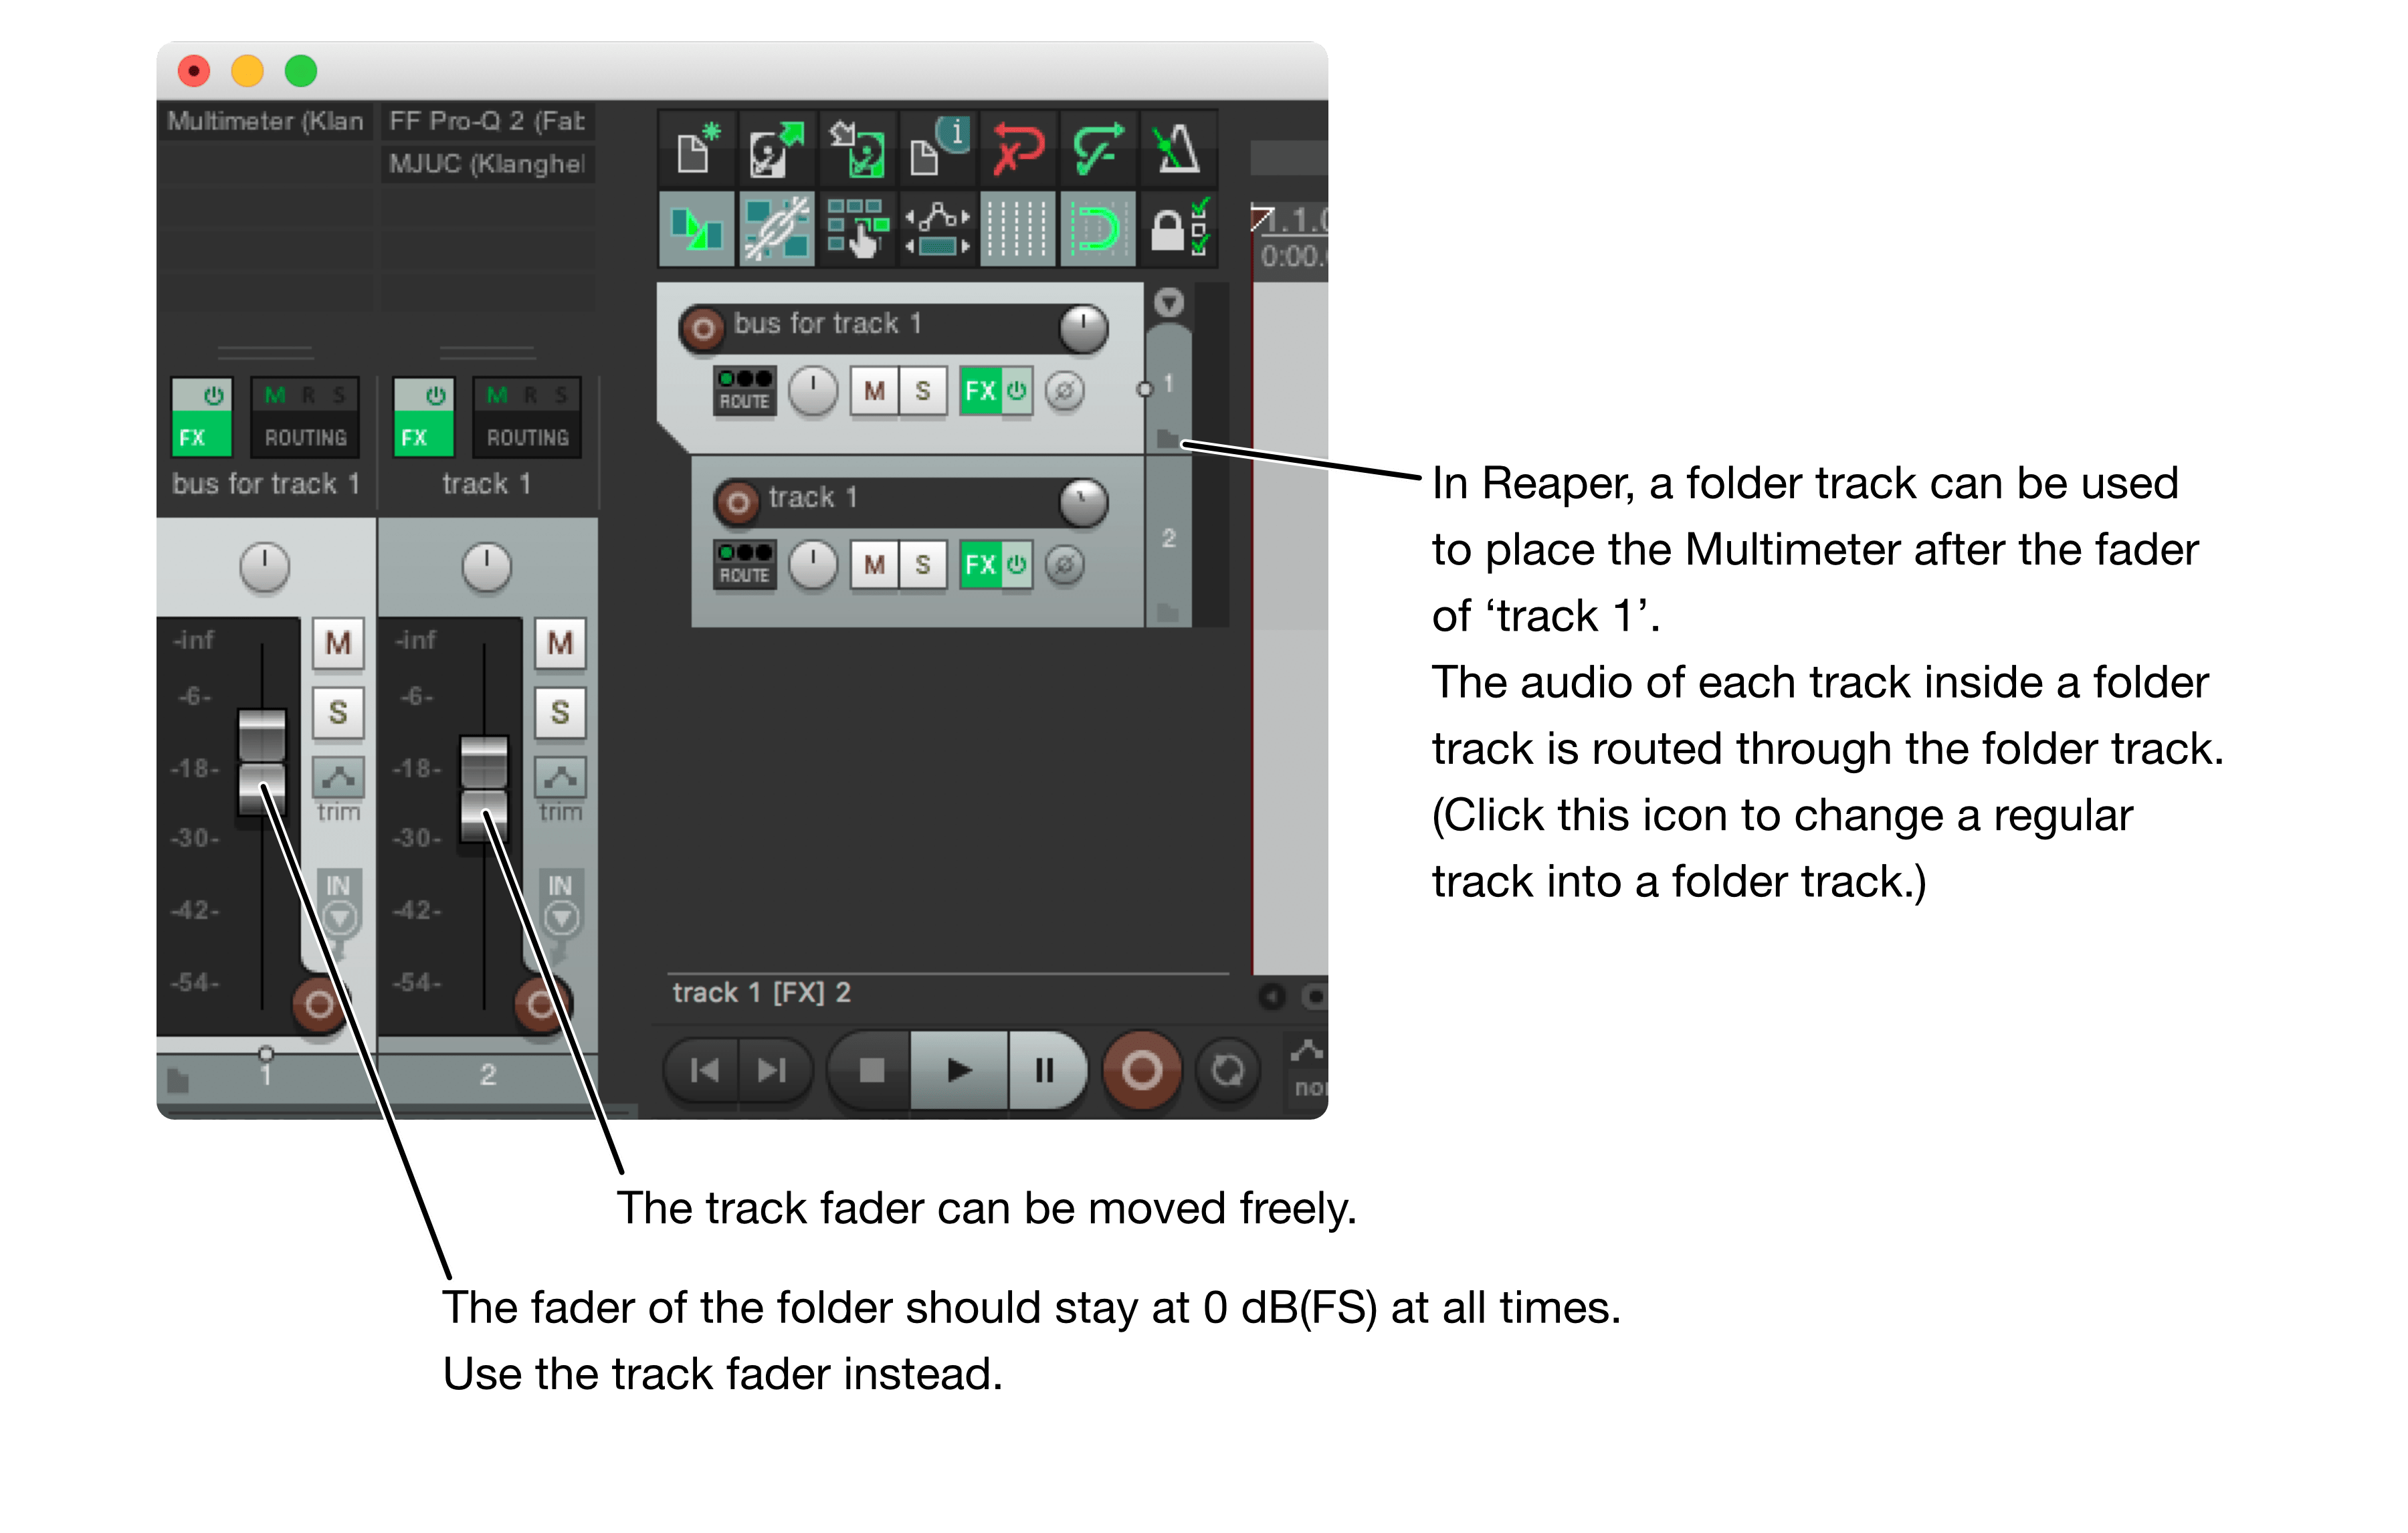
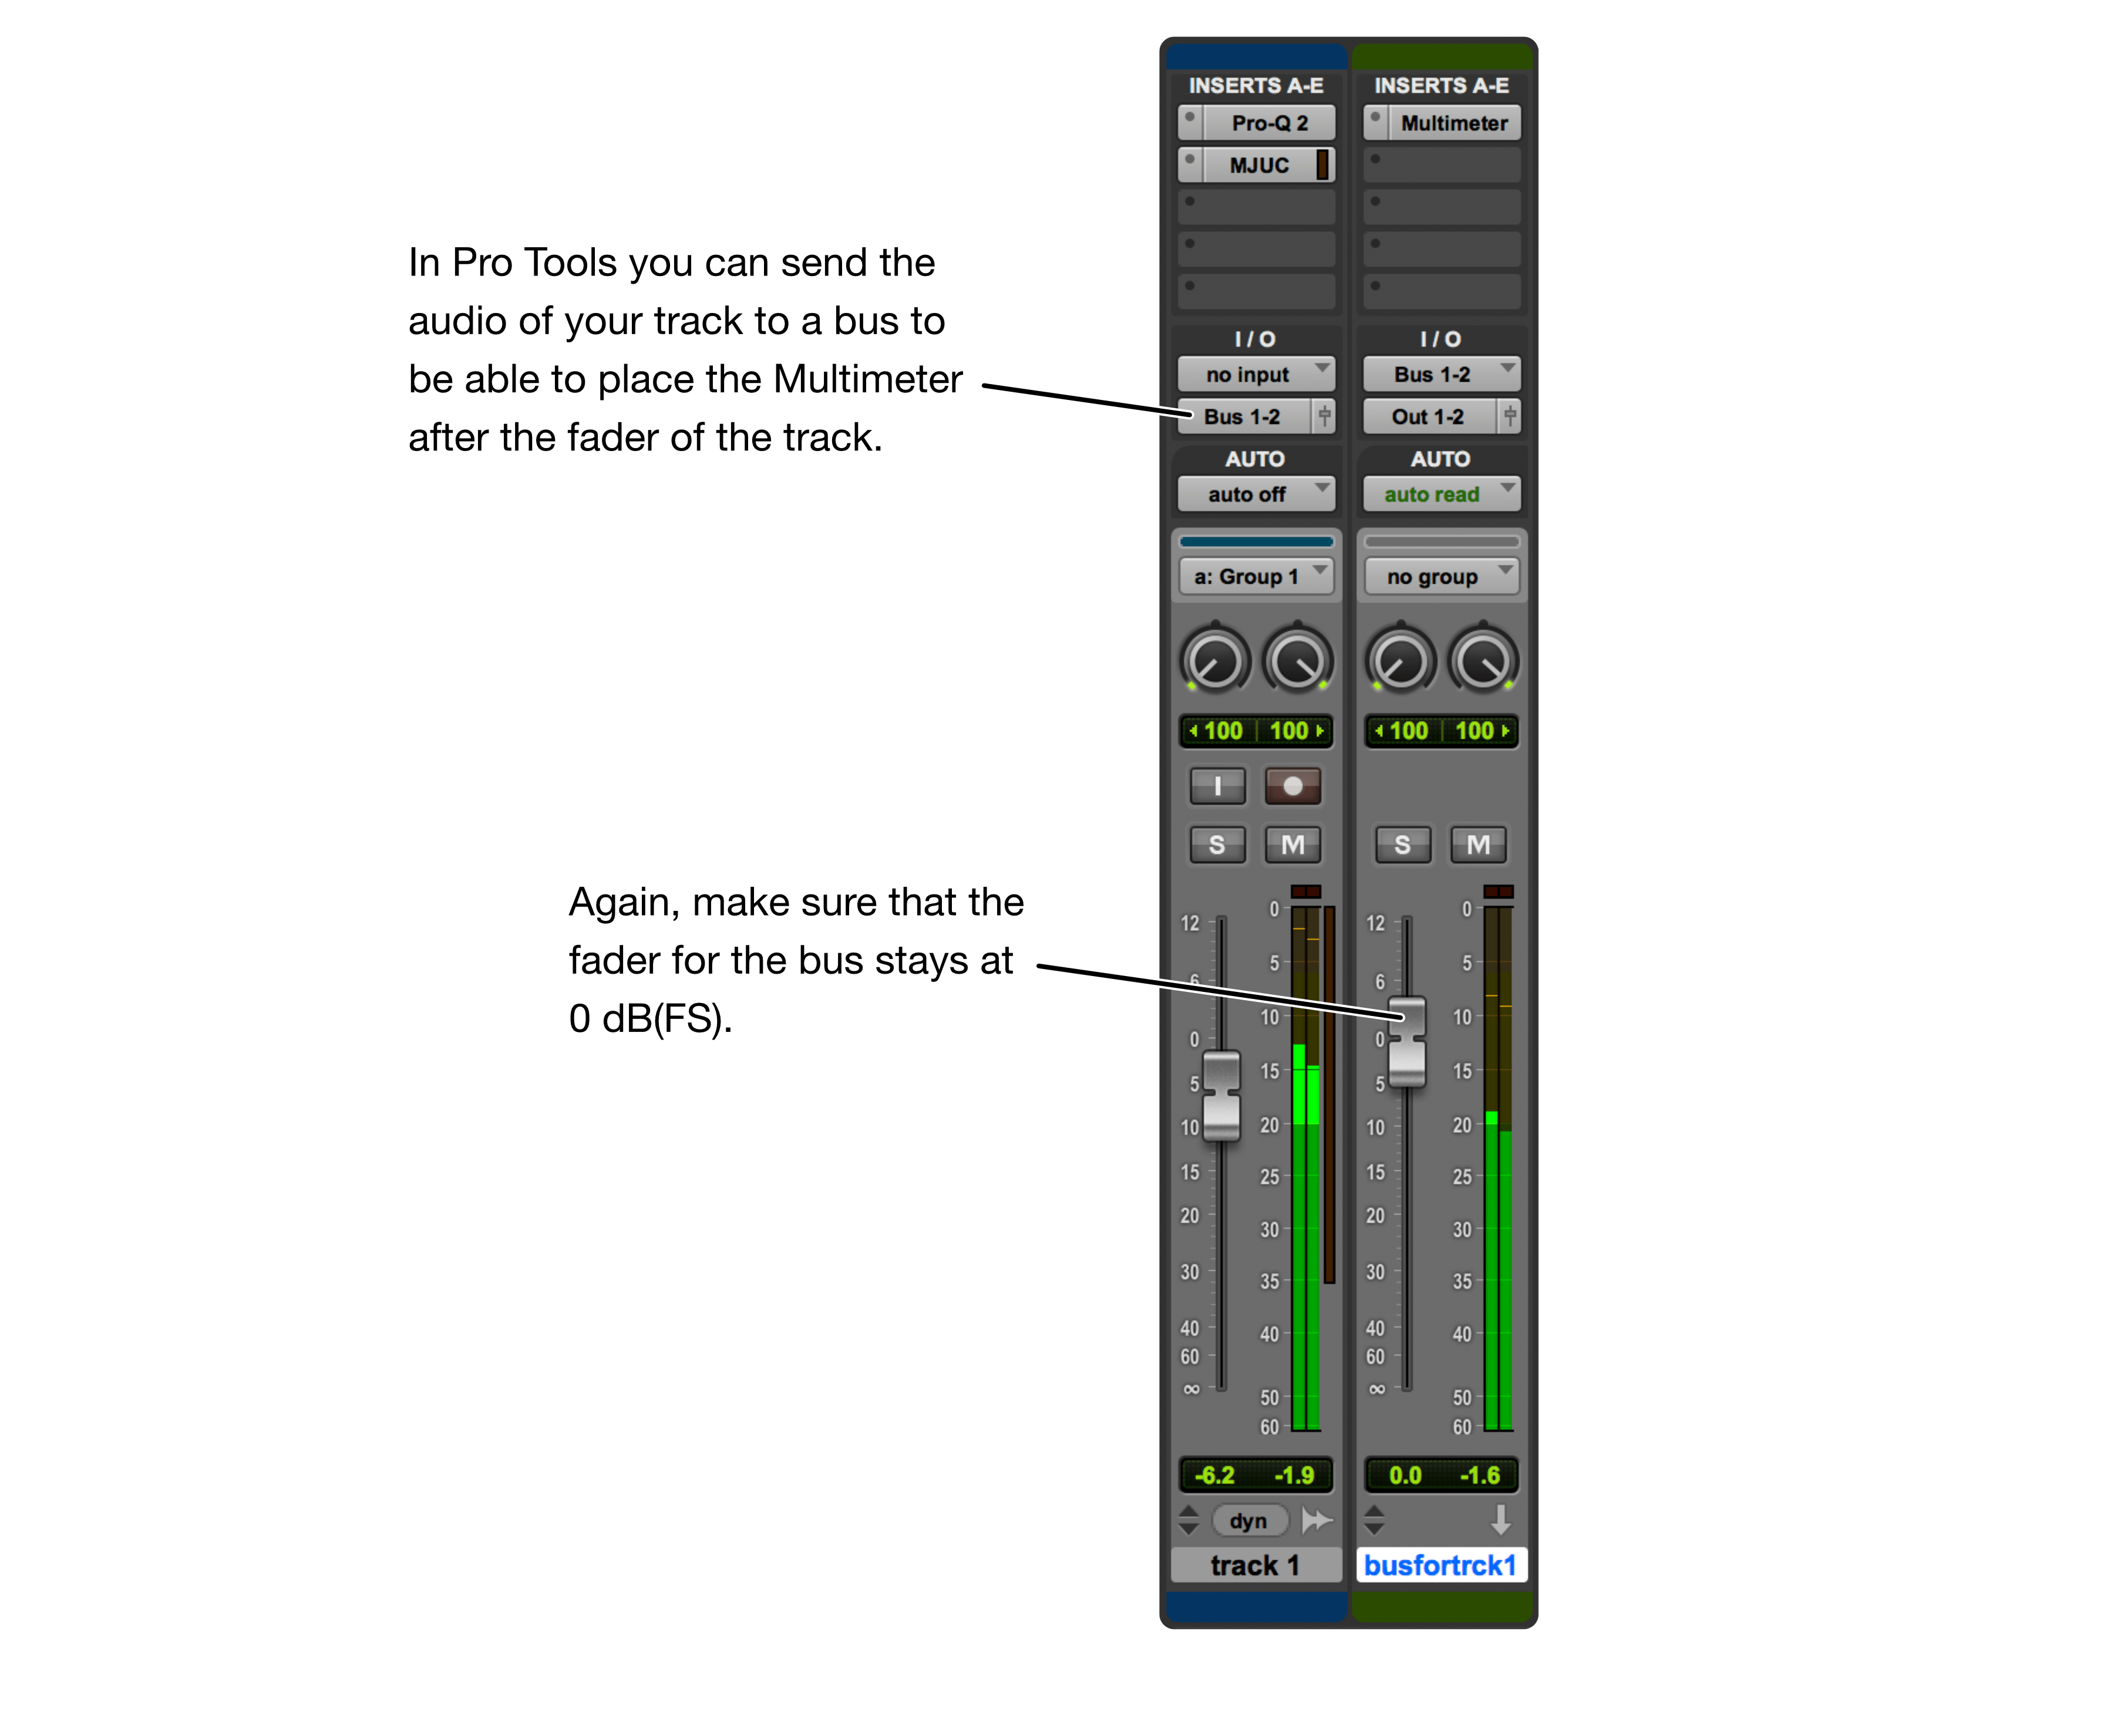
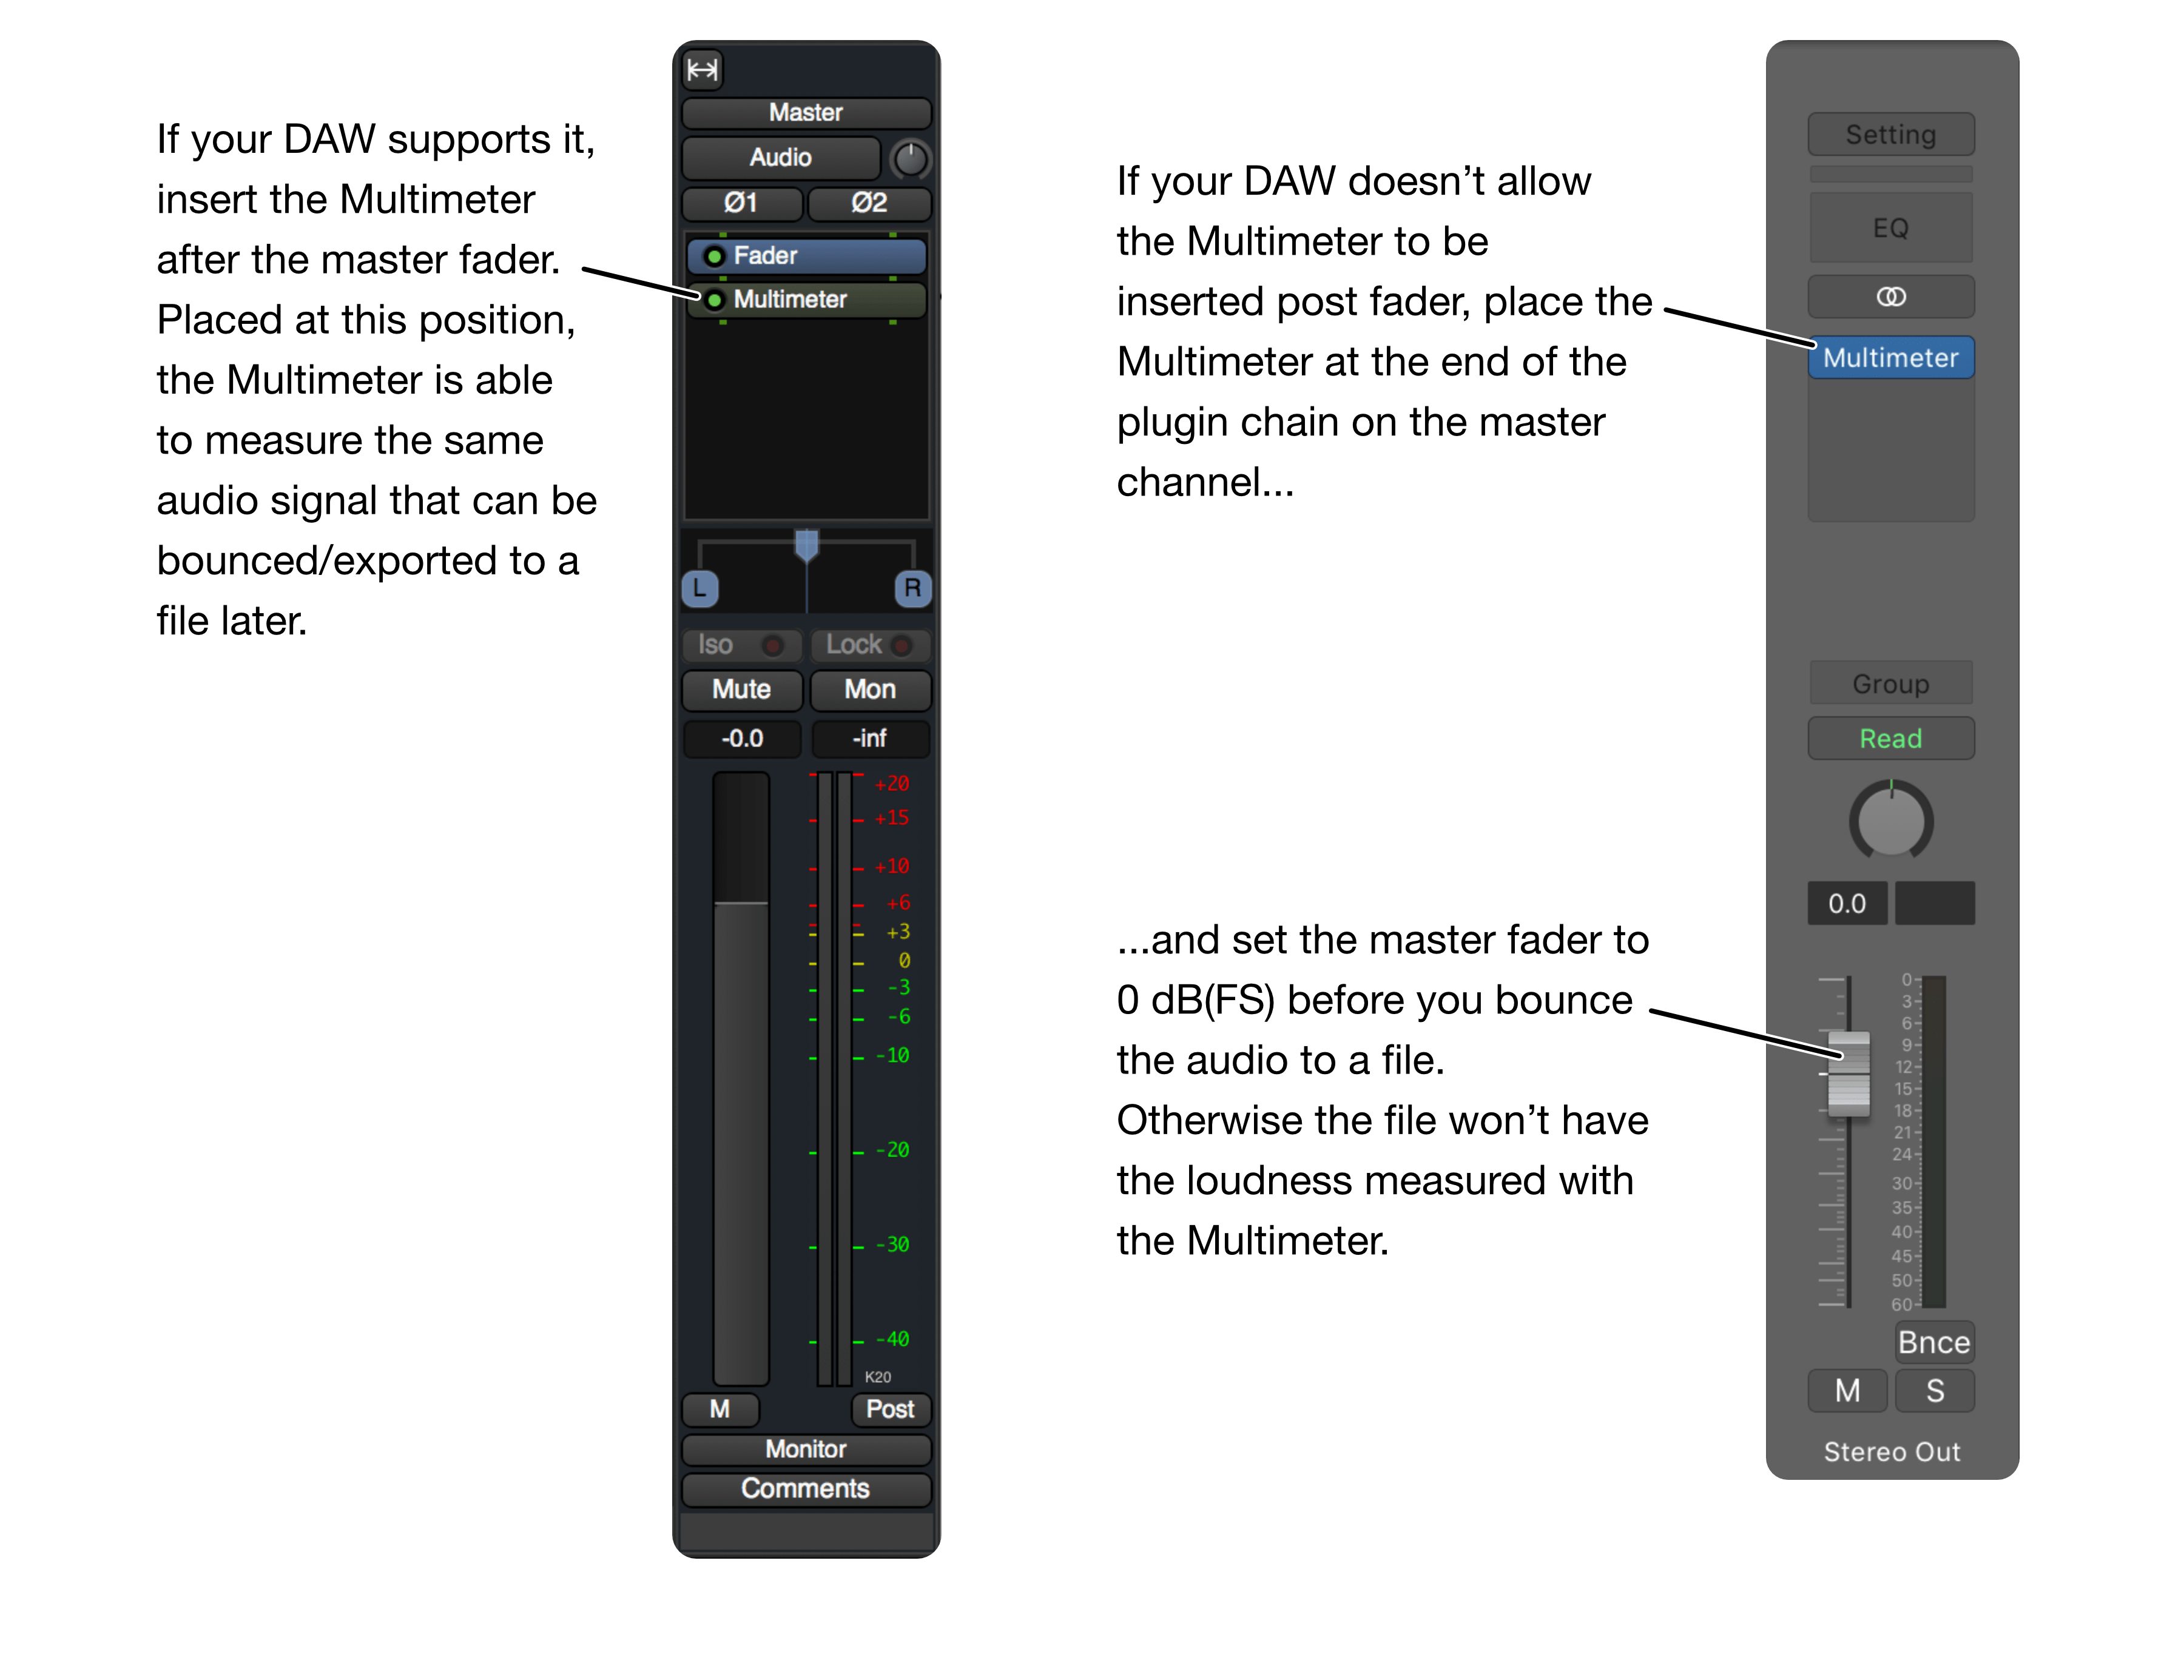
The placement of the Multimeter in your digital audio workstation (DAW) is crucial. The loudness gets measured at the position the Multimeter is inserted. Everything before the Multimeter is included in the measurement, everything after the Multimeter isn't. Usually you want to include everything and therefore you want to place the Multimeter post fader (after the track fader) at the end of your plug-in chain.
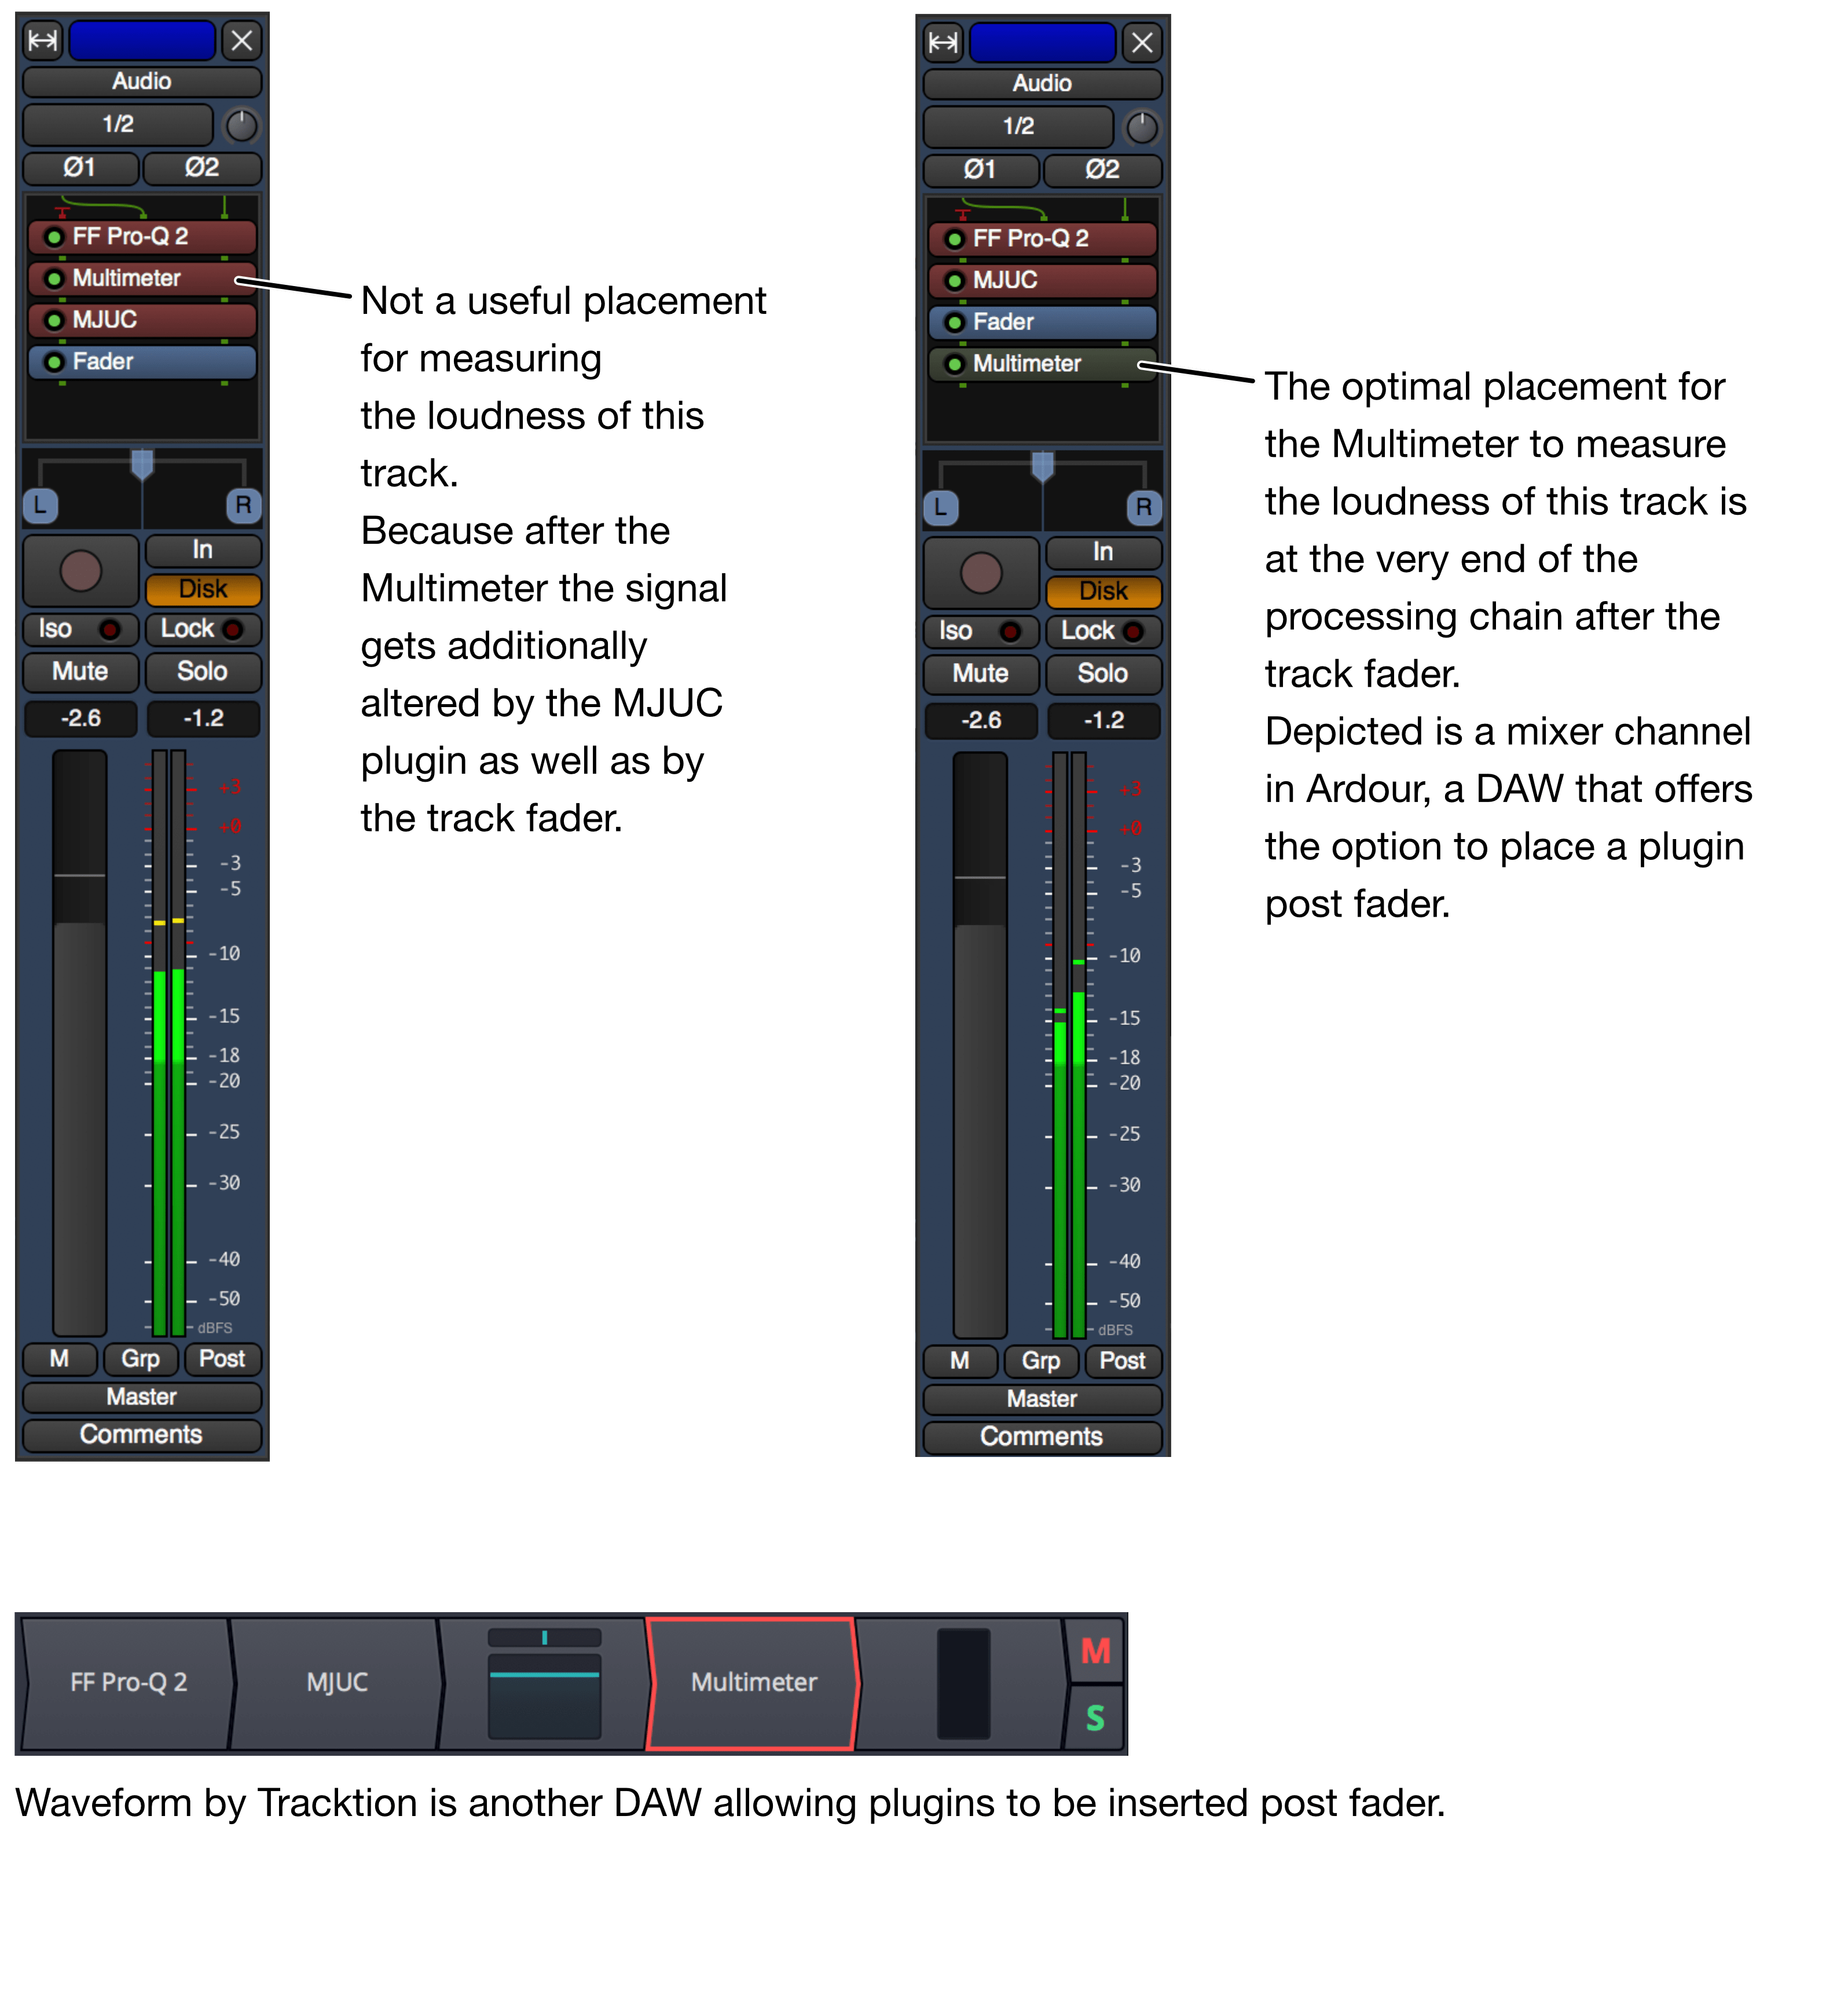
Not every DAW provides the option to insert a plug-in after a track fader. Alternatively, leave the tracks fader permanently at 0 dB(FS) and use a gain utility instead to alter and automate the volume.
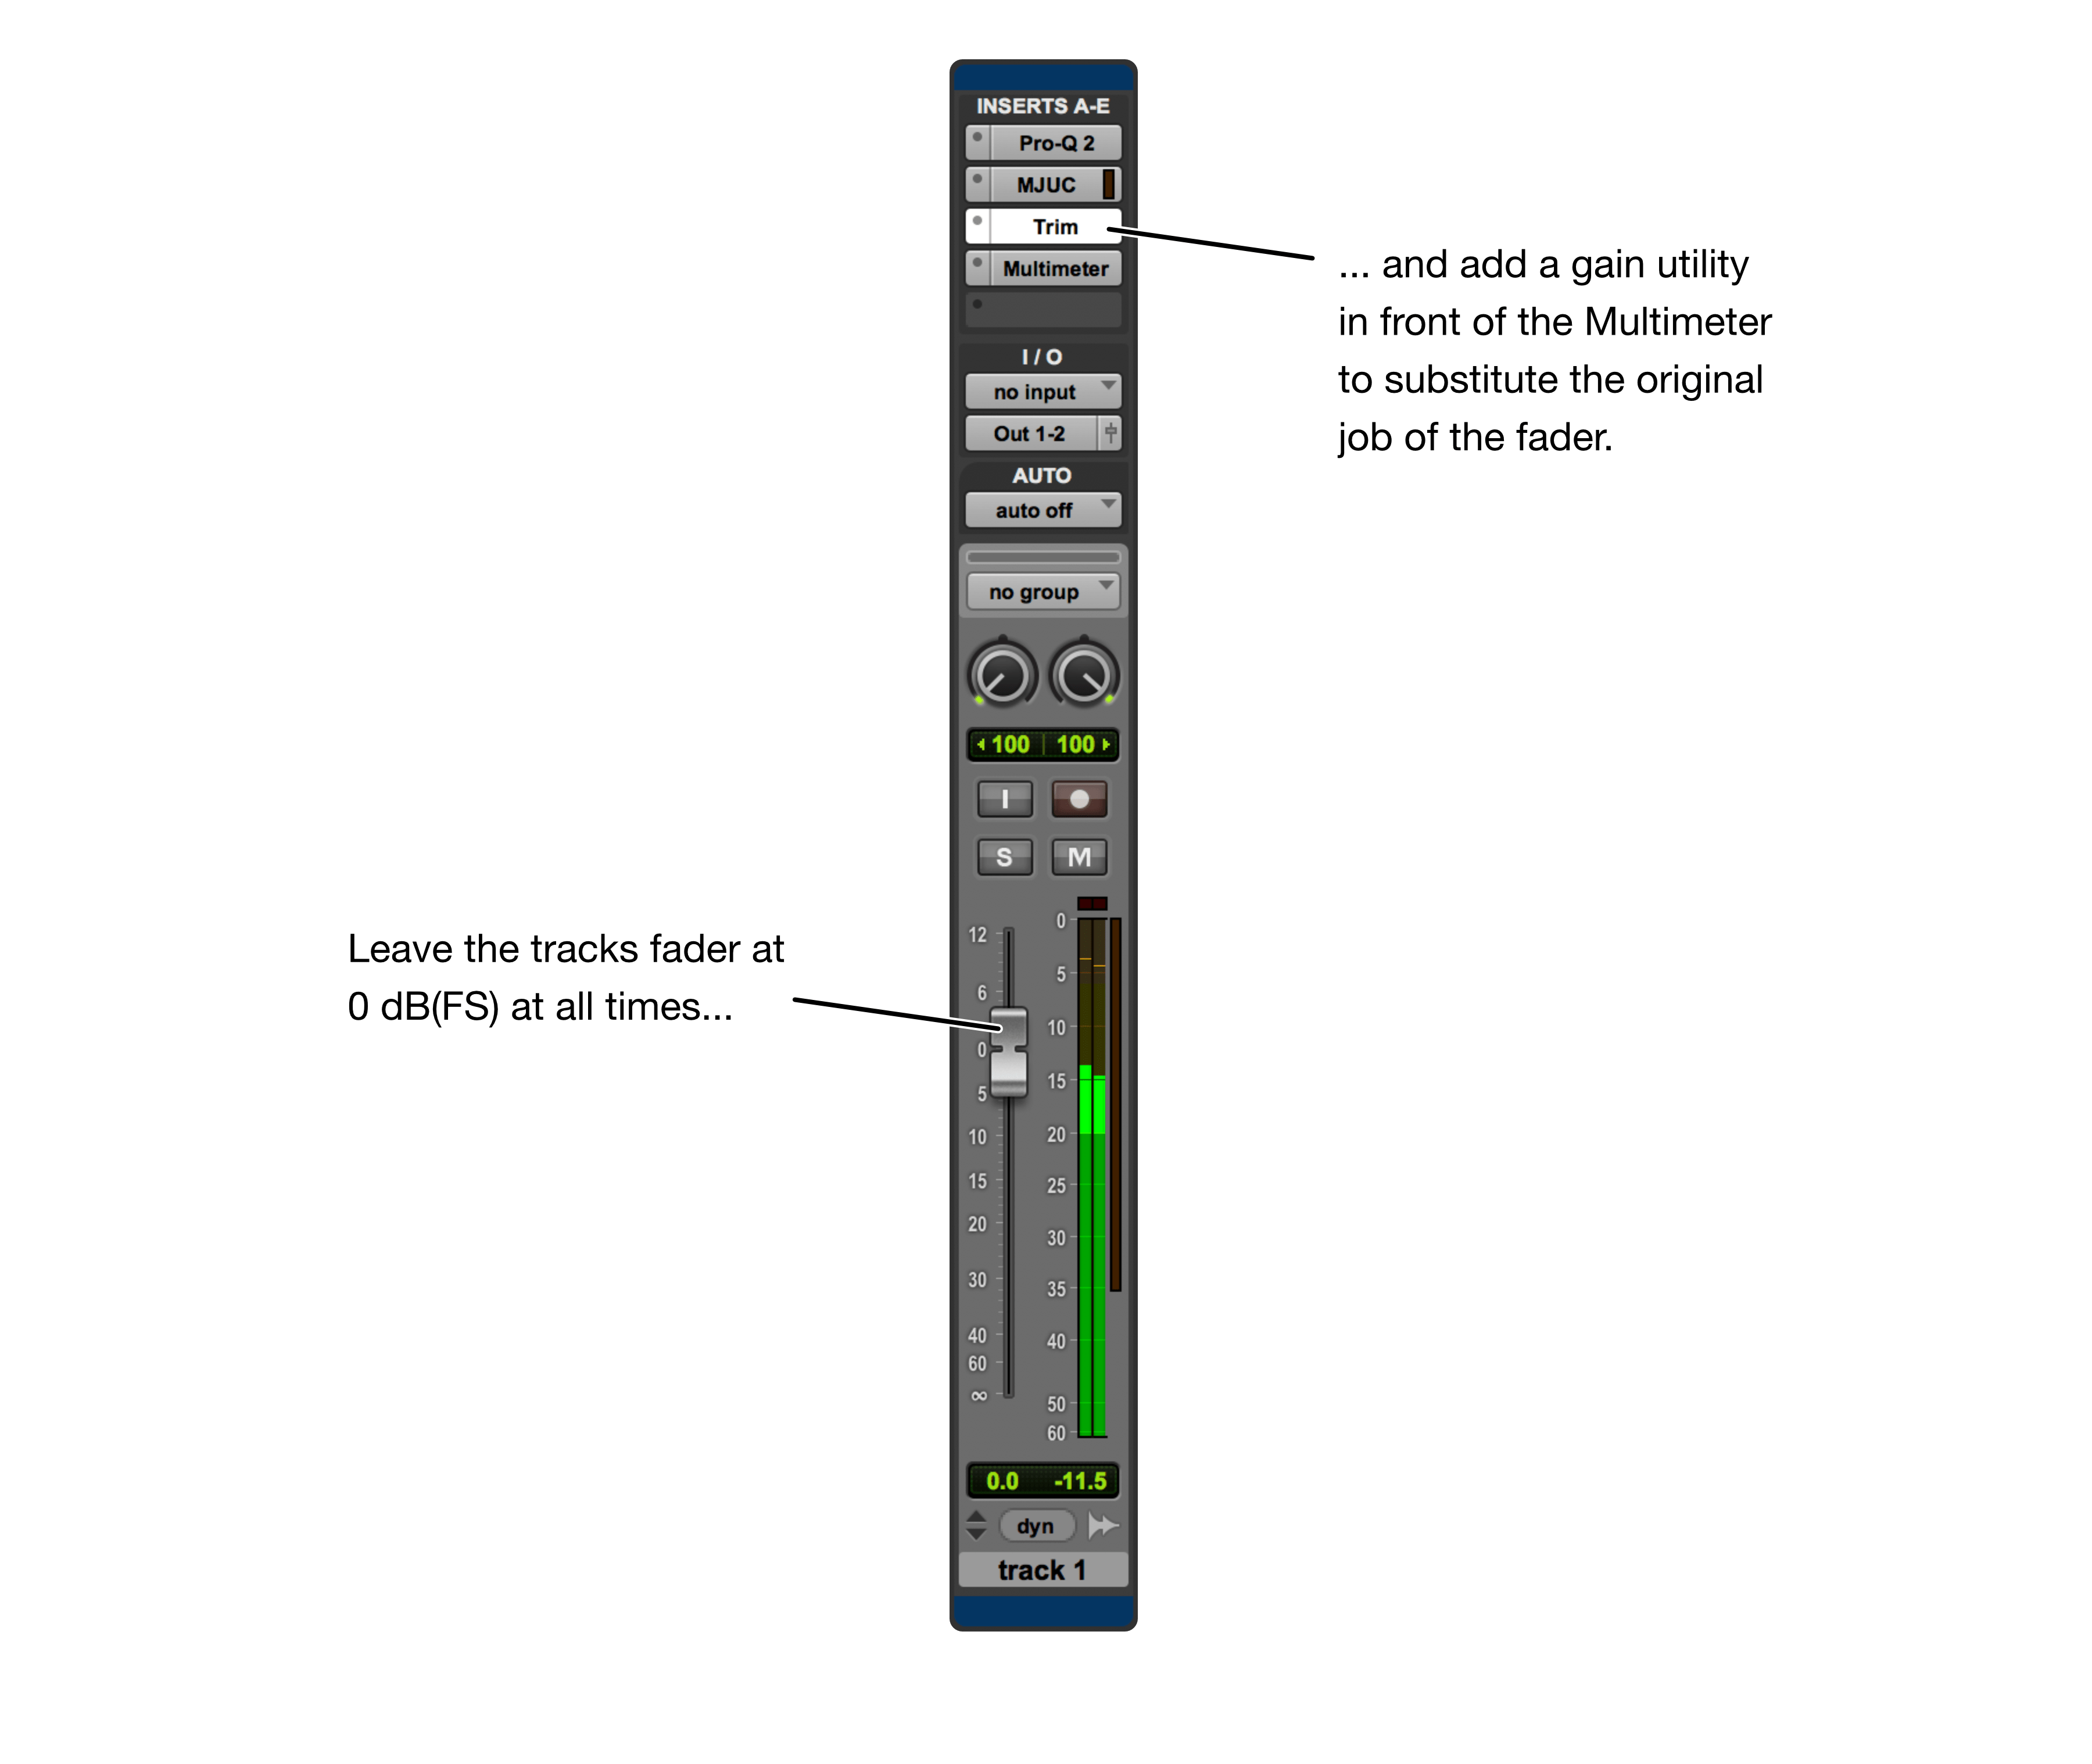
Yet another option for hosts without post fader plug-in support is to route the output of the track to another track/bus where only the Multimeter is inserted. It is important that the fader position of that second track/bus stays at 0 dB(FS) without moving.
Measure
The whole piece you want to measure needs to be played back through the Multimeter in order to be able to determine the loudness.
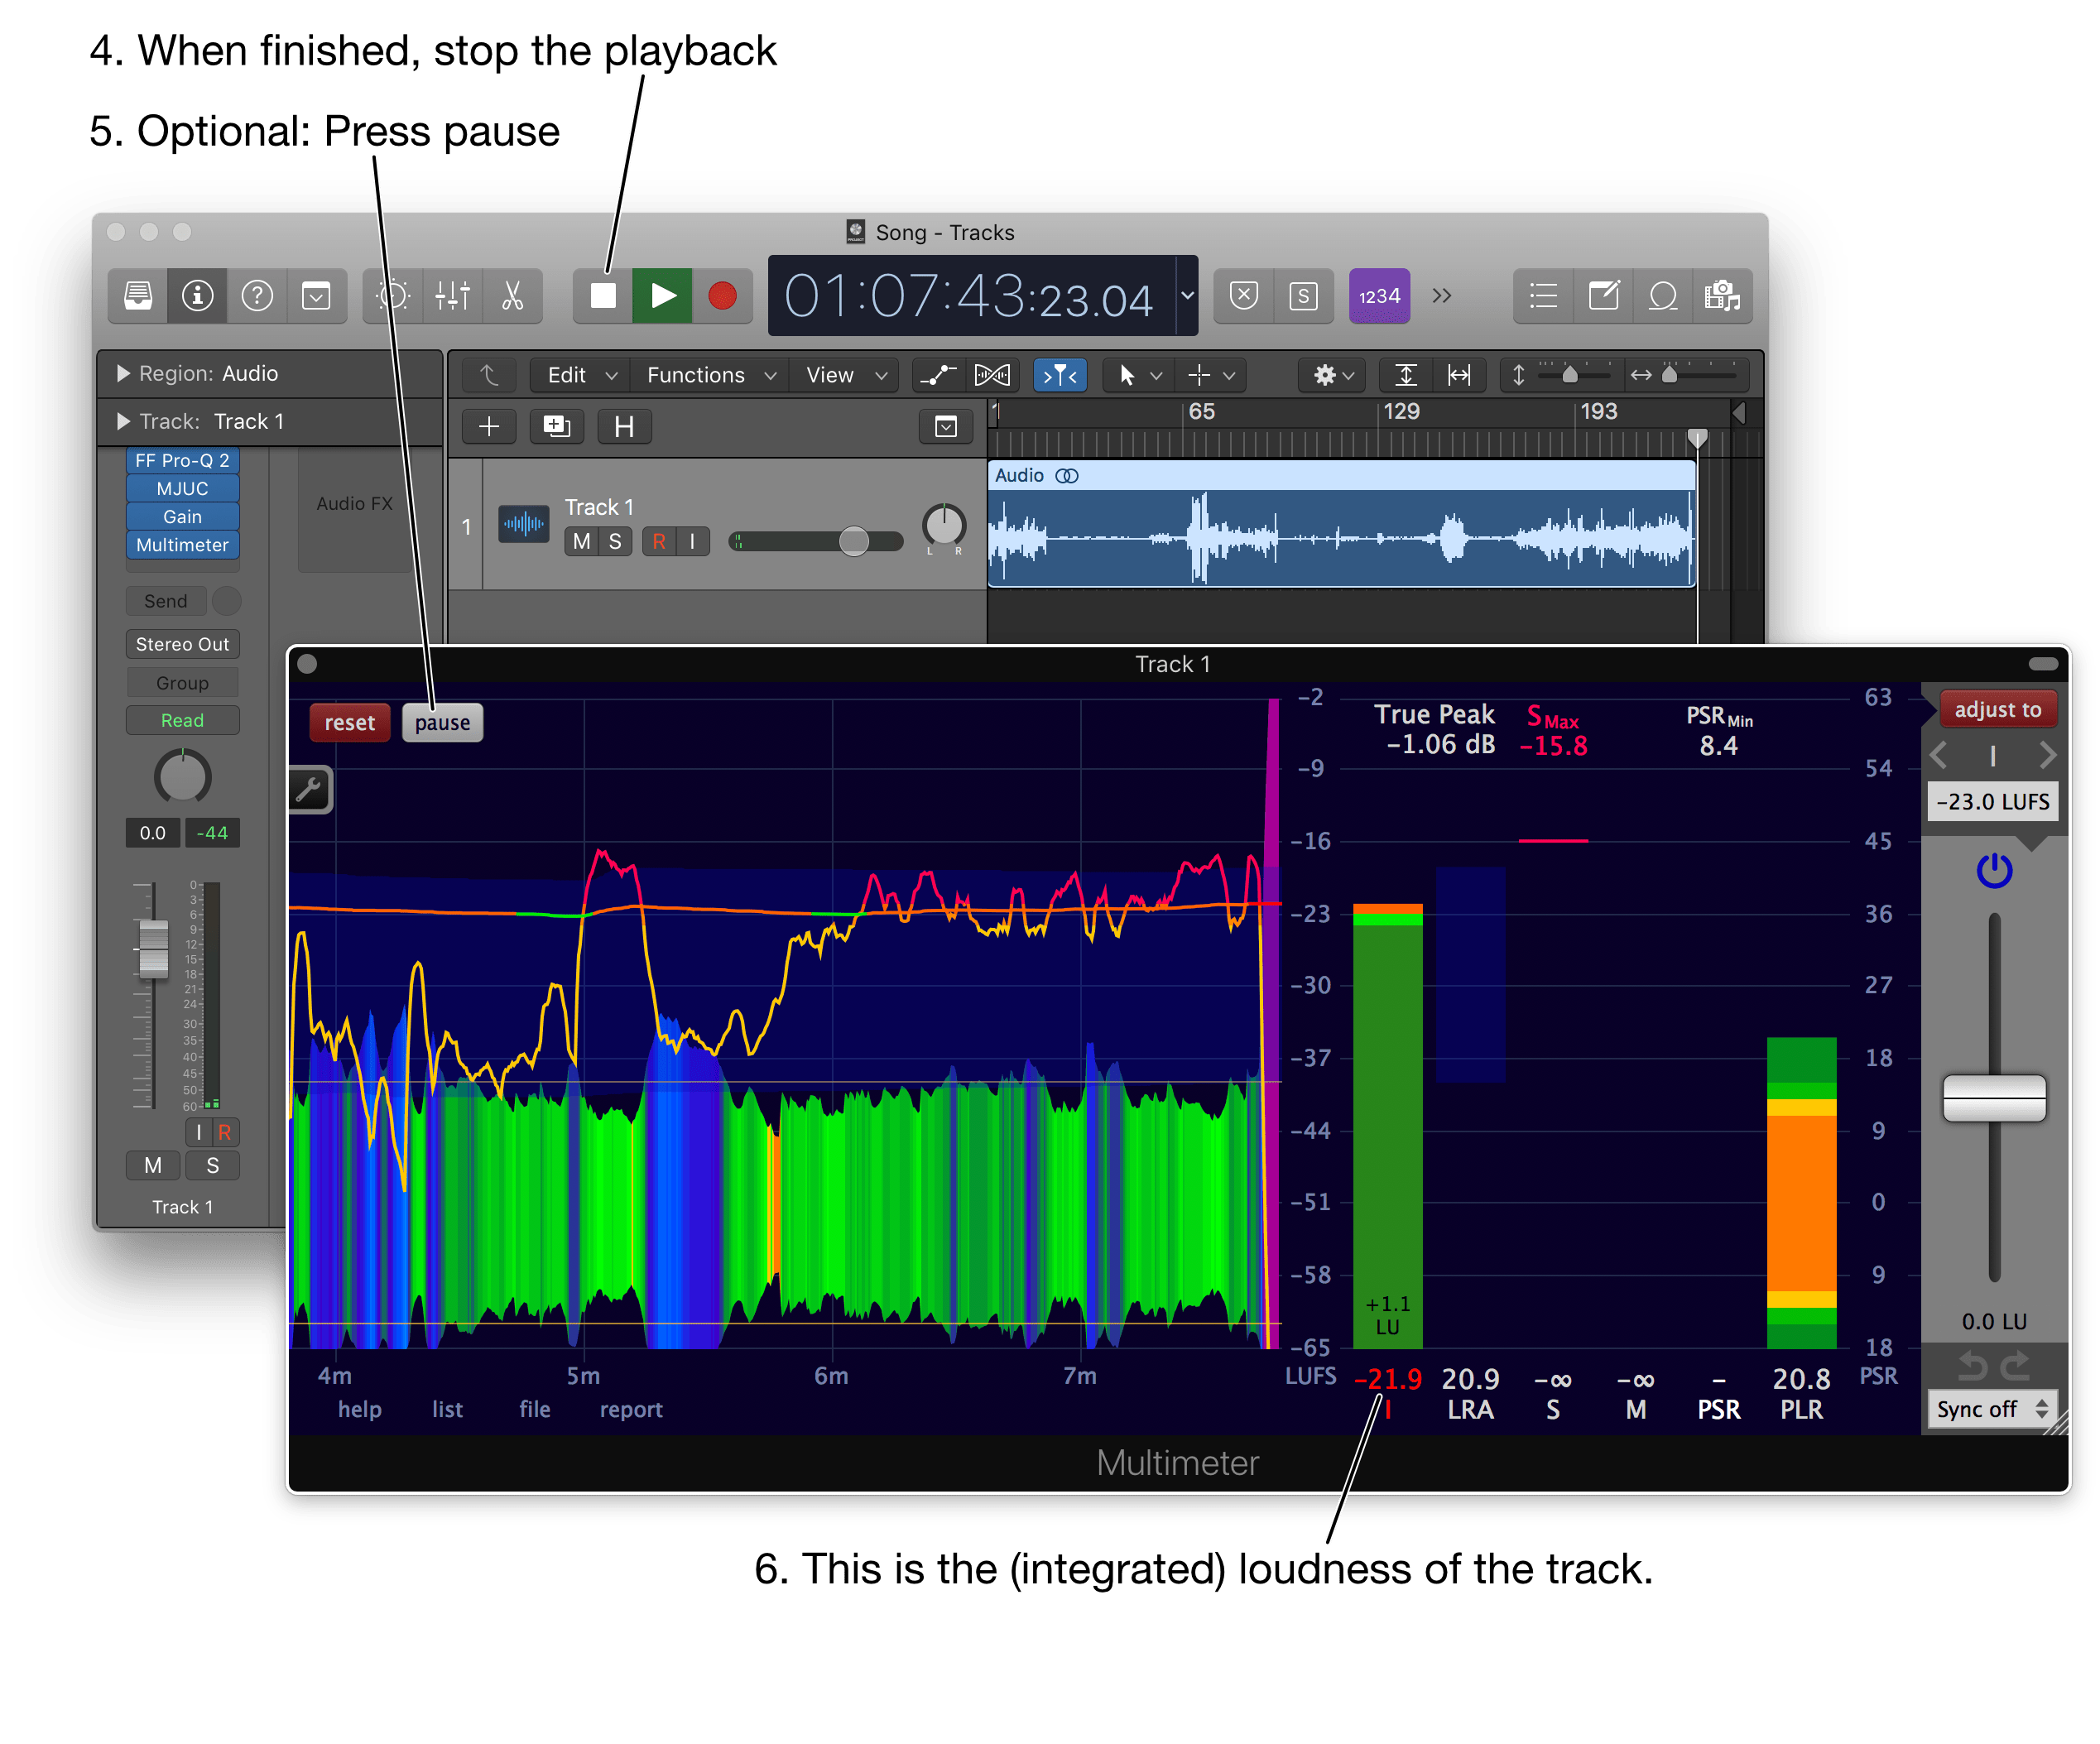
- Move the playhead of your audio workstation to the beginning.
- Click the reset button of the Multimeter.
(Silence is not considered by the loudness measurement, so you don't need to hurry to make the next step.) - Press play in your audio workstation and play back the entire piece.
- When finished, stop the playback.
(Again, the silence that comes after your piece is not taken into account by the measurement, so you don't have to hurry to make the next step.) - Optional: You might want to press the pause button. This will stop the measurement and will decrease the CPU usage of the Multimeter.
- Look at the integrated loudness. This is the loudness of your piece.

Measure the loudness of an entire multitrack project
Insert the Multimeter
If you are interested in the loudness of an entire project, place the Multimeter at the very end of the audio signal path.
Measure
The steps to measure the loudness are exactly the same as in the single track chapter before.
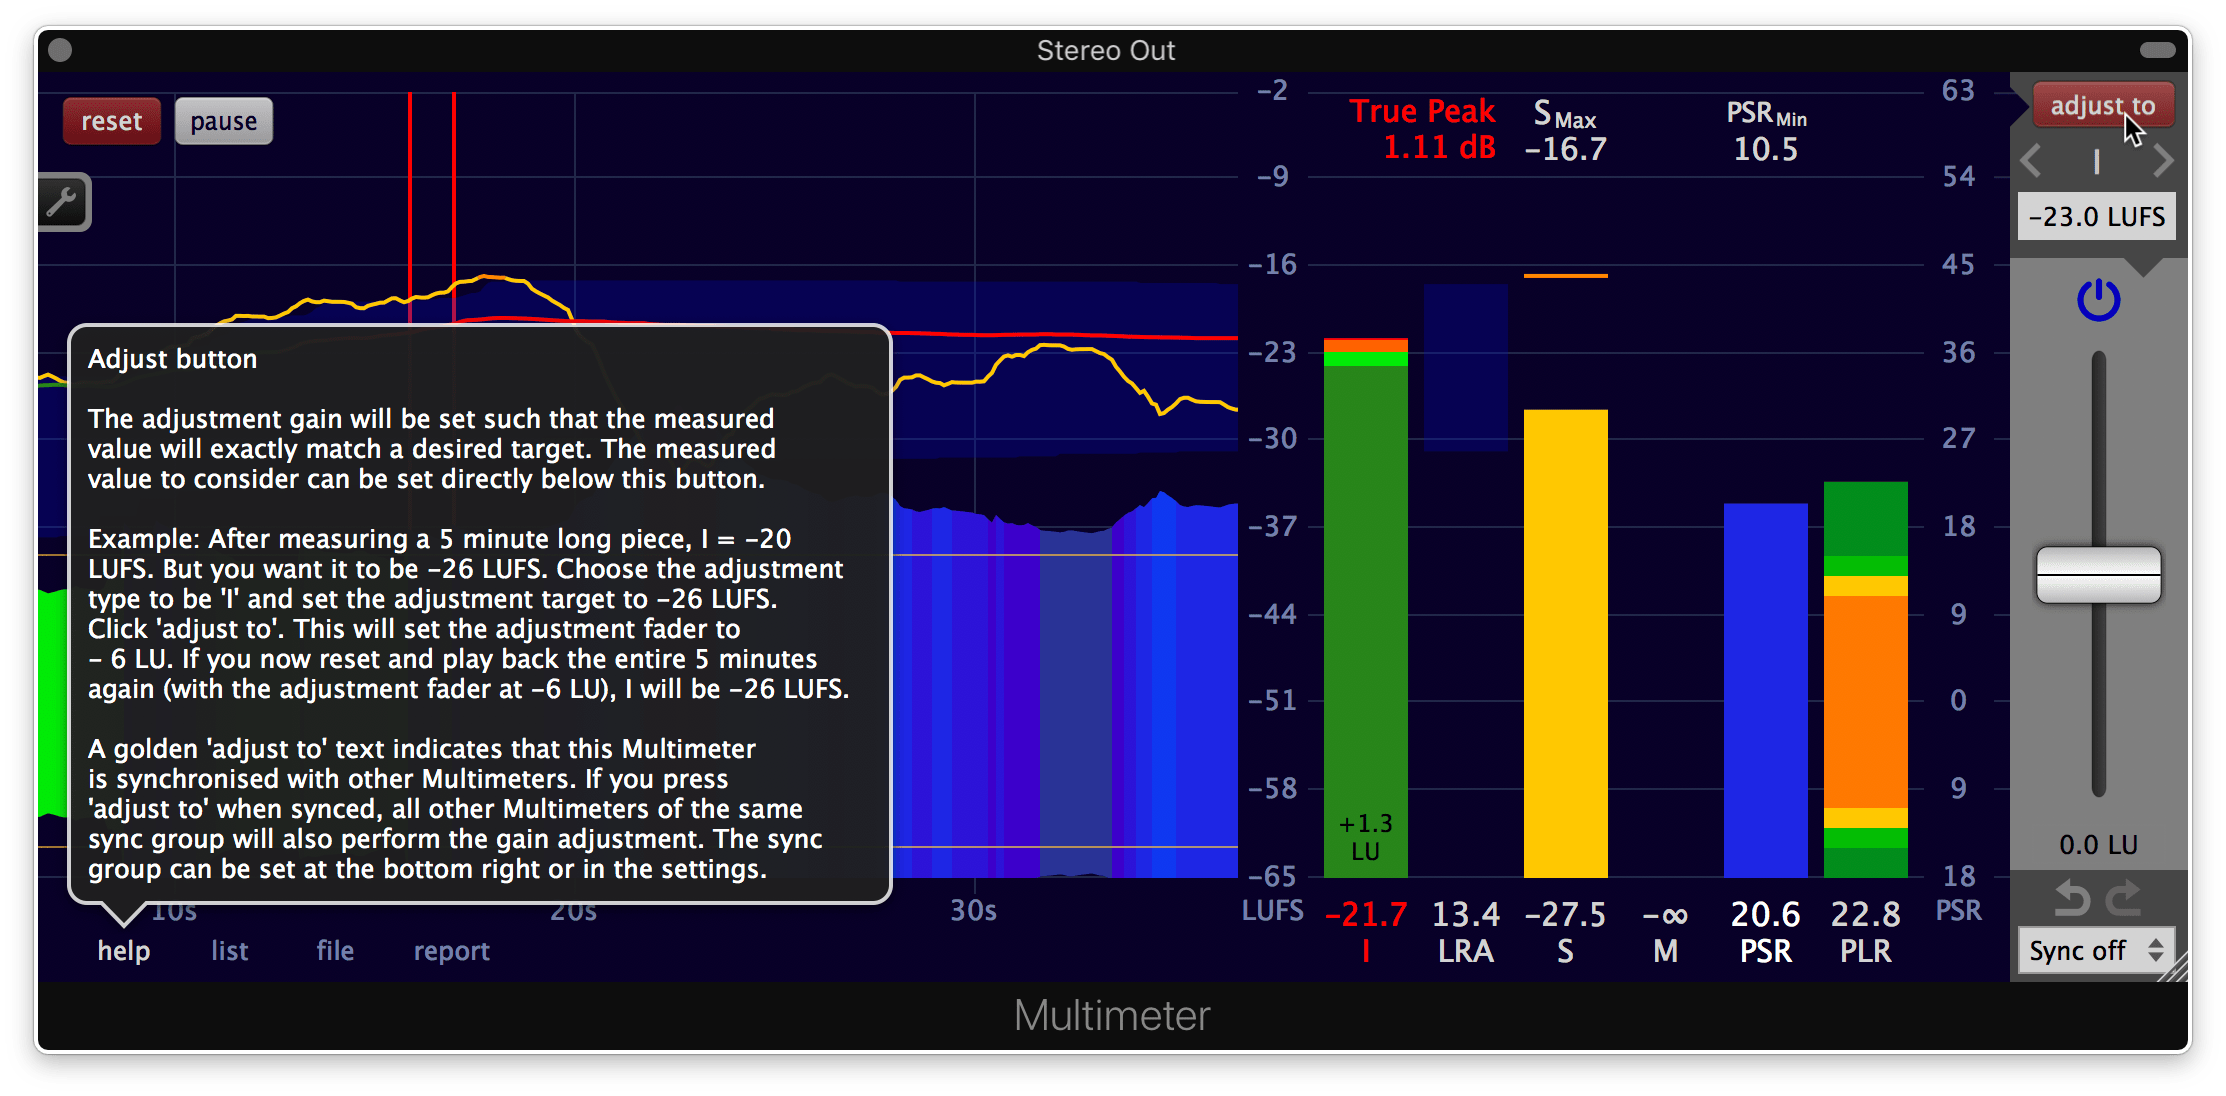
Adjust the loudness
It is often required to deliver audio with a specific loudness. The Multimeter is well suited for this task.
- Place the Multimeter plug-in at the end of the processing chain and measure the loudness, as described in the chapter 'Measure the loudness of an entire multitrack project'.
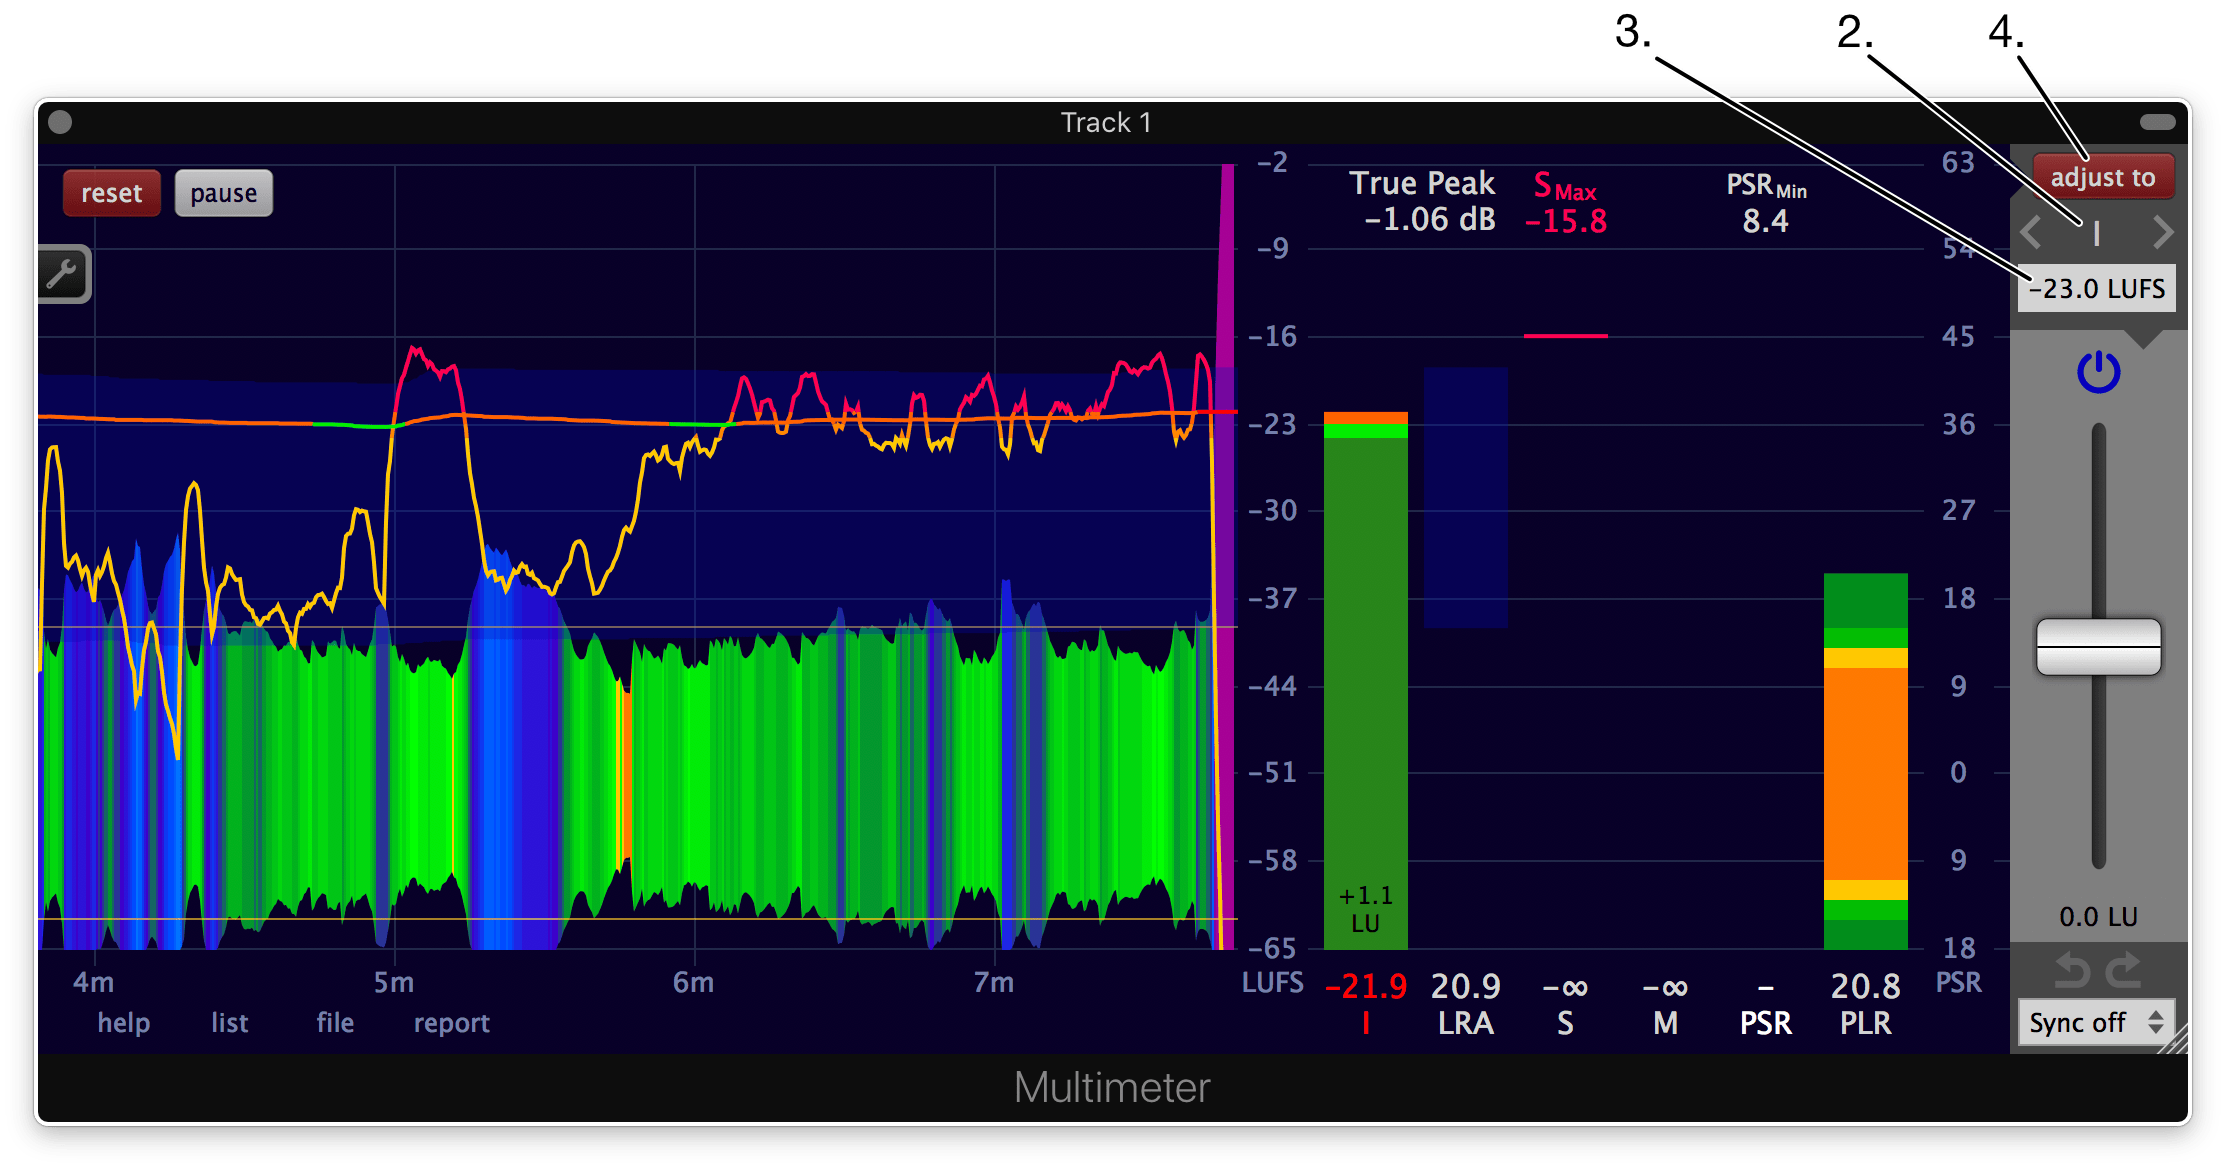
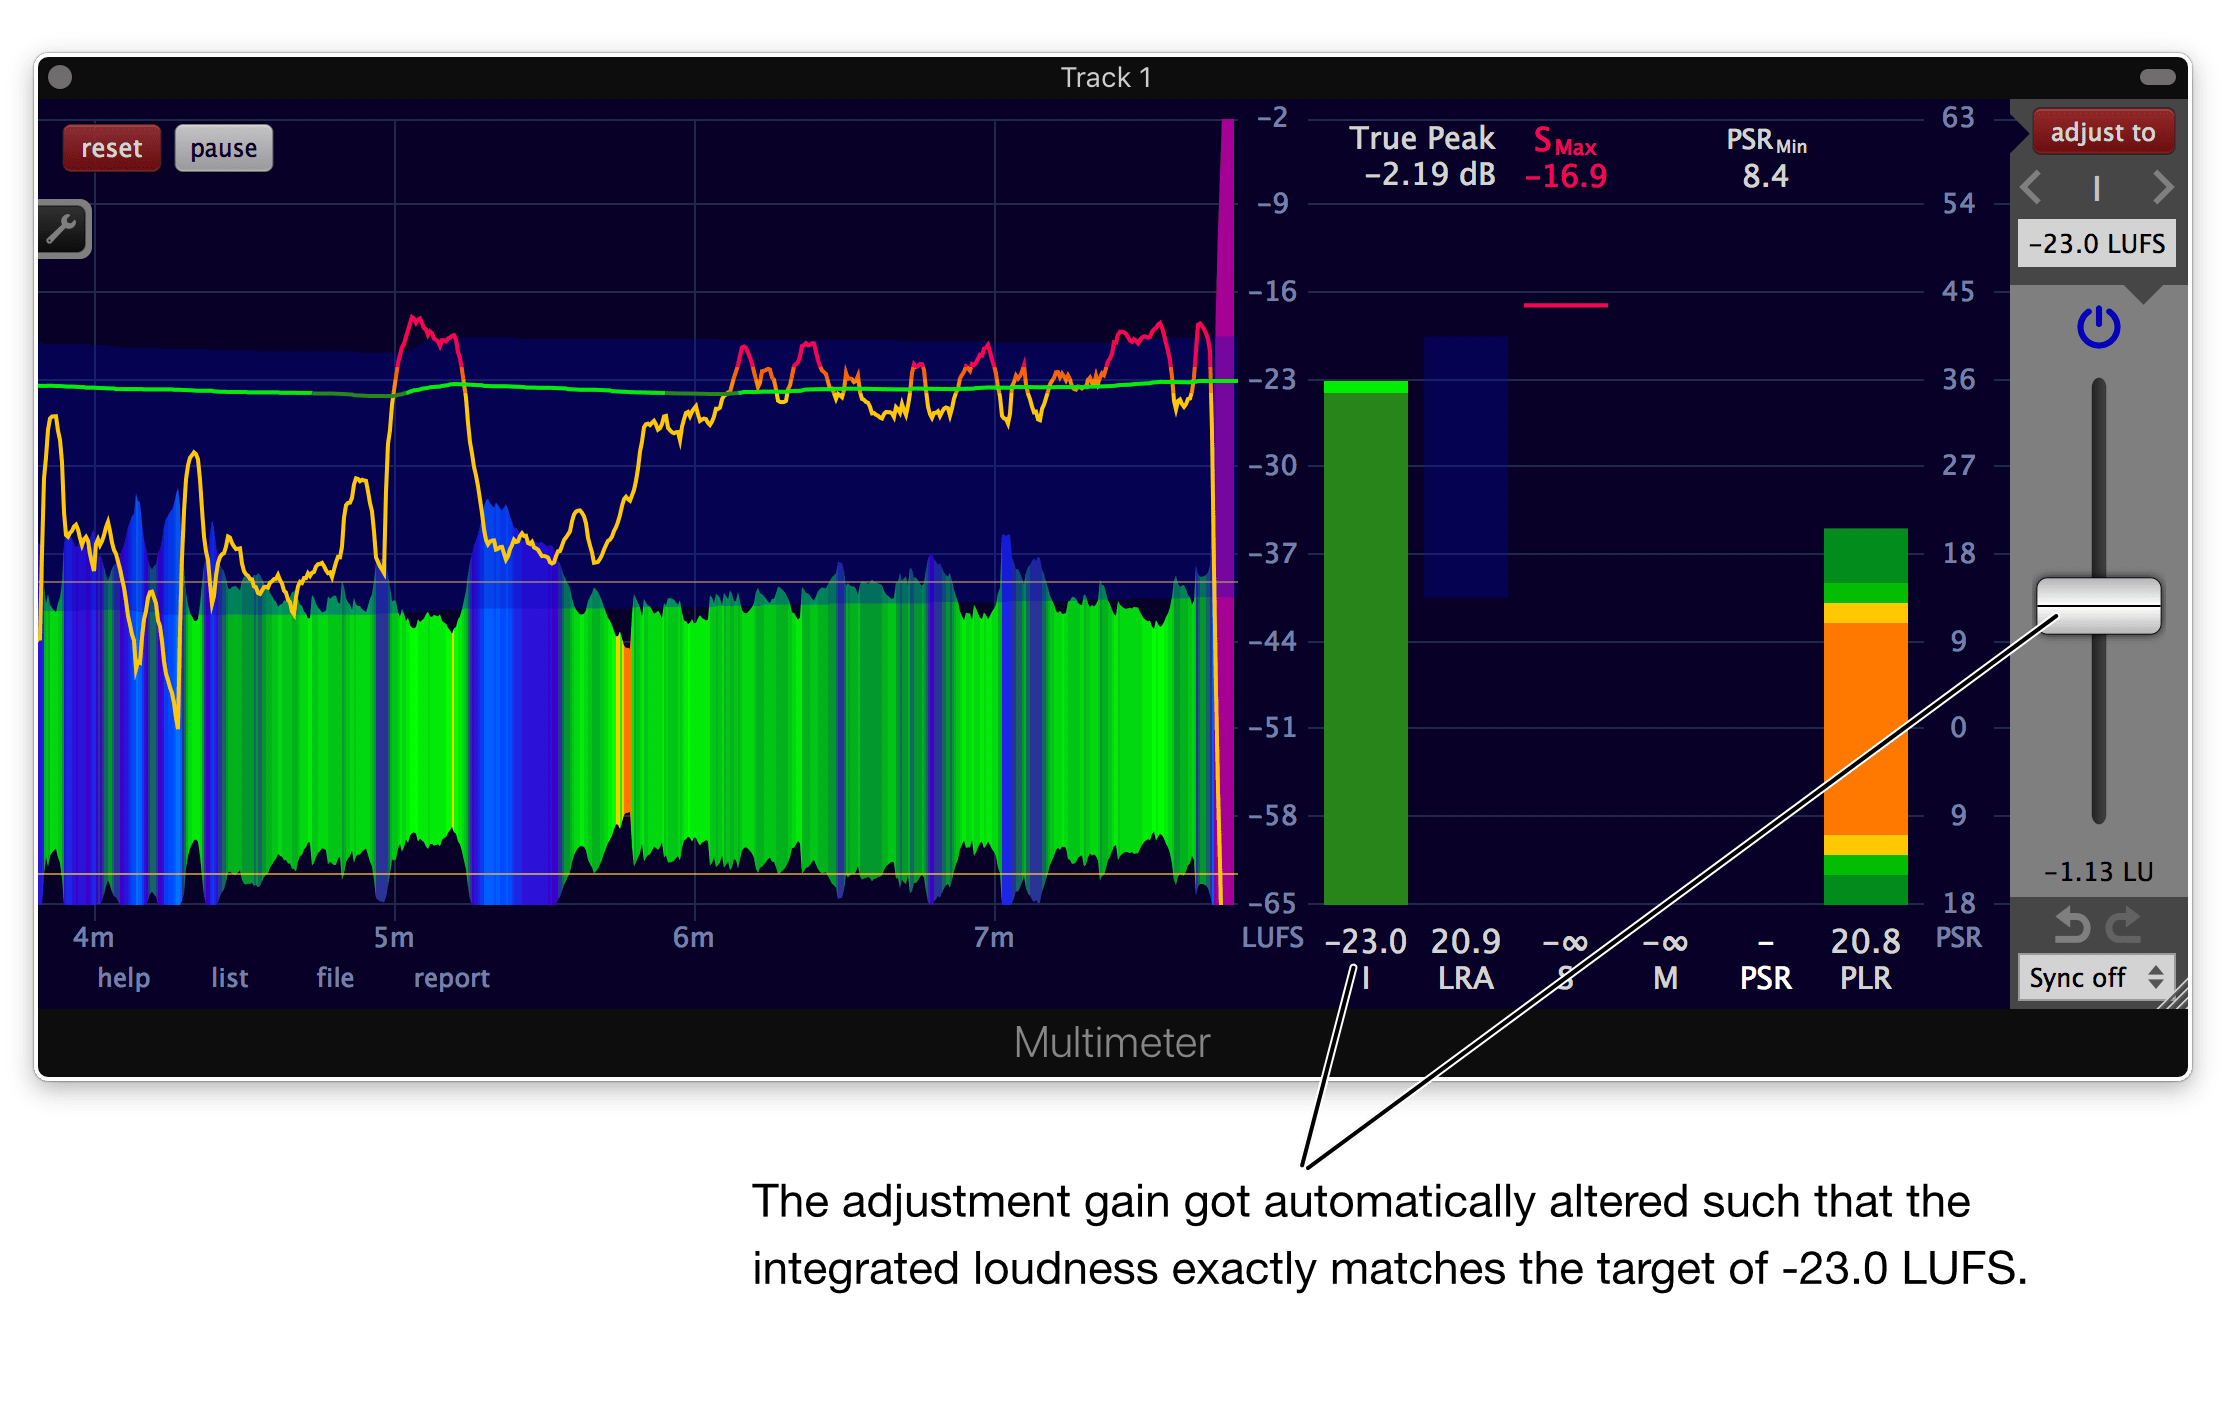
- Choose the desired measurement type (I, S_Max, M_Max or True Peak).
- Set the desired adjustment target.
- Click the 'adjust to' button.
This procedure is also described in a short video.
Many DAWs offer the option to normalise when exporting or rendering an audio file. Make sure to disable this normalisation to preserve the loudness.
Measure and adjust as fast as possible in a DAW (offline processing)
Like every plug-in in a DAW (using the common VST, VST3, AAX or AU plug-in specification), the Multimeter can't access the entire audio content of a track at once. It only can "hear" the audio at the current playhead position.
Because the entire audio content has to pass through the Multimeter in order to get the integrated loudness, measuring the loudness with a plug-in in a DAW is quite slow (realtime).
Luckily, in almost every host passing audio through the Multimeter can be accelerated tremendously by using a faster-than-realtime offline processing option, often called 'render to disk', 'bounce', 'export' or 'freeze'.
In Pro Tools, the Audio Suite version of the Multimeter is very handy for offline processing.
In Logic, use one of the options available under File -> Bounce.
In Reaper, use File -> Render... or press Command-Alt-R (Mac) or Ctrl-Alt-R (Windows and Linux).
Videos:
Measure a file
The Multimeter can measure wav, flac, mp3, m4a and many other audio files and even some video files (the ones macOS or Windows provide to 3rd party applications). Such an offline measurement will be hundreds of times faster than a measurement done in a DAW in realtime.
1. Drag and drop the file over the interface of the Multimeter. Or use the 'file' button at the bottom left of the Multimeter.

2. A confirmation dialog will appear if Settings -> Misc -> 'Show file measurement confirmation dialog' is enabled. Click 'Continue'.

3. After the analysis, the measurement results will be displayed.
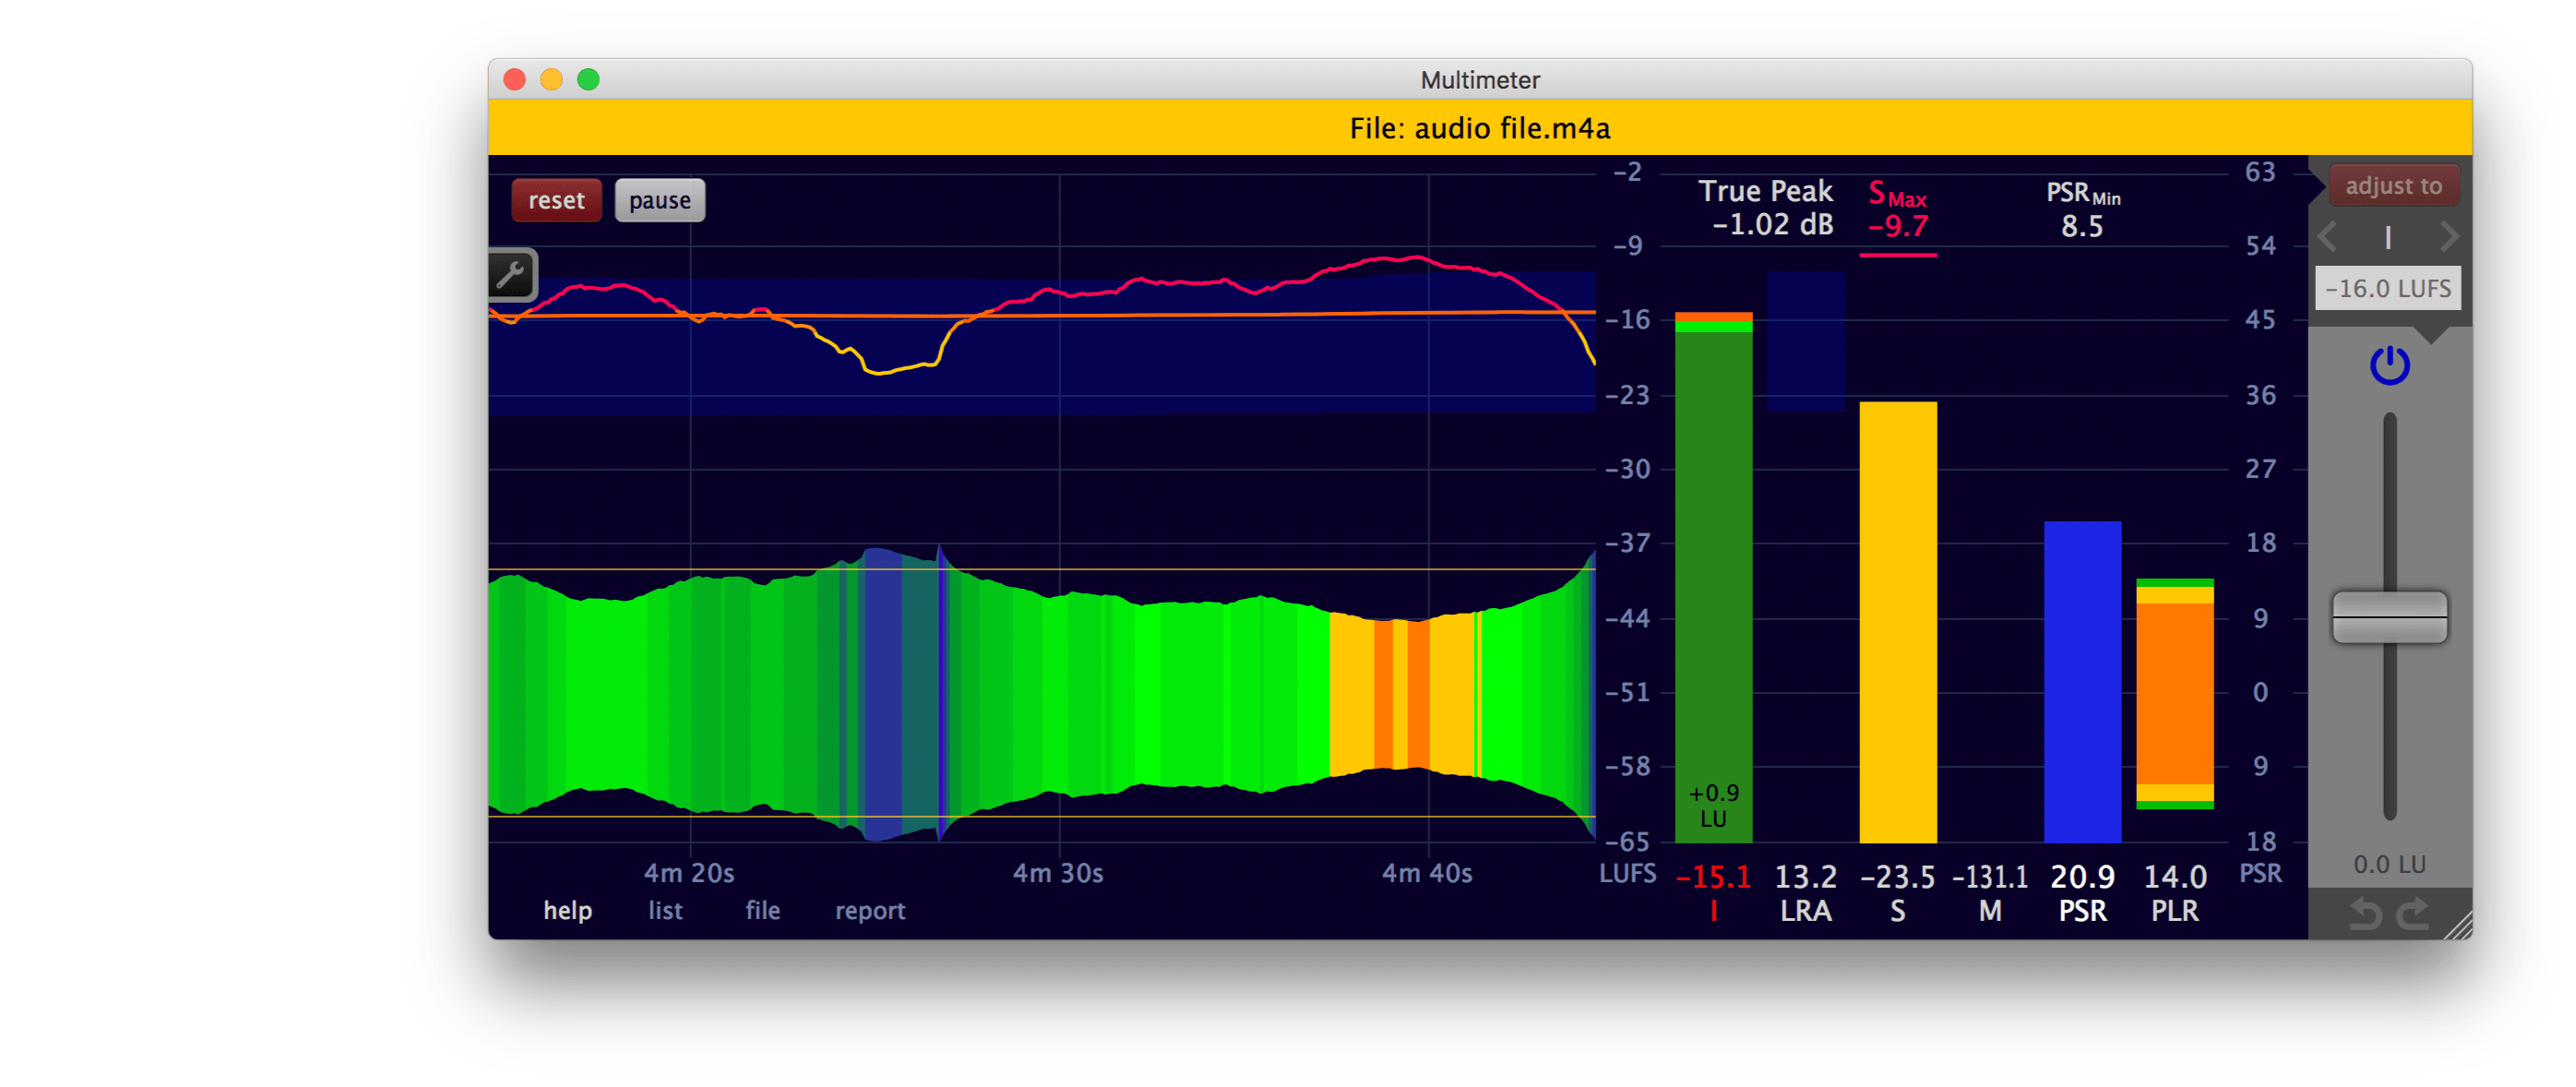
The Multimeter doesn't alter a file at all. To highlight this, the adjustment section on the right is disabled after a file measurement.
Save a measurement report
Click the 'report' button at the bottom of the Multimeter to save the measurement results in a text file.
To specify which measurement data the report will contain, use the list viewer. Only the visible columns of the list viewer will be written to the report text file. The sort order in the text file will be determined by the sort order in the list viewer as well.
The report is formatted as a 'comma-separated values' (CSV) text file. It can be opened with a text editor, a spreadsheet application like Excel and many other applications.
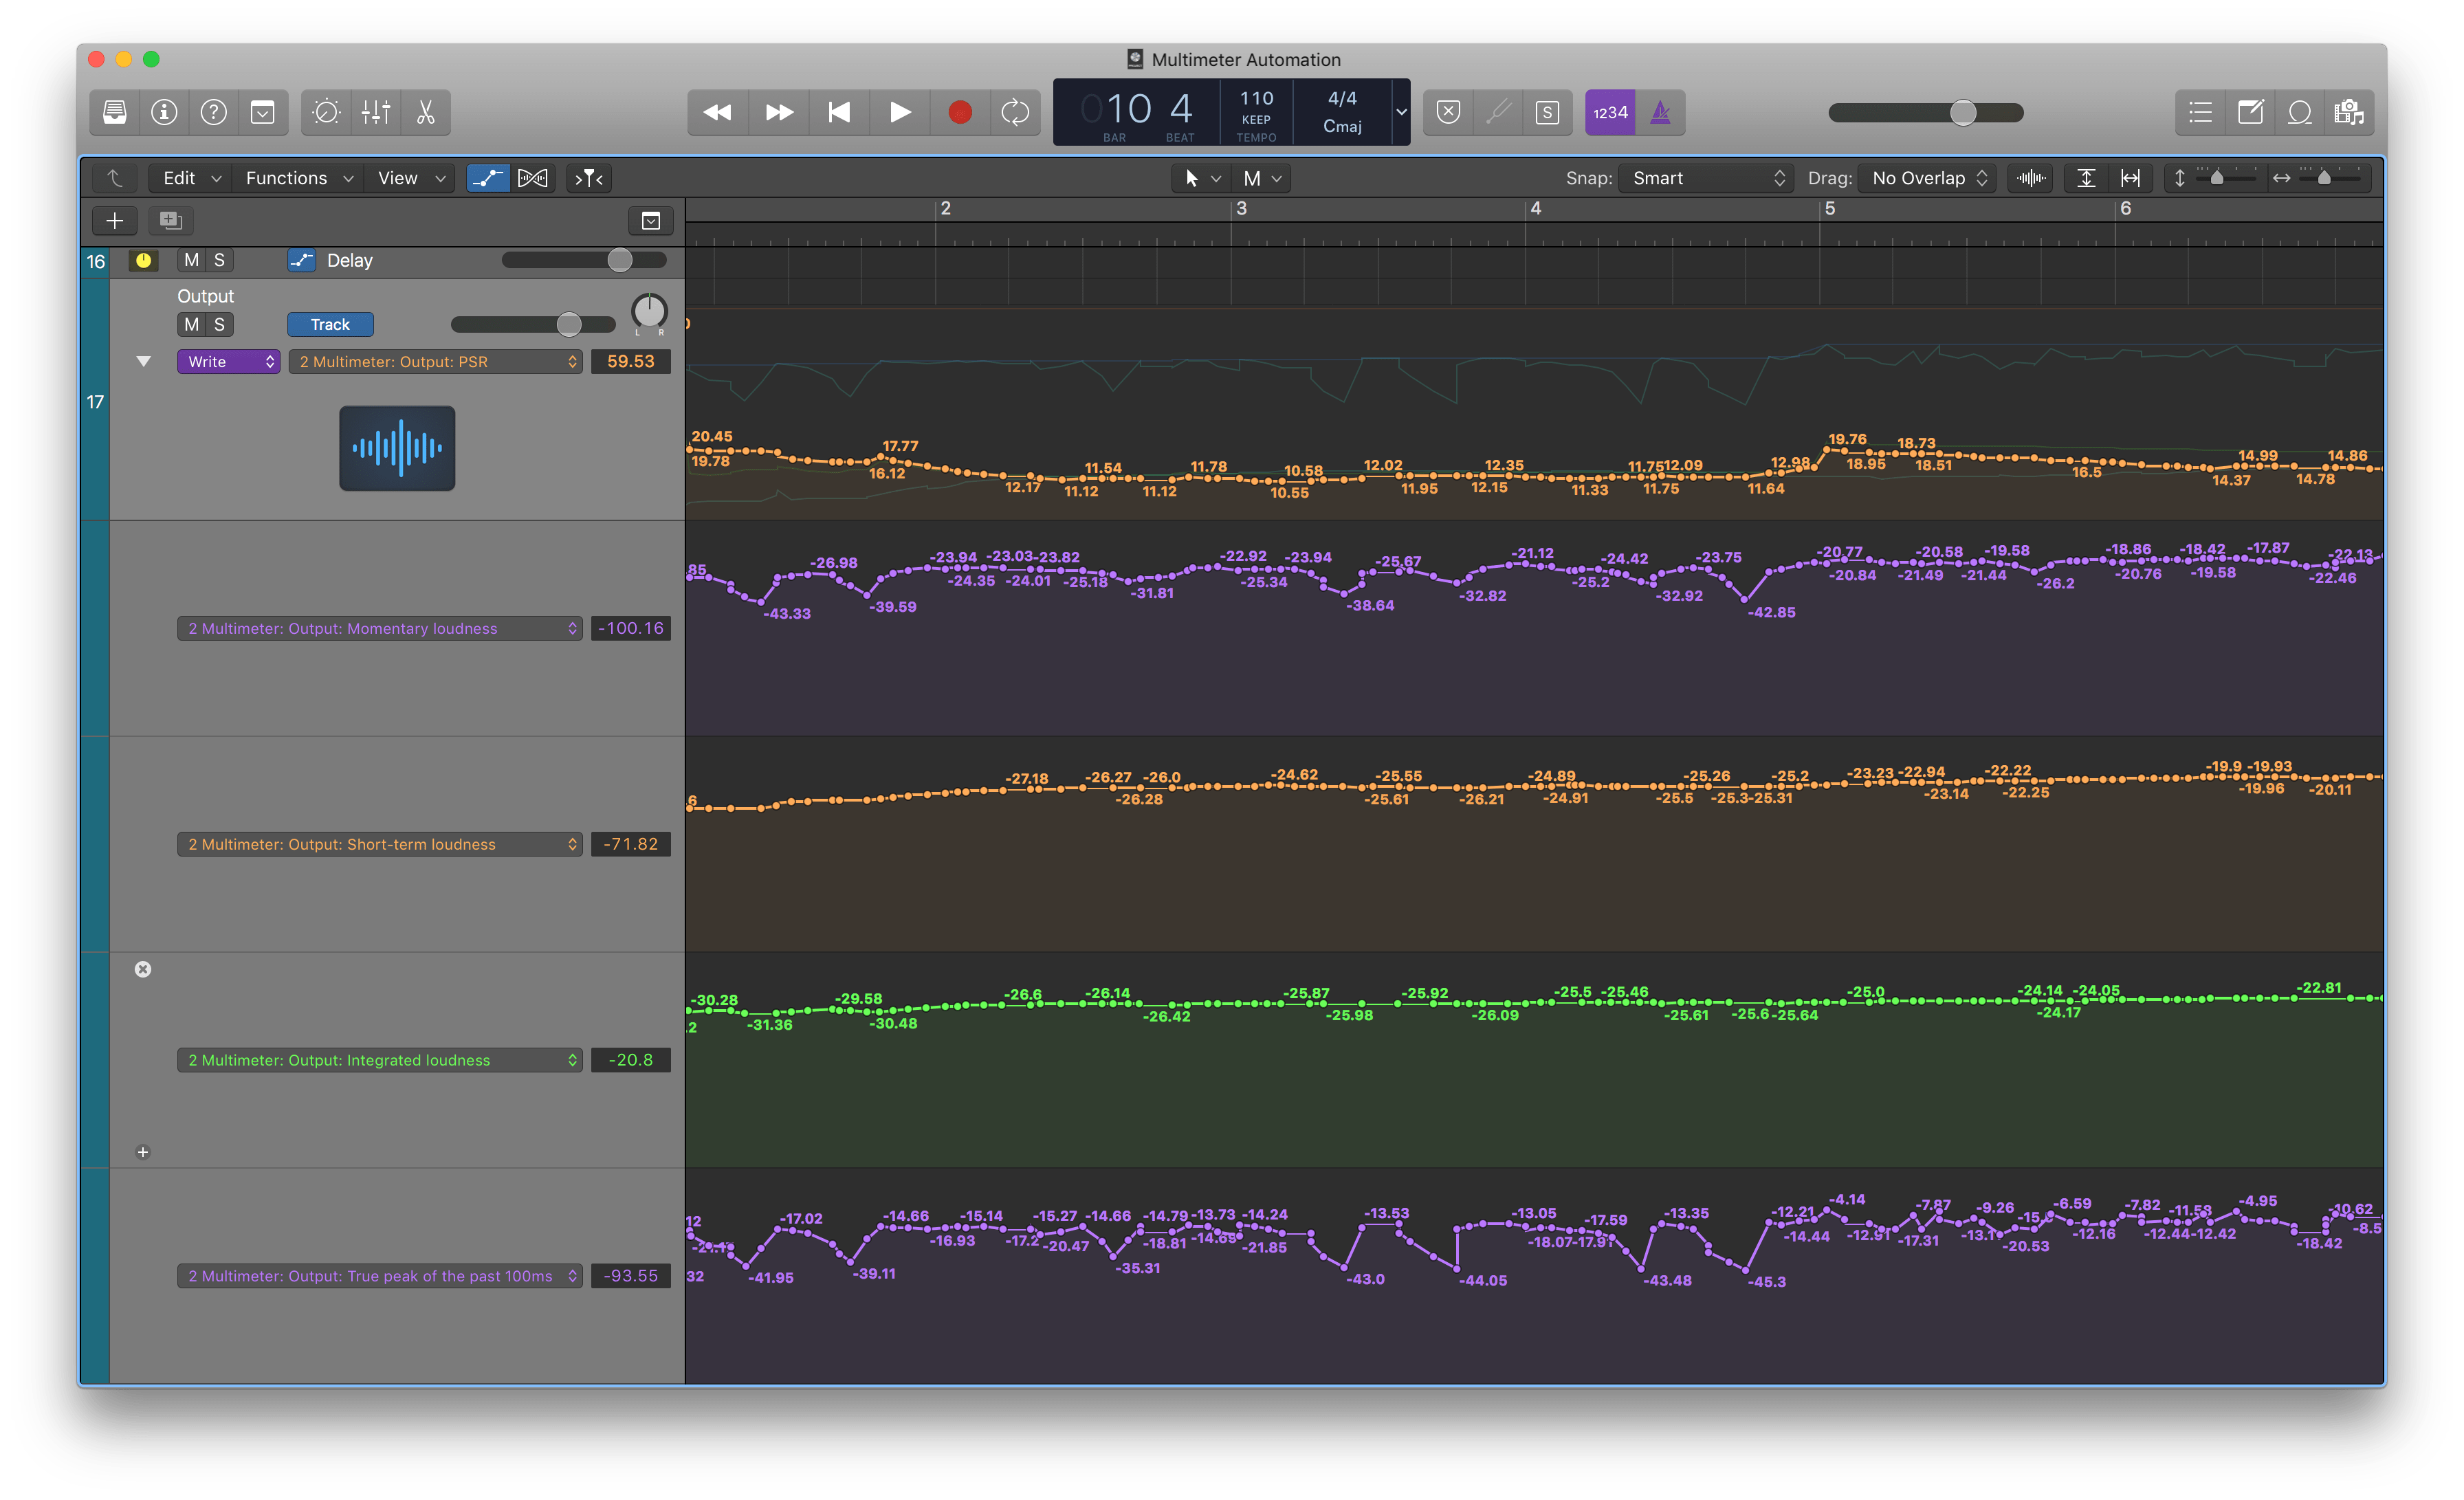
Synchronisation
The Multimeter offers two distinct synchronisation mechanisms. They are available when the Multimeter is used as a plug-in.
- Multiple Multimeters can be synchronised with each other.
- The Multimeter can react to playback changes of the host - like start and stop of the playback.
Synchronise multiple Multimeters (Sync groups)
At the bottom right, a sync group can be selected. It can also be set in the Sync settings.
If multiple instances of the Multimeter belong to the same sync group, clicking the reset button on one of them will reset the others as well. The same goes for the 'pause', the 'adjust to', the 'adjustment power', the 'undo' and the 'redo' button.
To set the adjustment gain to zero in all instances within the same sync group, hold the Alt-key and double click on the adjustment gain fader. Hold the Alt-key and click and drag the adjustment gain fader to simultaneously change the adjustment gain of all instances belonging to the same sync group. Their relative gain differences will be preserved.
In order to work, all synced Multimeters need to be of the same kind. E.g. a VST and an AU Multimeter are not able to synchronise. That's because they don't share any common memory.
Synchronisation with the host
The Multimeter can reset and pause the measurement as well as adjust the loudness automatically when the playback of the host starts or stops. The desired behaviour can be set in the Sync settings.
Create a faders up mix
Introduction
Getting started on a new mix can be time consuming, especially if the project contains a lot of tracks.
A helpful starting point is the initial faders up mix, where all tracks are set to the same loudness, such that all of them can be heard clearly.
Different ways exist to achieve such a faders up mix. One can create it manually by listening and adjusting the levels of the individual tracks until everything sounds equally loud. But this is a time consuming process. Another method is to listen to each track in isolation and adjust it's level such that it aligns with a reference pink noise signal.
The LUFS Meter and the Multimeter provide a third method, based on their unique synchronisation features. This is the fastest way to create a faders up mix. How to do this with the Multimeter is described next.
This procedure is also described in a video.
Step 1. Track faders
Set all track faders to the same position.
It is recommended to set them to unity. Because faders on most DAWs have finer resolution around their zero position.
Step 2. Add the first Multimeter
A Multimeter will be added to each track. Before doing so, only add one Multimeter to your first track. If this track already contains plug-ins, add the Multimeter after the last plug-in.
In the Multimeter, turn off the true peak measurement to save processing power. It is not needed for this application. Also enable synchronisation by choosing a sync group.
Either set these two options manually, or choose a preset
like the 'faders-up mix, I & S', where these two options are
already set correctly for this application.
Step 3. Copy this Multimeter to the other tracks
Copy this Multimeter to the remaining tracks. Insert it after the last plug-in on each track. Since you copy it, all Multimeters do belong to the same sync group.
Step 4. Measure the entire project
Open one of the Multimeters and click the reset button. Because of the enabled synchronisation all other Multimeters will also reset.
Play the project from start to finish, such that each Multimeter can measure the audio of its track. This can be accelerated by utilising the offline processing capabilities of your DAW.
Step 5. Adjust all tracks at once
Press the 'adjust to' button on one Multimeter. All other Multimeters will also adjust their corresponding track.
The faders up mix is now created.
To turn off the measurement of all Multimeters, press the pause button. Now the Multimeters operate as simple gain plug-ins with a neglectable hit on your processor.
If the sum of all tracks is too loud or is clipping the master bus, either
- Lower the adjustment target on one of the Multimeters and click the 'adjust to' again. No need to re-measure. This works because the adjustment target also is synchronised between all instances of the Multimeter belonging to the same sync group.
- Turn down the level of the master track or insert a gain
utility at the beginning of the plug-in chain on the master
track and turn its gain down. This works without any
clipping in the signal path, because all DAWs known to
Klangfreund work with huge headrooms internally.
(In need of a gain utility? If pause is enabled, the Multimeter is a nice gain utility that uses virtually no ressources of your computer.) - Turn down all track faders by the same amount.
Undo and redo
This is optional. You might want to compare the mix before and after the adjustment. To do so, click the undo button below the adjustment gain. All adjustment gain faders of the synchronised Multimeters will jump back to their position before the 'adjust to' button was clicked. Now you can listen to the mix before the gain adjustment of the synchronised Multimeters is applied. Click the redo button on the right of the undo button and you are back at the faders up mix.
This works because Klangfreund has developed a unique undo history for the Multimeter capable of keeping track of an arbitrary amount of synchronised instances of the Multimeter.
Re-adjust while mixing
After the faders up mix you most likely will use the track
faders to find a sweet loudness balance between the different
tracks. Lets call this state SLB.
This SLB wont last long. As soon as the dynamic of a track
gets changed or if some equalization is applied, the tracks
loudness will also change and the SLB is destroyed.
If only one track was altered, manually adjusting the track fader (or a gain plug-in somewhere before the Multimeter) is the fastest way to get back to the SLB.
But if multiple tracks have been changed it might be faster to reinvoke the Multimeters and to let them do the adjustment. To do so, turn off the pause, push the reset button, play back the entire project and click the 'adjust to' button again. Because the track faders are still in the SLB position, this will result in the SLB again.
Judge effects effectively
If not in a hurry, an audio engineer can easily spend hours building and tweaking effect chains on a single audio track to achieve a mind blowing sonic masterpiece (Or more realistically, to fix a poor performance or a bad recording..). During this process it is essential to continuously compare the unprocessed signal (before the effects) with the processed signal (after the effects). No one wants to get a worse sounding result after all the effort.
But there's a catch. If an effect slightly degrades the audio quality, but at the same time increases the loudness, it is perceived as better sounding - A psychoacoustic effect one needs to take into account. Luckily there exists a countermeasure to not be fooled: Adjust the unprocessed and the processed signal to the same loudness before performing the critical listening camparison. The Multimeter comes in handy for this task.
...in Reaper
For the sake of simplicity, the project shown here only contains one track with one effect.
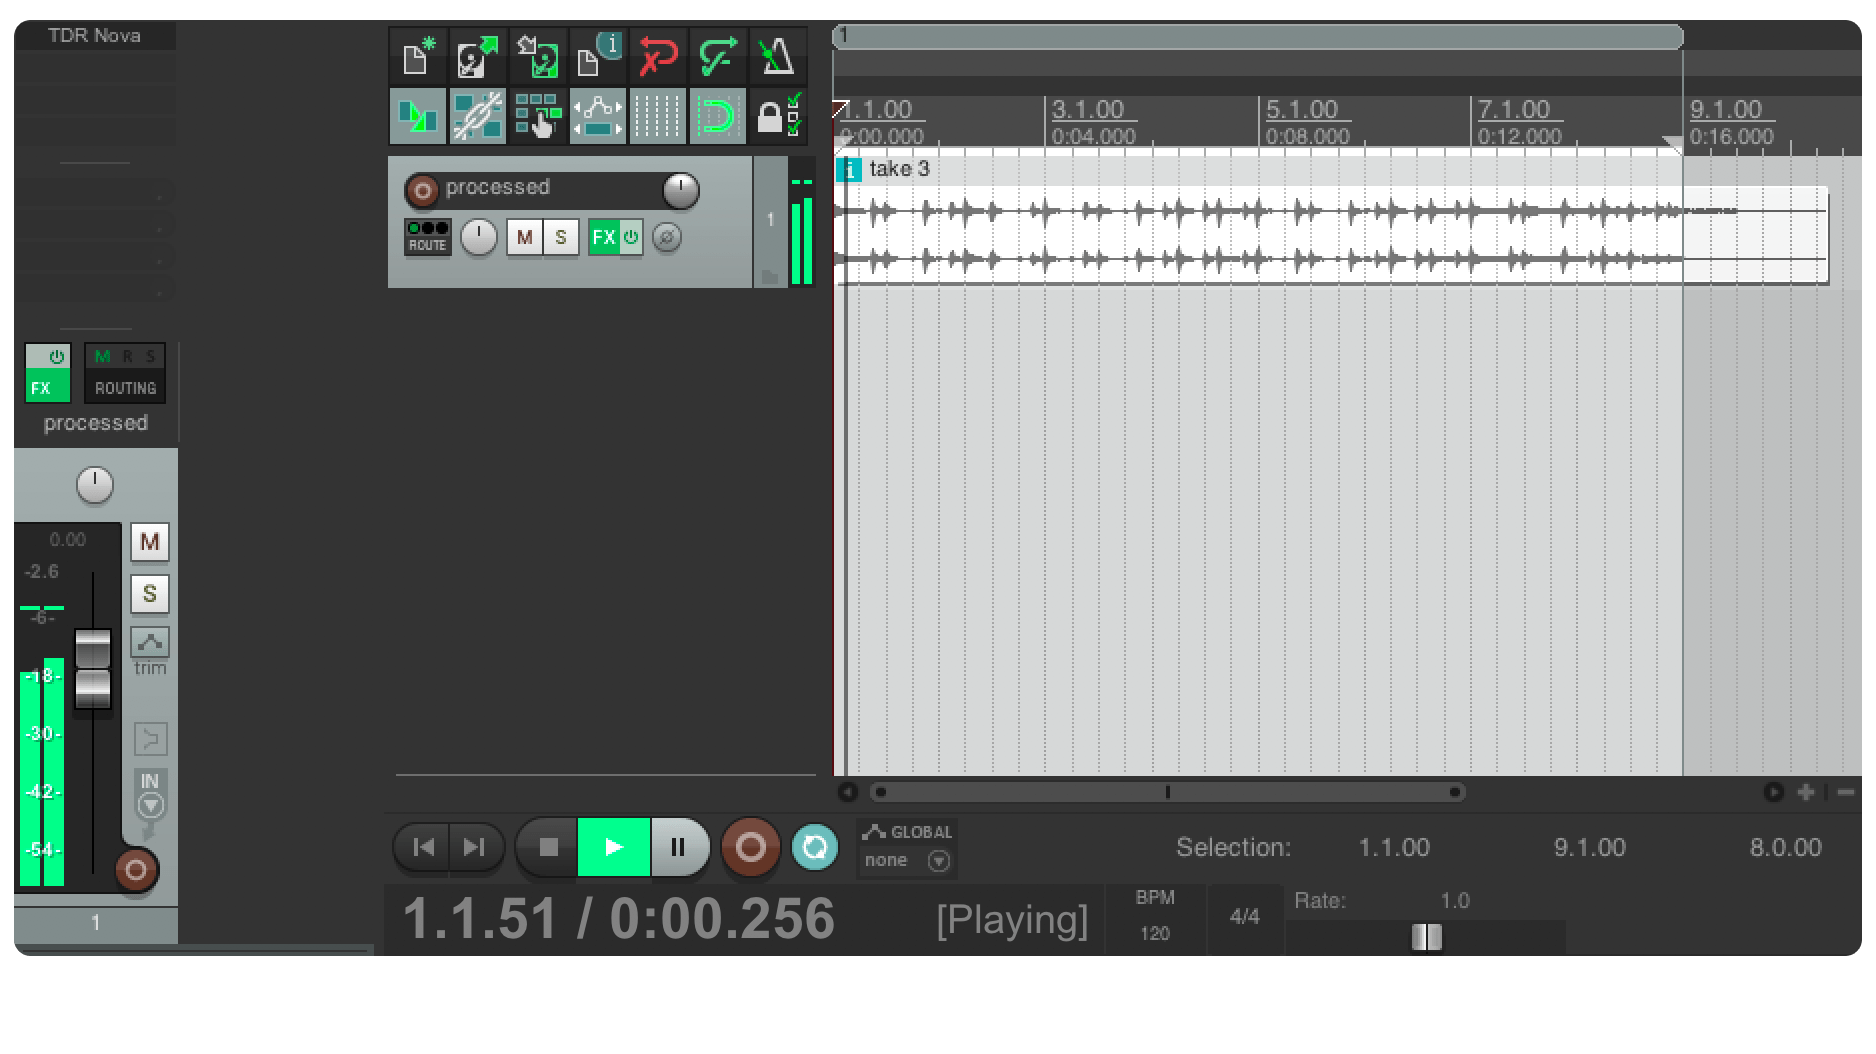
Add a second track by double clicking below the current track (Named 'clean' in this example).
Route the audio of the first track to the second by grabbing the route icon of the first track and drop it over the second track. A pop-up window appears where you can choose at which position of the first track the audio should be taken. Choose 'Pre-FX', such that the second track will receive the unprocessed audio.
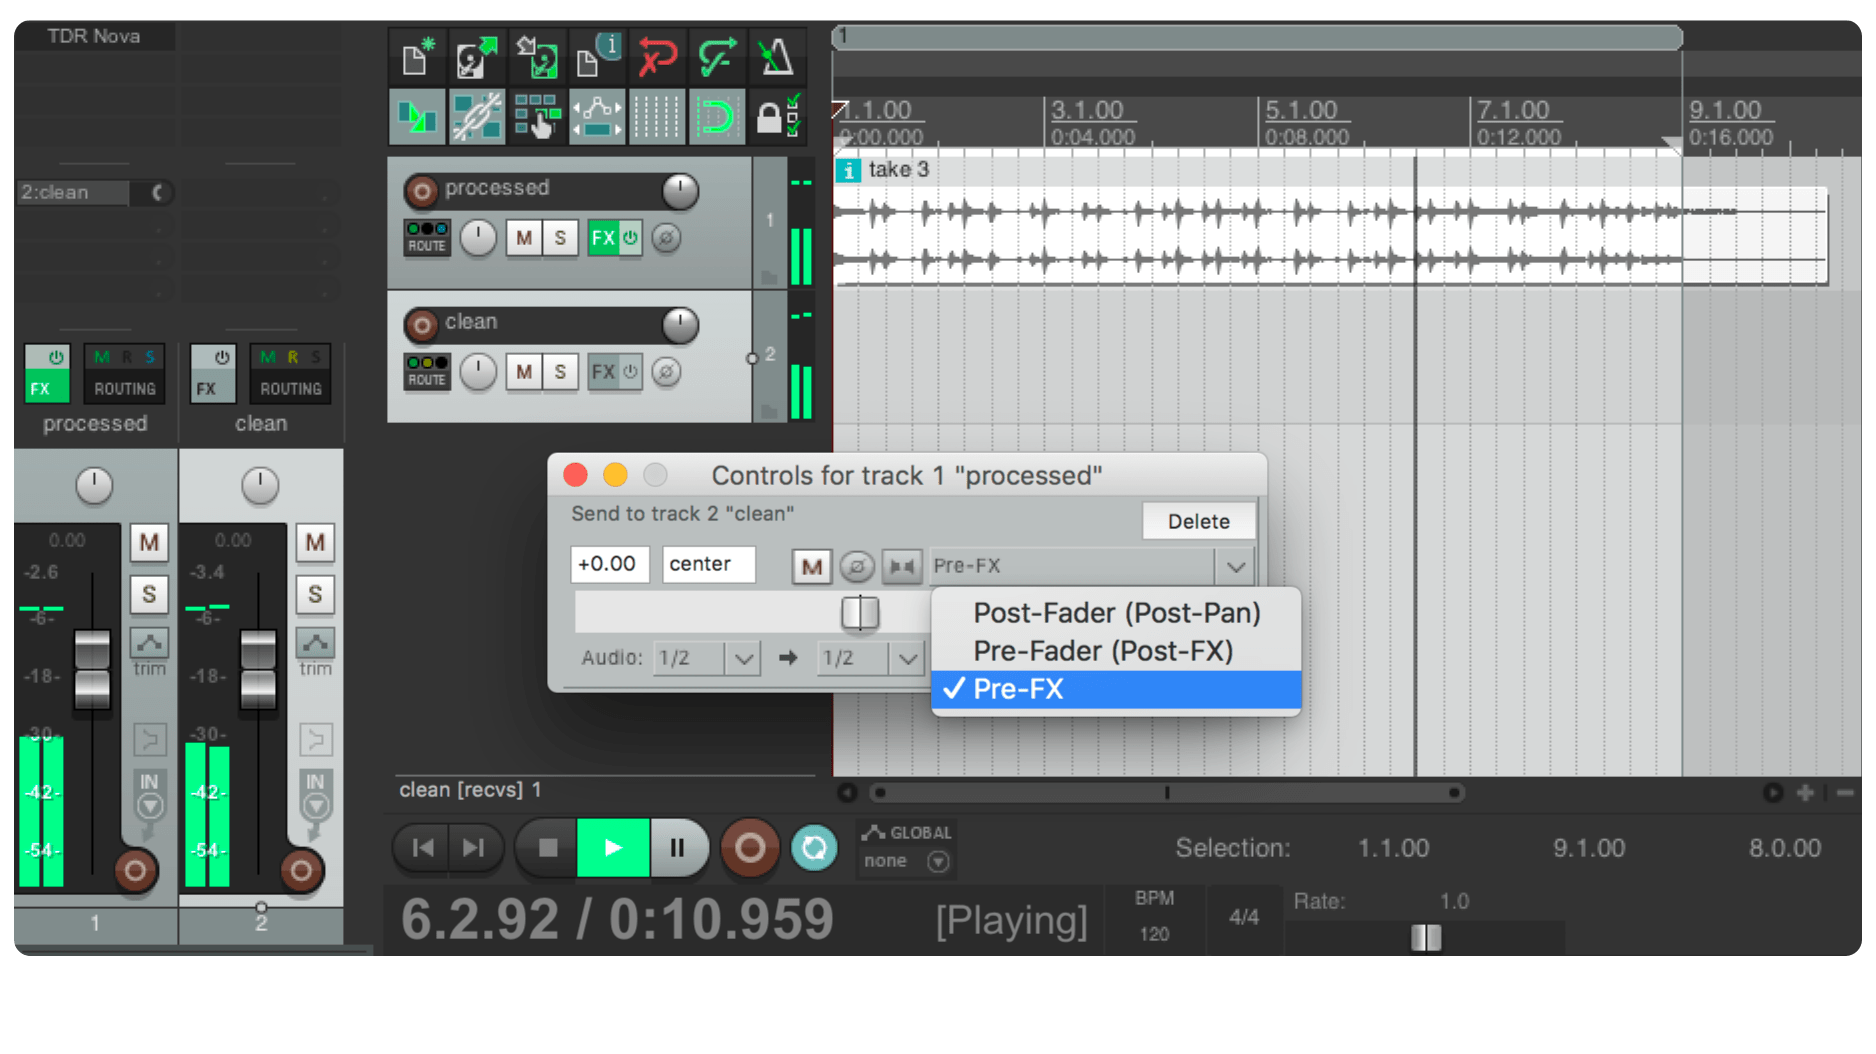
Close the pop-up window and add a Multimeter to your first track. It needs to be the last effect on that track for this application. Enable the synchronisation of the Multimeter by choosing a sync group.
Drag and drop the Multimeter from the first track to the second track. This will create a copy of the Multimeter with the same settings as the first one. In particular: Both belong to the same sync group.
The first Multimeter now receives the processed audio (In this example by the TDR Nova plug-in) and the second Multimeter receives the unprocessed audio.
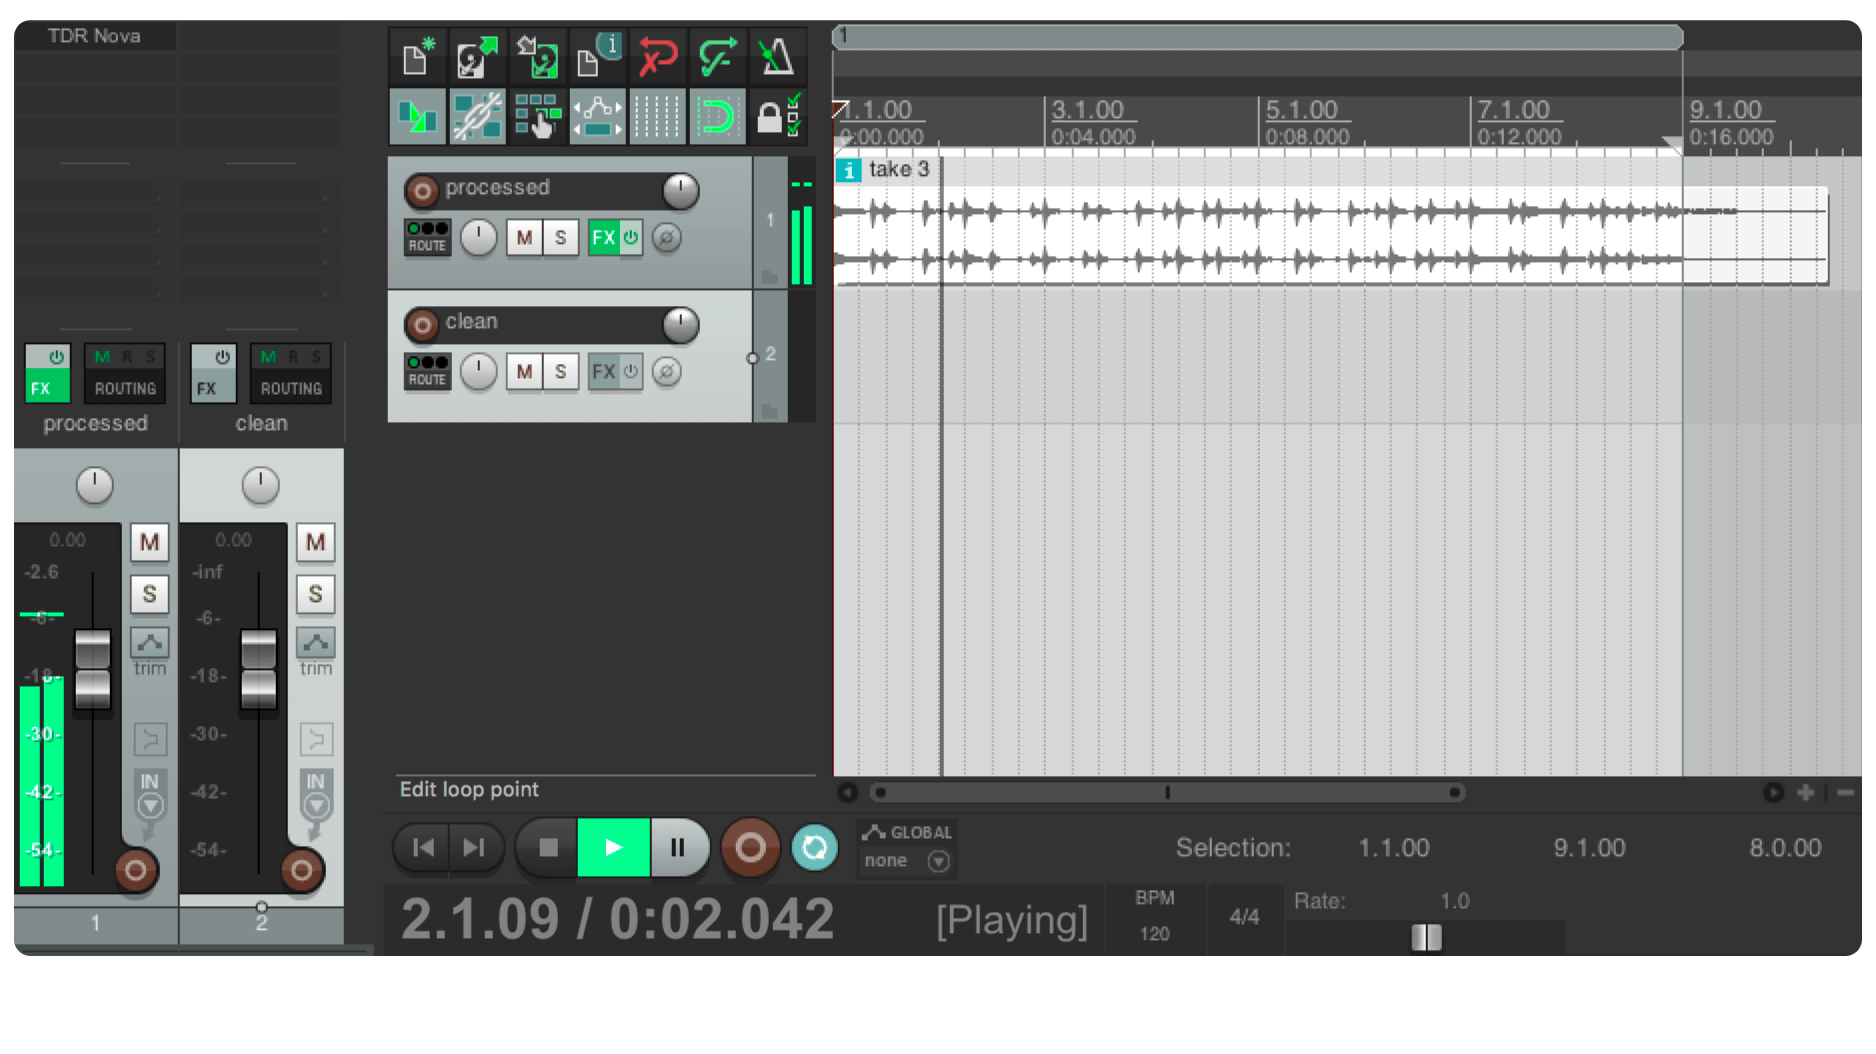
Measure and adjust the loudness with one of these Multimeters (the loudness target for this application can be chosen to personal taste). Because of the enabled sync feature the first as well as the second track are now loudness adjusted. Or stated differently, the clean as well as the processed track are now equally loud. To hear both tracks at an equal loudness, make sure that the channel fader of the second track is at the exact same position as the first one.
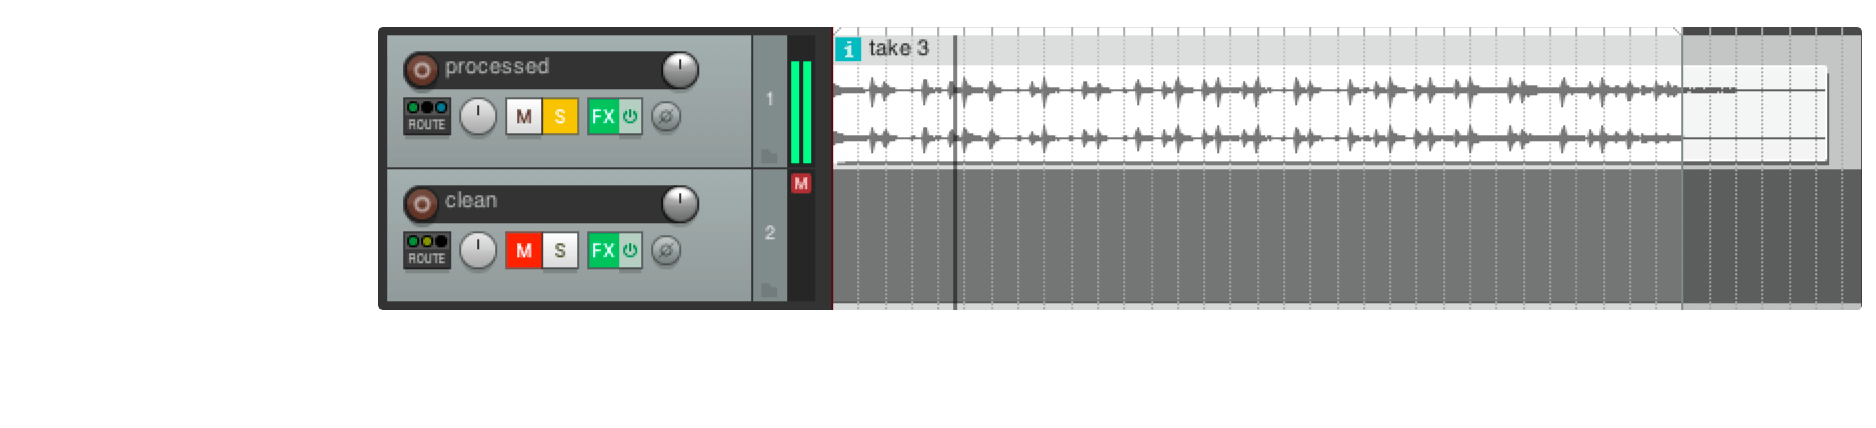
Now you are able to compare the processed and the clean signal by listening exclusively to each of these two tracks using the solo buttons (Hint: Click the S button while holding the Command/Ctrl and the Alt key. This will un-solo every other previously toggled solo button).
There is one caveat in Reaper. If you solo the first track, you will also hear the second one, even if the solo button of the second one is not lit. To avoid this, click the mute button of the second track.
This is how to listen to the processed signal:
And this is how to listen to the clean signal:

... in all hosts
The goal is to compare the signal before the effect(s) with the signal after the effect(s) at the same loudness. Here are some ideas on how to achieve this:
If your host supports it, route the (dry) pre effect signal to an empty track. This is actually exactly what has been described in the previous section for Reaper.
Another strategy is to add one Multimeter before your effect(s) and a second one after the effect(s). Don't synchronise these two Multimeters. Create an effects group containing the effect(s) and the second Multimeter. Analyse and adjust the loudness with the first Multimeter. Repeat this with the second Multimeter (contained in the group). The output of boths Multimeters are now adjusted to the same loudness. Via the bypass (on/off) toggle of the group you can now listen to the dry as well as to the processed signal.
A third option, applicable in all hosts:
Add a Multimeter after the effect(s). Duplicate the entire
track with all the contained regions and effects. Remove the
effect(s) you wan't to judge from the duplicated track but keep
the Multimeter. Adjust the loudness of both tracks by
using the Multimeters on each track. Now you can
solo one of the tracks, listen carefully, solo the other track
and listen again. Toggle back and forth as many times as you want
to figure out if the effect(s) make your track sound better or
worse.
Compare your work with reference tracks
To achieve beautiful results it's crucial to compare your work with reference tracks while you are working on it.
A proven strategy is to bounce/export your work to an audio file and put it into a new project. Together with some reference tracks, each one on a separate audio track. Use the solo feature of your DAW to listen to the individual tracks. Take notes about possible improvements in your own work. Go back to your original project and work on these issues.
There is one catch though. A slightly louder track sounds better to the human ear - Even without detecting it is louder. That's why it is important that all the tracks in the comparison are equally loud.
To adjust your work and all the reference tracks to the same loudness, proceed exactly as described in the chapter Create a faders up mix. The only difference is that this time you will listen to the individual tracks in separation - via the solo feature of your DAW.
Comply with a high loudness target
The original idea of using a low integrated loudness target like -23 LUFS is that there is plenty of headroom available, such that a limiter on the master bus is only rarely triggered.
Though for some applications, like music listening on mobile devices, targeting a higher integrated loudness might be required, for example -16 LUFS. A lot of material adjusted to -16 LUFS will have its true peak exeeding 0 dB(TP) which can result in audible clipping in the final audio file. This section describes how to use the Multimeter in conjunction with a limiter to reach an integrated loudness of -16 LUFS and a true peak of -1 dB(TP) or below.
The stock limiter 'MGA JS Limiter' in Reaper is used here, but any limiter will do. Be prepared to spend some time tweaking the parameters to get a pleasing sounding result. Also try different limiters, they often sound quite different.
Initial analysis
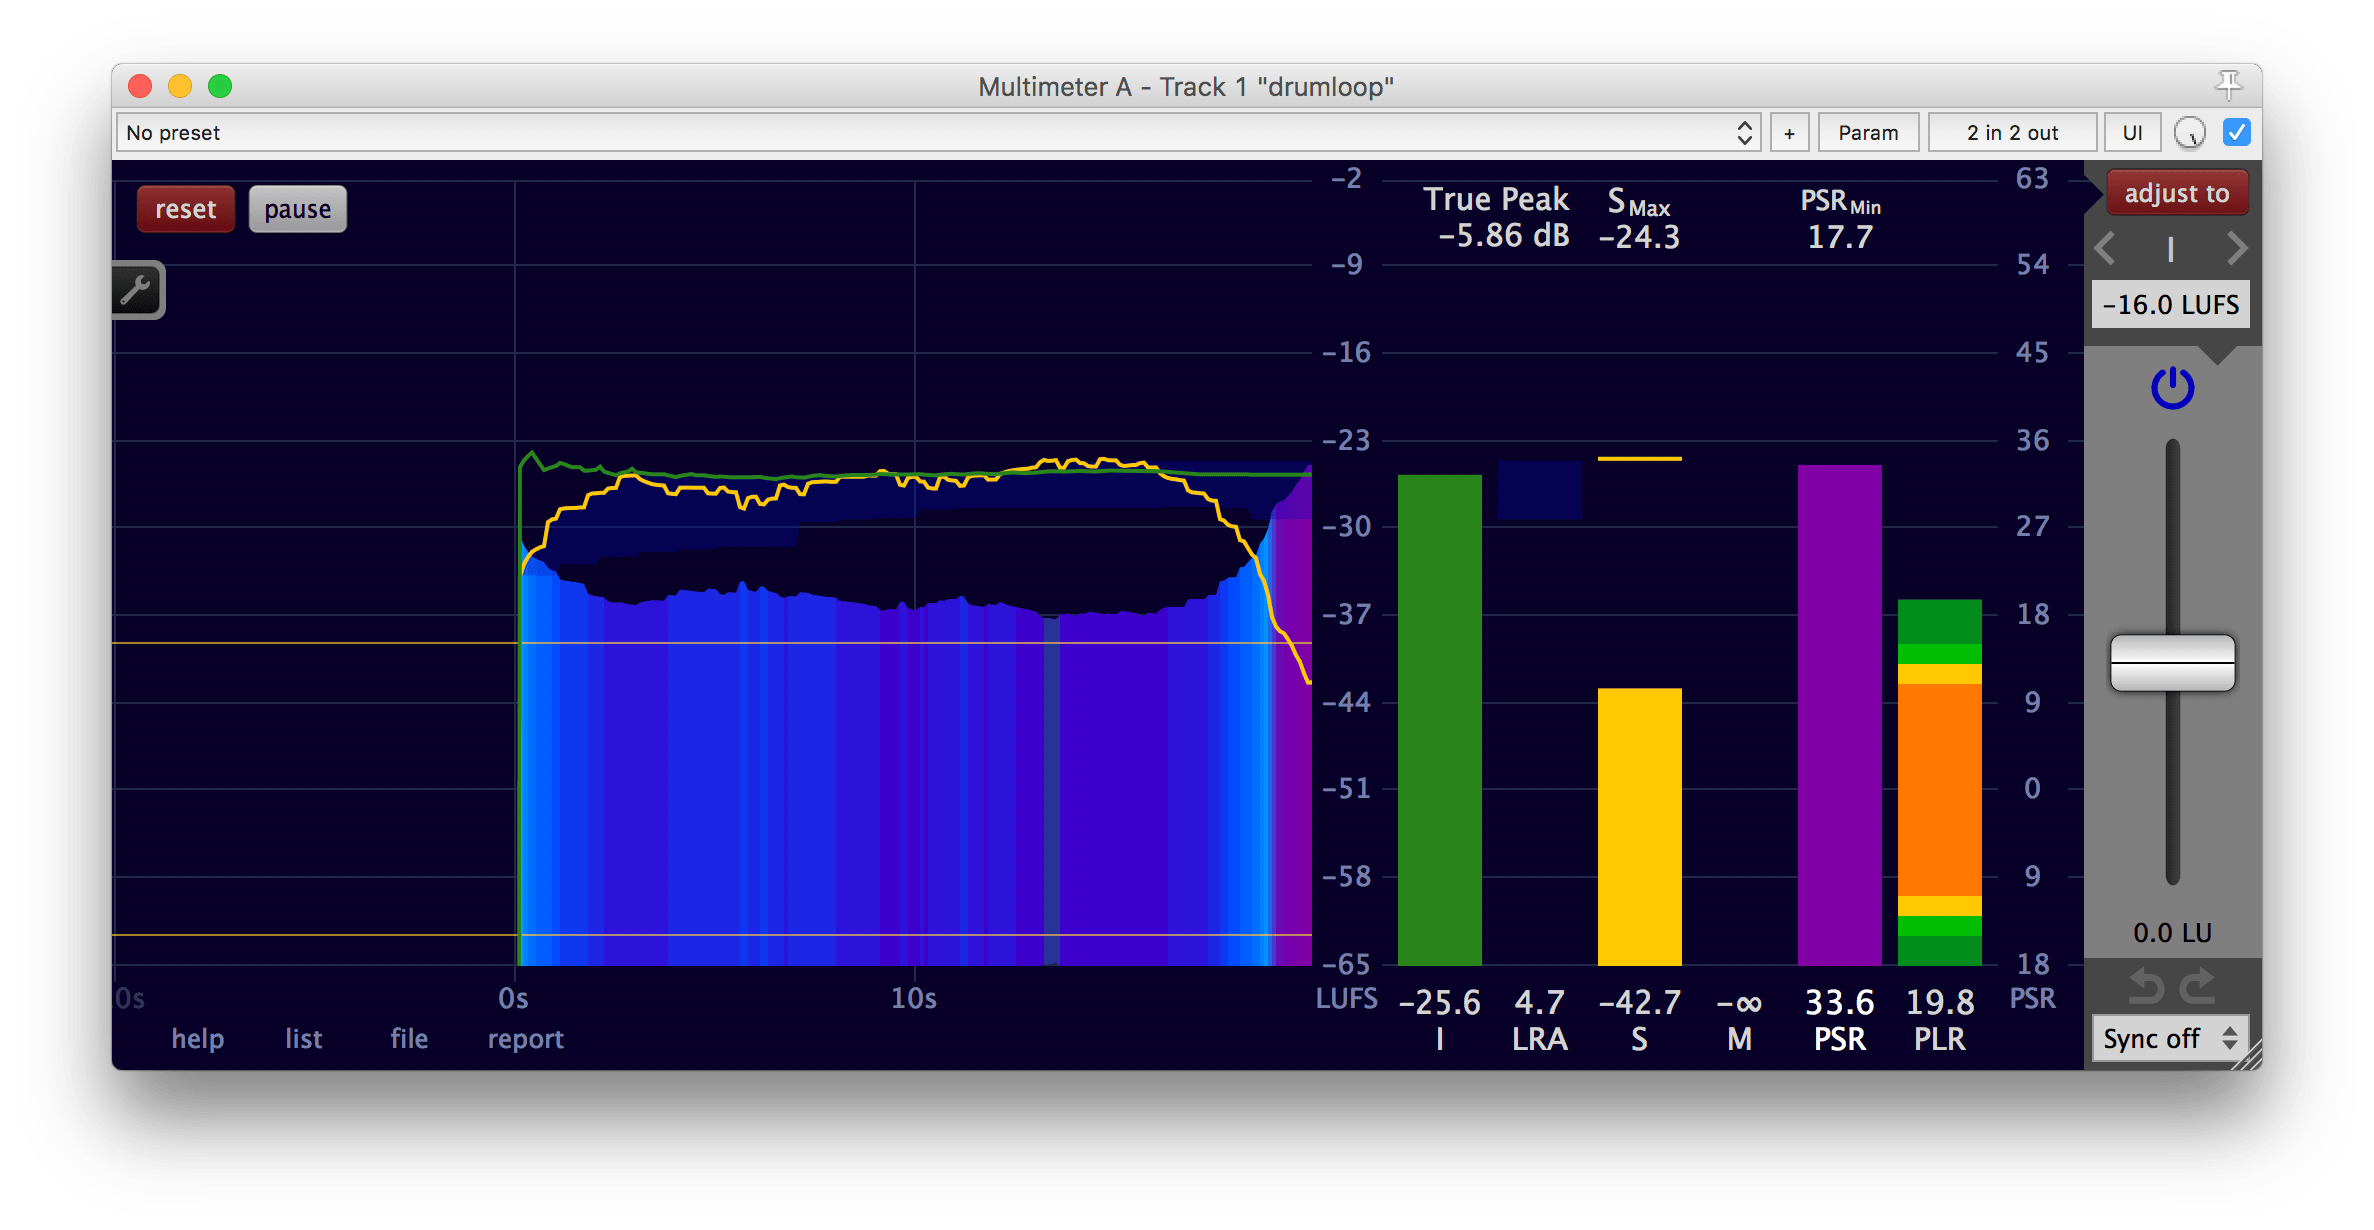
To follow along you can download the drumloop used in this example.
Load the drumloop in your DAW and add a Multimeter to its track and measure it. You can speed up this process by utilising the offline processing capabilities of your DAW.
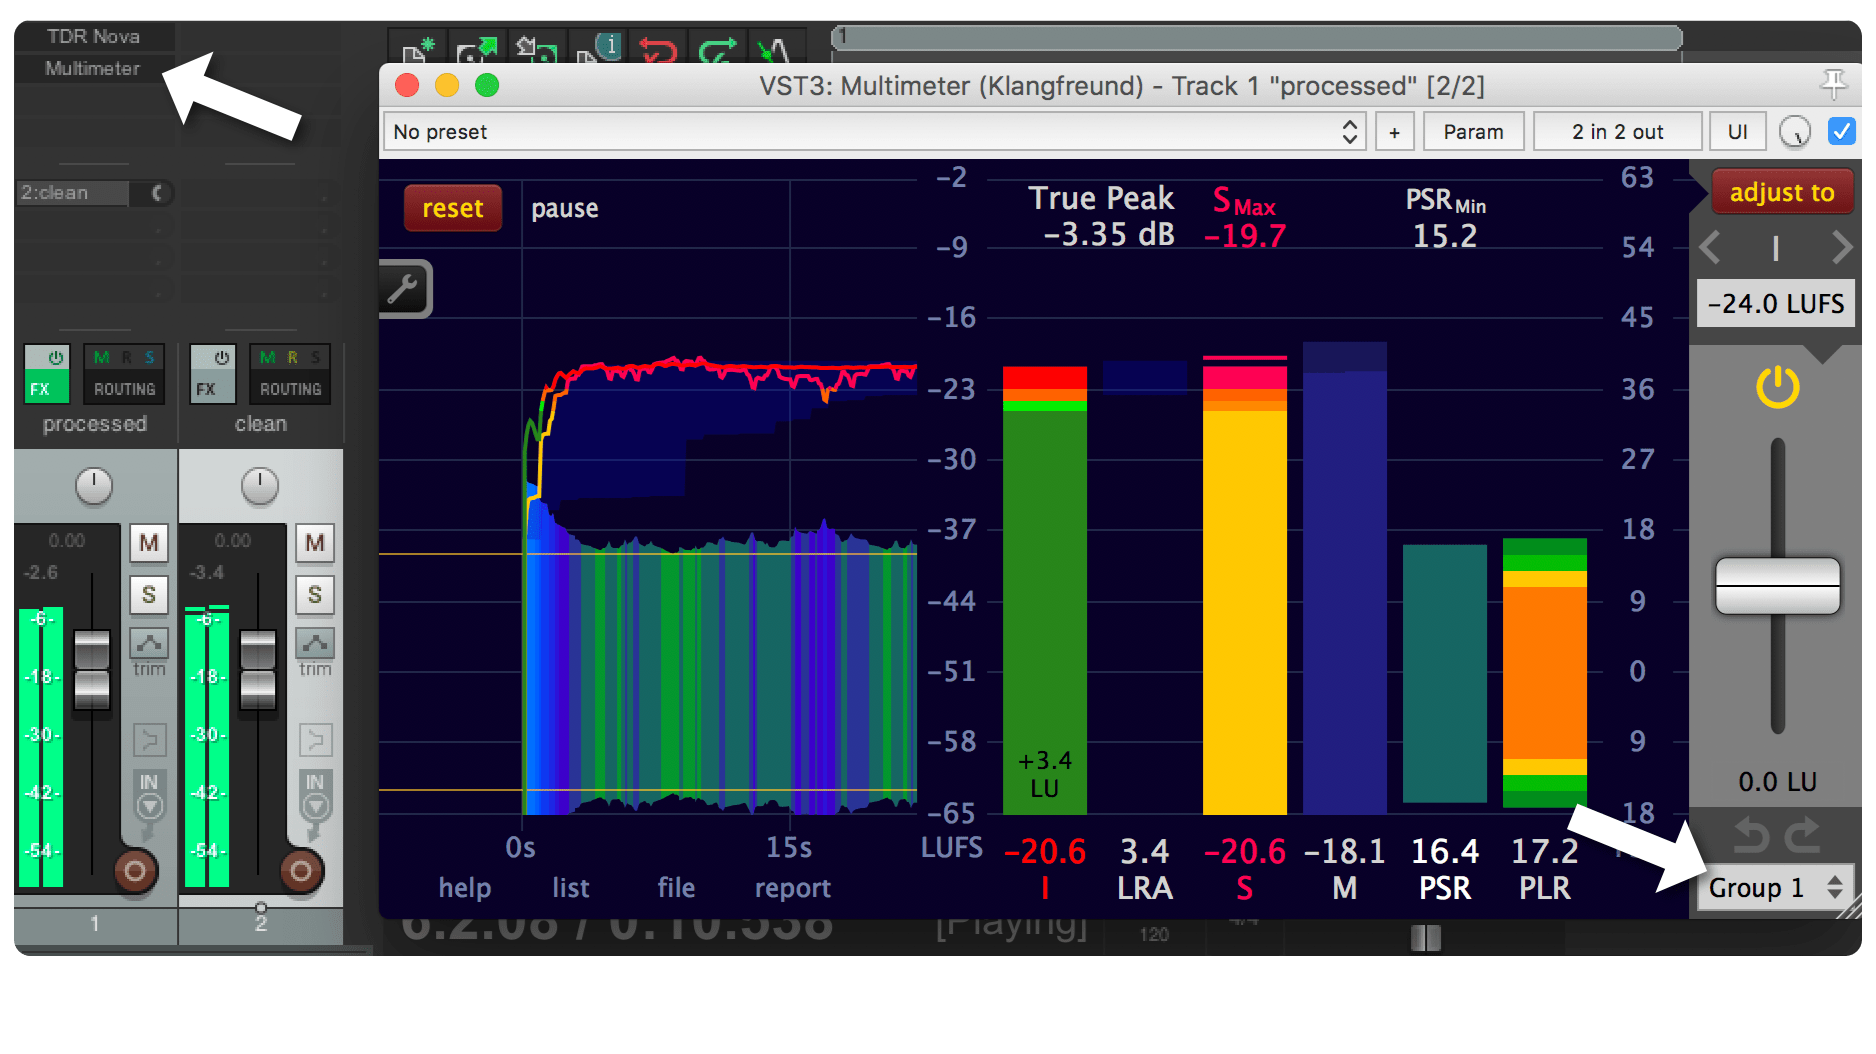
The Multimeter reveals that this drumloop has an integrated loudness of -25.6 LUFS and a true peak of -5.86 dB(TP).
If it is required to deliver this piece of audio with a program loudness below -16 LUFS and a true peak below -1 dB(TP) this is easy to achieve. Just increase the adjustment gain of the Multimeter until the first of the two values reaches its specified limit. In this example, it is the true peak. A quick way to set the adjustment gain correctly: Choose the true peak target to be -1 dB(TP) and click the 'adjust to' button.
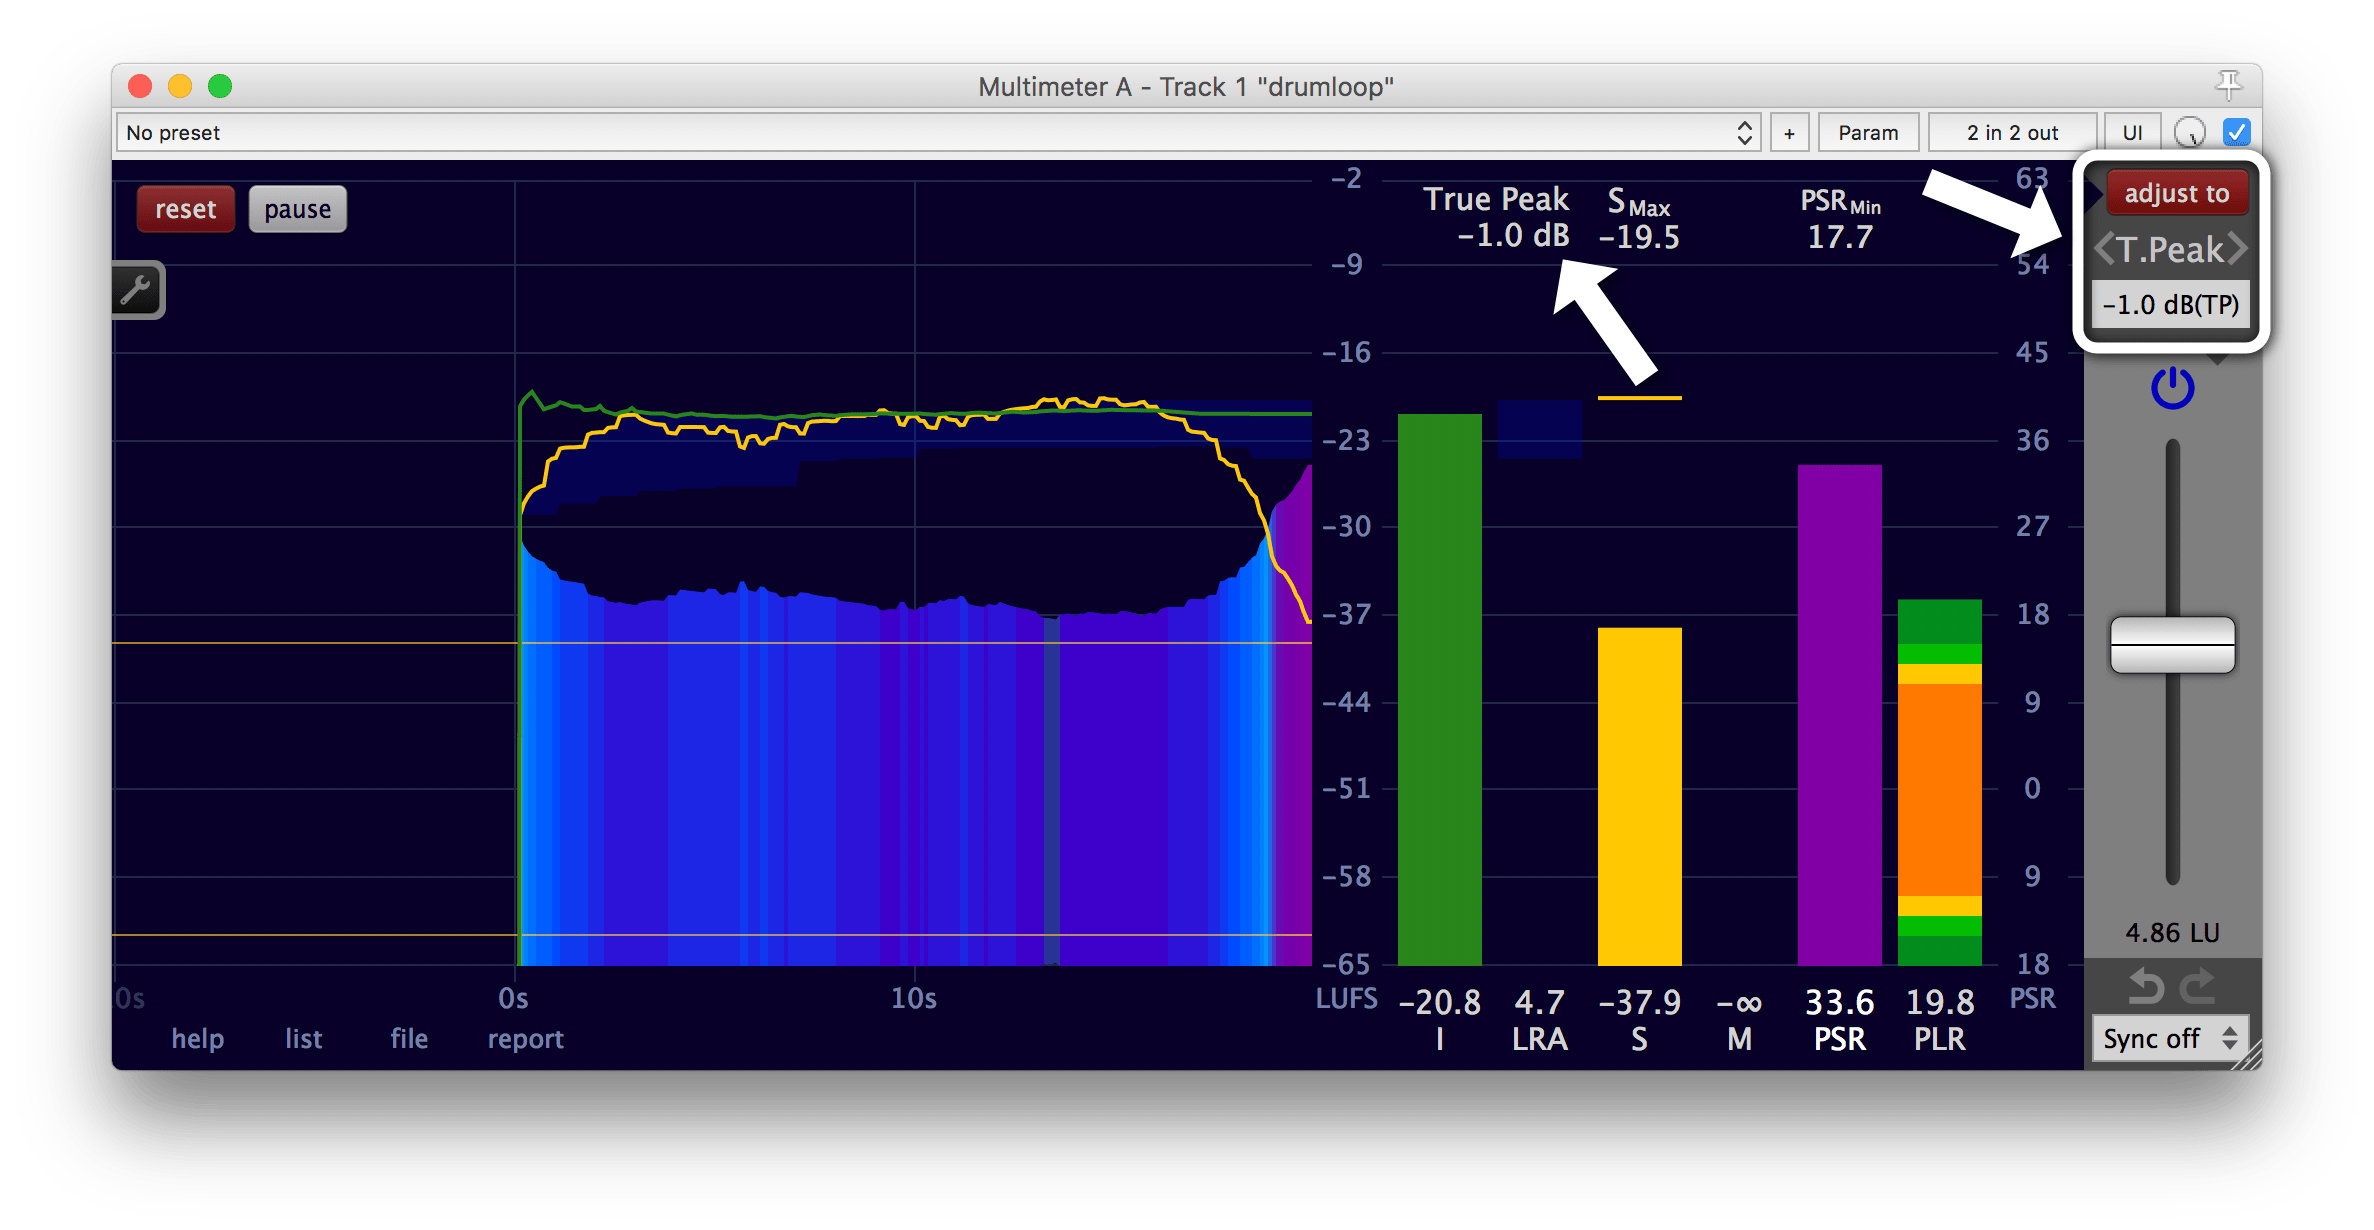
The output has now an integrated loudness of -20.8 LUFS and a true peak of -1.0 dB(TP).
Limiting
If it is required to deliver this piece of audio with a program loudness of EXACTLY -16 LUFS and a true peak below -1 dB(TP) this isn't as straightforward as before. By choosing the integrated loudness target -16 LUFS at the top right and clicking the 'adjust to' button...
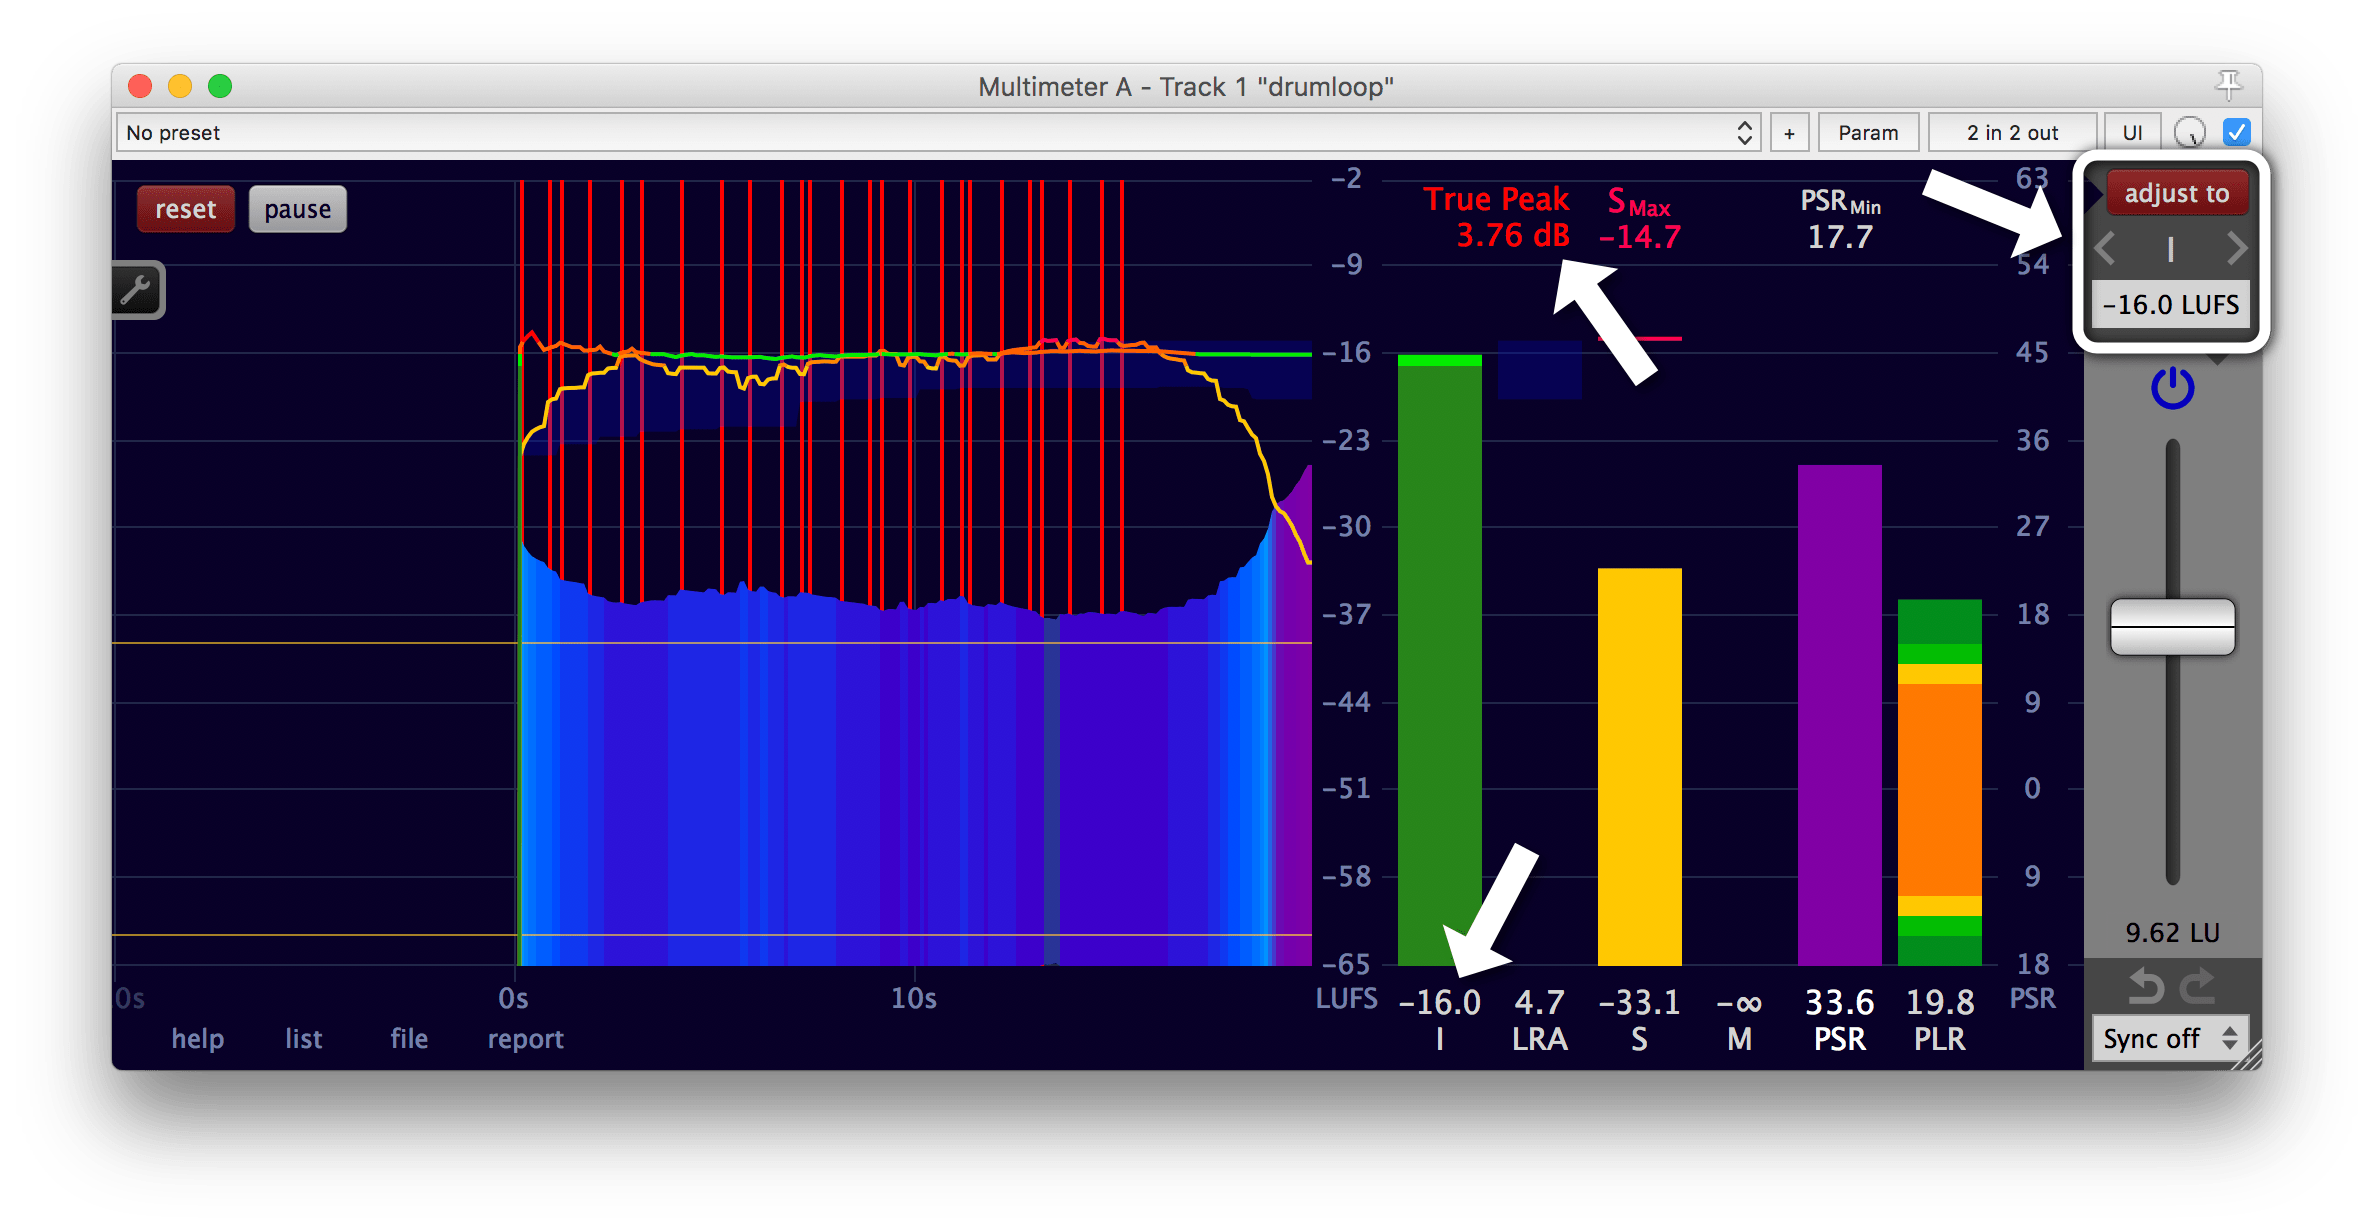
the readings are now I = -16 LUFS and true peak = 3.76 dB(TP). The true peak is much higher than the maximal allowed -1 dB(TP).
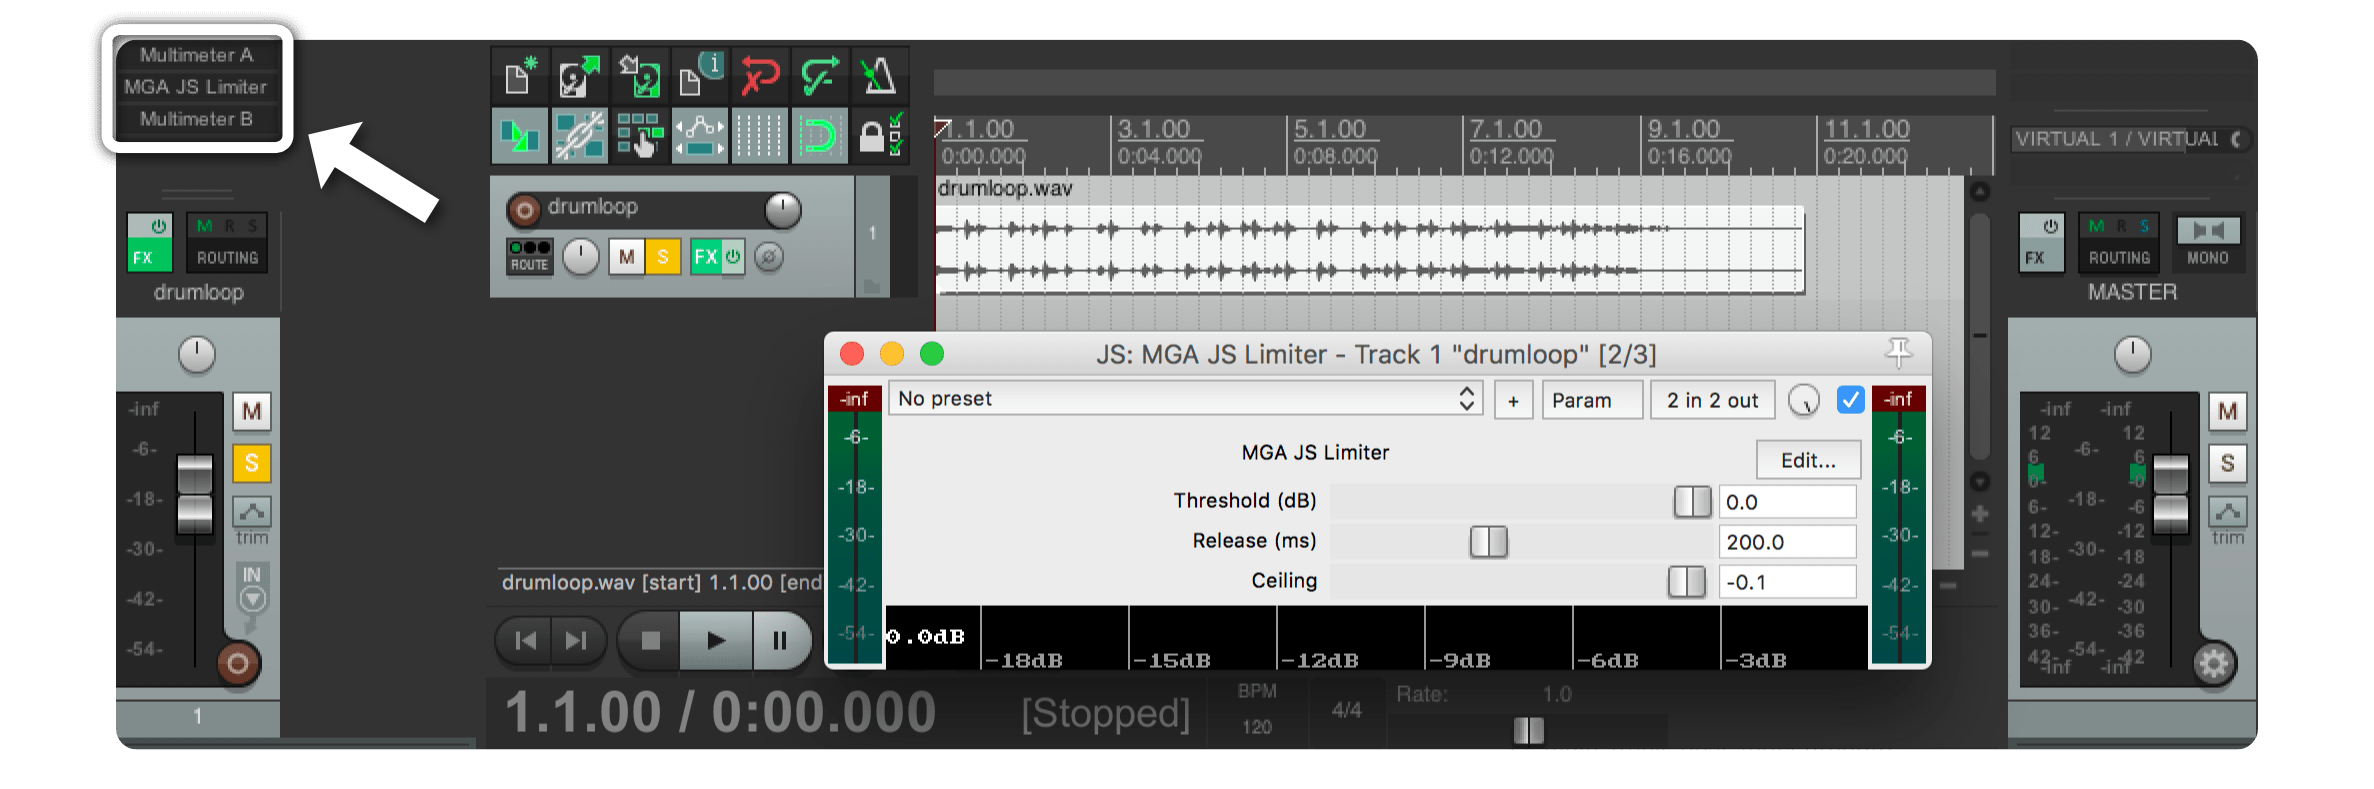
We need to alter the dynamics. This can be done by surgically editing the volume automation or by using a limiter. Here, the MGA JS Limiter included in Reaper is used to demonstrate how to get there with a stock plug-in that comes with the DAW. The MGA JS Limiter doesn't offer inter-sample peak detection (which is needed to directly detect the true peak within the limiter) but it is still possible to achieve the desired result. The process described here can be applied to almost any limiter at hand.
Add the limiter after the Multimeter.
At first, one might tink that this chain (Multimeter -> limiter) will take care of the problem at hand: The Multimeter will adjust the loudness to -16 LUFS and the limiter will - after some tweaking - ensure that the true peak will stay below -1 dB(TP).
This might even work with audio containing only very few peaks exceeding -1 dB(TP). But in general, the limiter will change the loudness as well. And a further gain adjustment is needed.
This can be verified with ease by adding a second Multimeter after the limiter.
In the first Multimeter the adjustment gain is already set such that the audio on its output has a loudness of I = -16 LUFS. It doesn't need to perform the measurement anymore. To save resources, enable the pause.
Let's measure the output of the limiter with its default settings with the second Multimeter. It reveils that the true peak after the limiter is now lower, at 0.27 dB(TP) (Before the limiter it was at 3.76 dB(TP)). But the second Multimeter also uncovers the side effect of the limiter. The limiter changed the loudness. It is now at I = -17.1 LUFS.
Hit the 'adjust to' button on the second Multimeter and the loudness will be adjusted to the desired I = -16 LUFS. The applied gain change of +1.05 LU also affects the true peak, which is now higher as well, at 1.32 dB(TP).
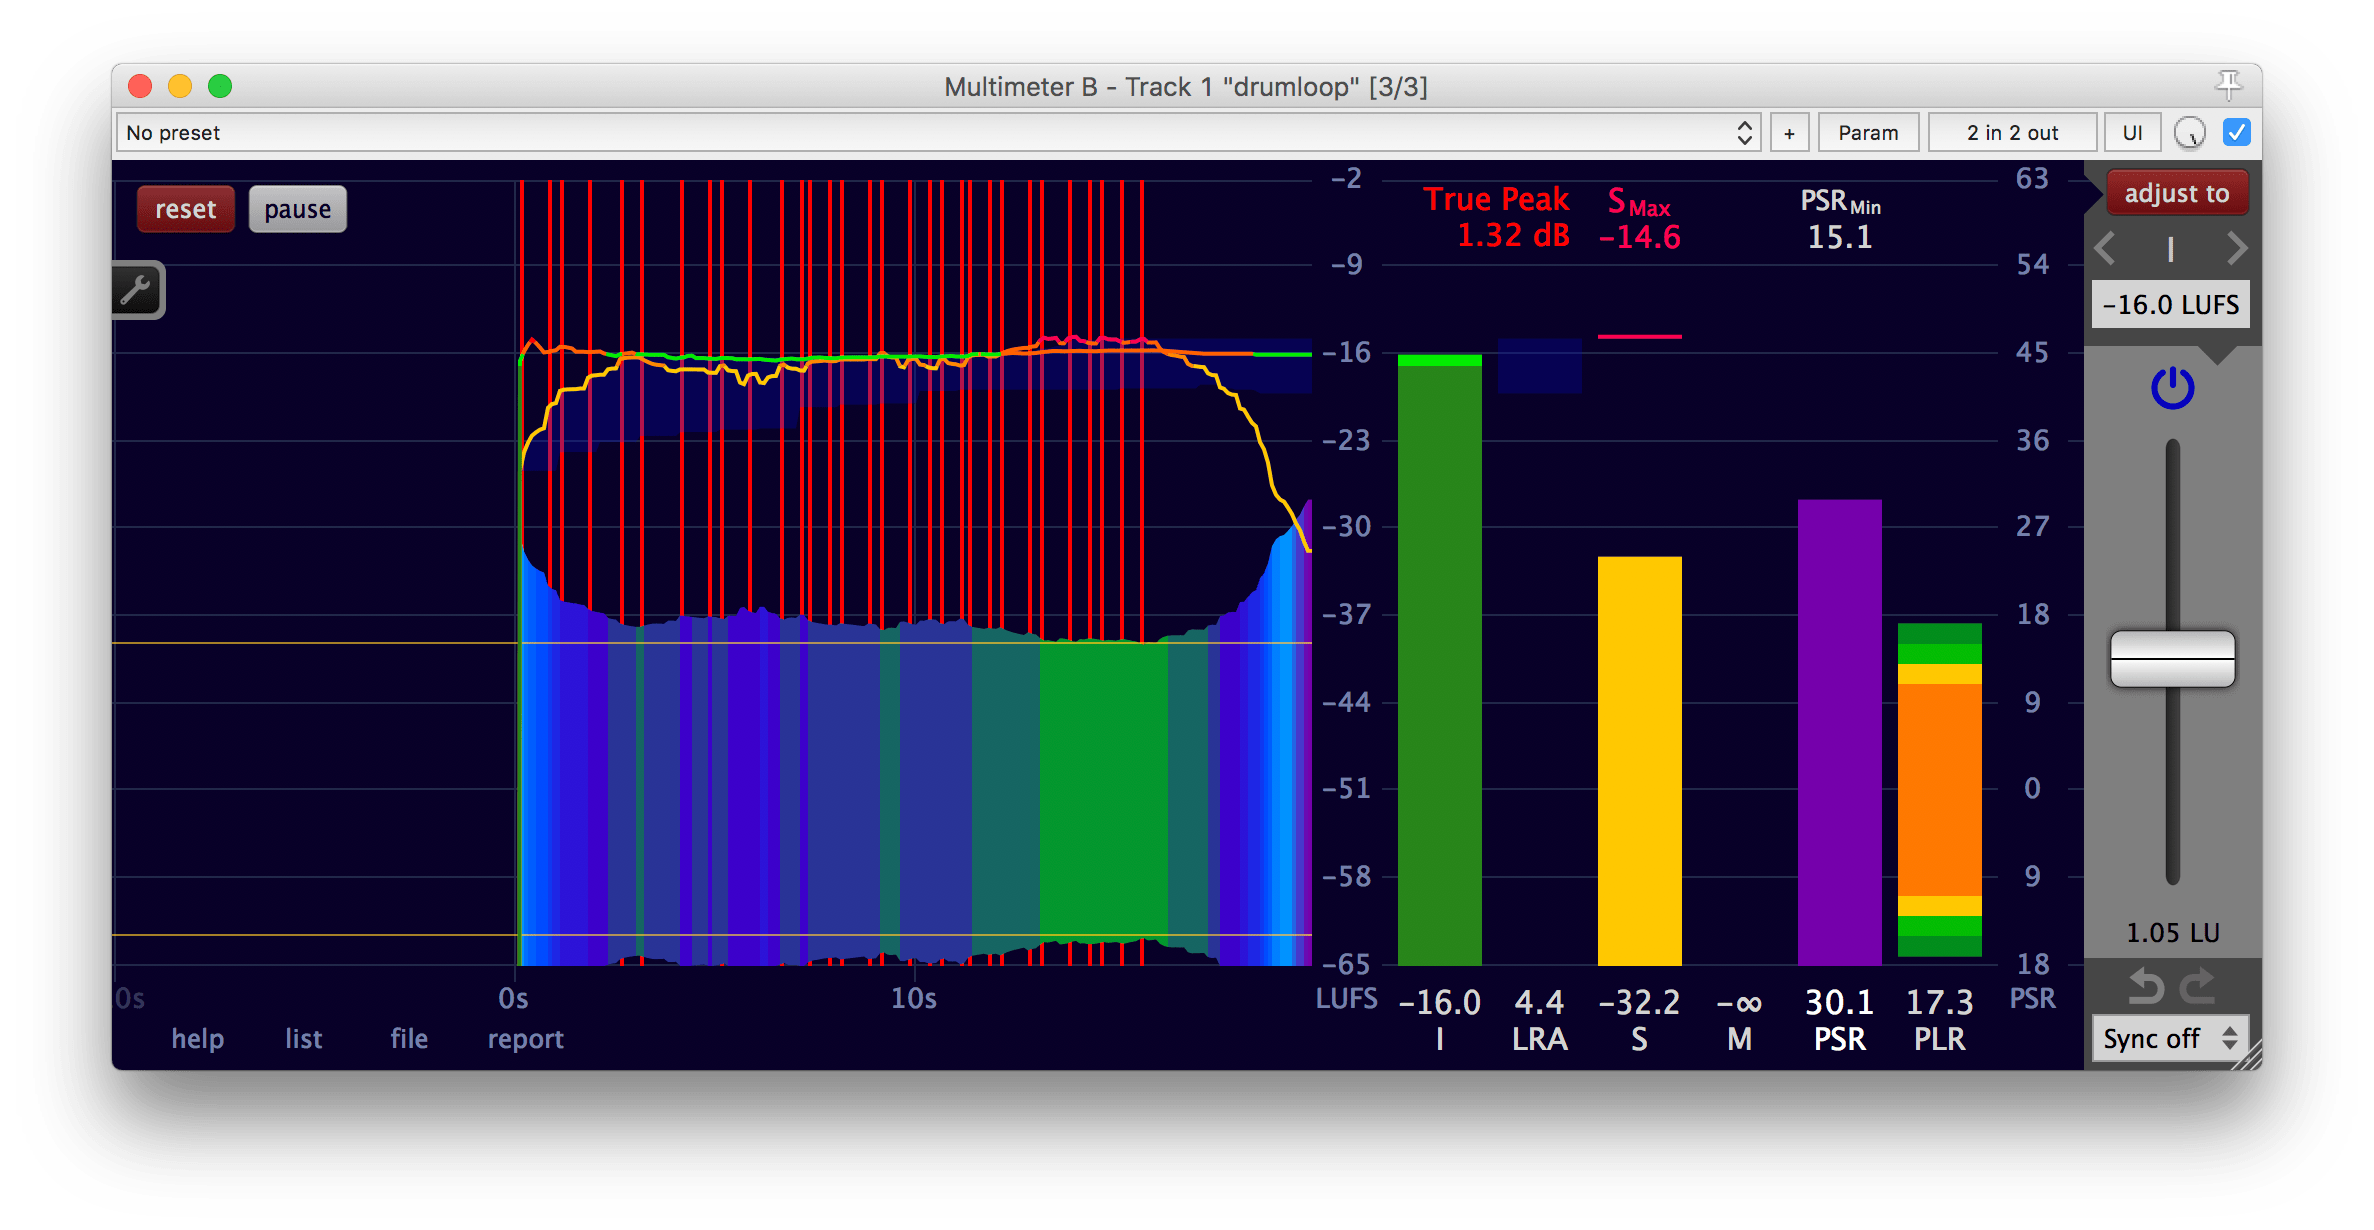
Don't be too disappointed. Even though the true peak is not yet at the desired -1 dB(TP), it is already much closer to the target than before the limiter (3.76 dB(TP)).
To bring the true peak further down, either increase the loudness of the input to the limiter or adjust the parameters of the the limiter, such that the limiter will work more aggressively. In this example, the input gets increased by increasing the adjustment gain of the first Multimeter.
The required input boost can't be quickly calculated, because without further knowledge about the exact algorithm the limiter uses it is almost impossible to predict how much the limiter will alter the loudness. But luckily it only takes a few trials of different adjustment gain positions of the first Multimeter to achieve the desired result.
Tip 1: Offline processing speeds up each measurement quite dramatically.
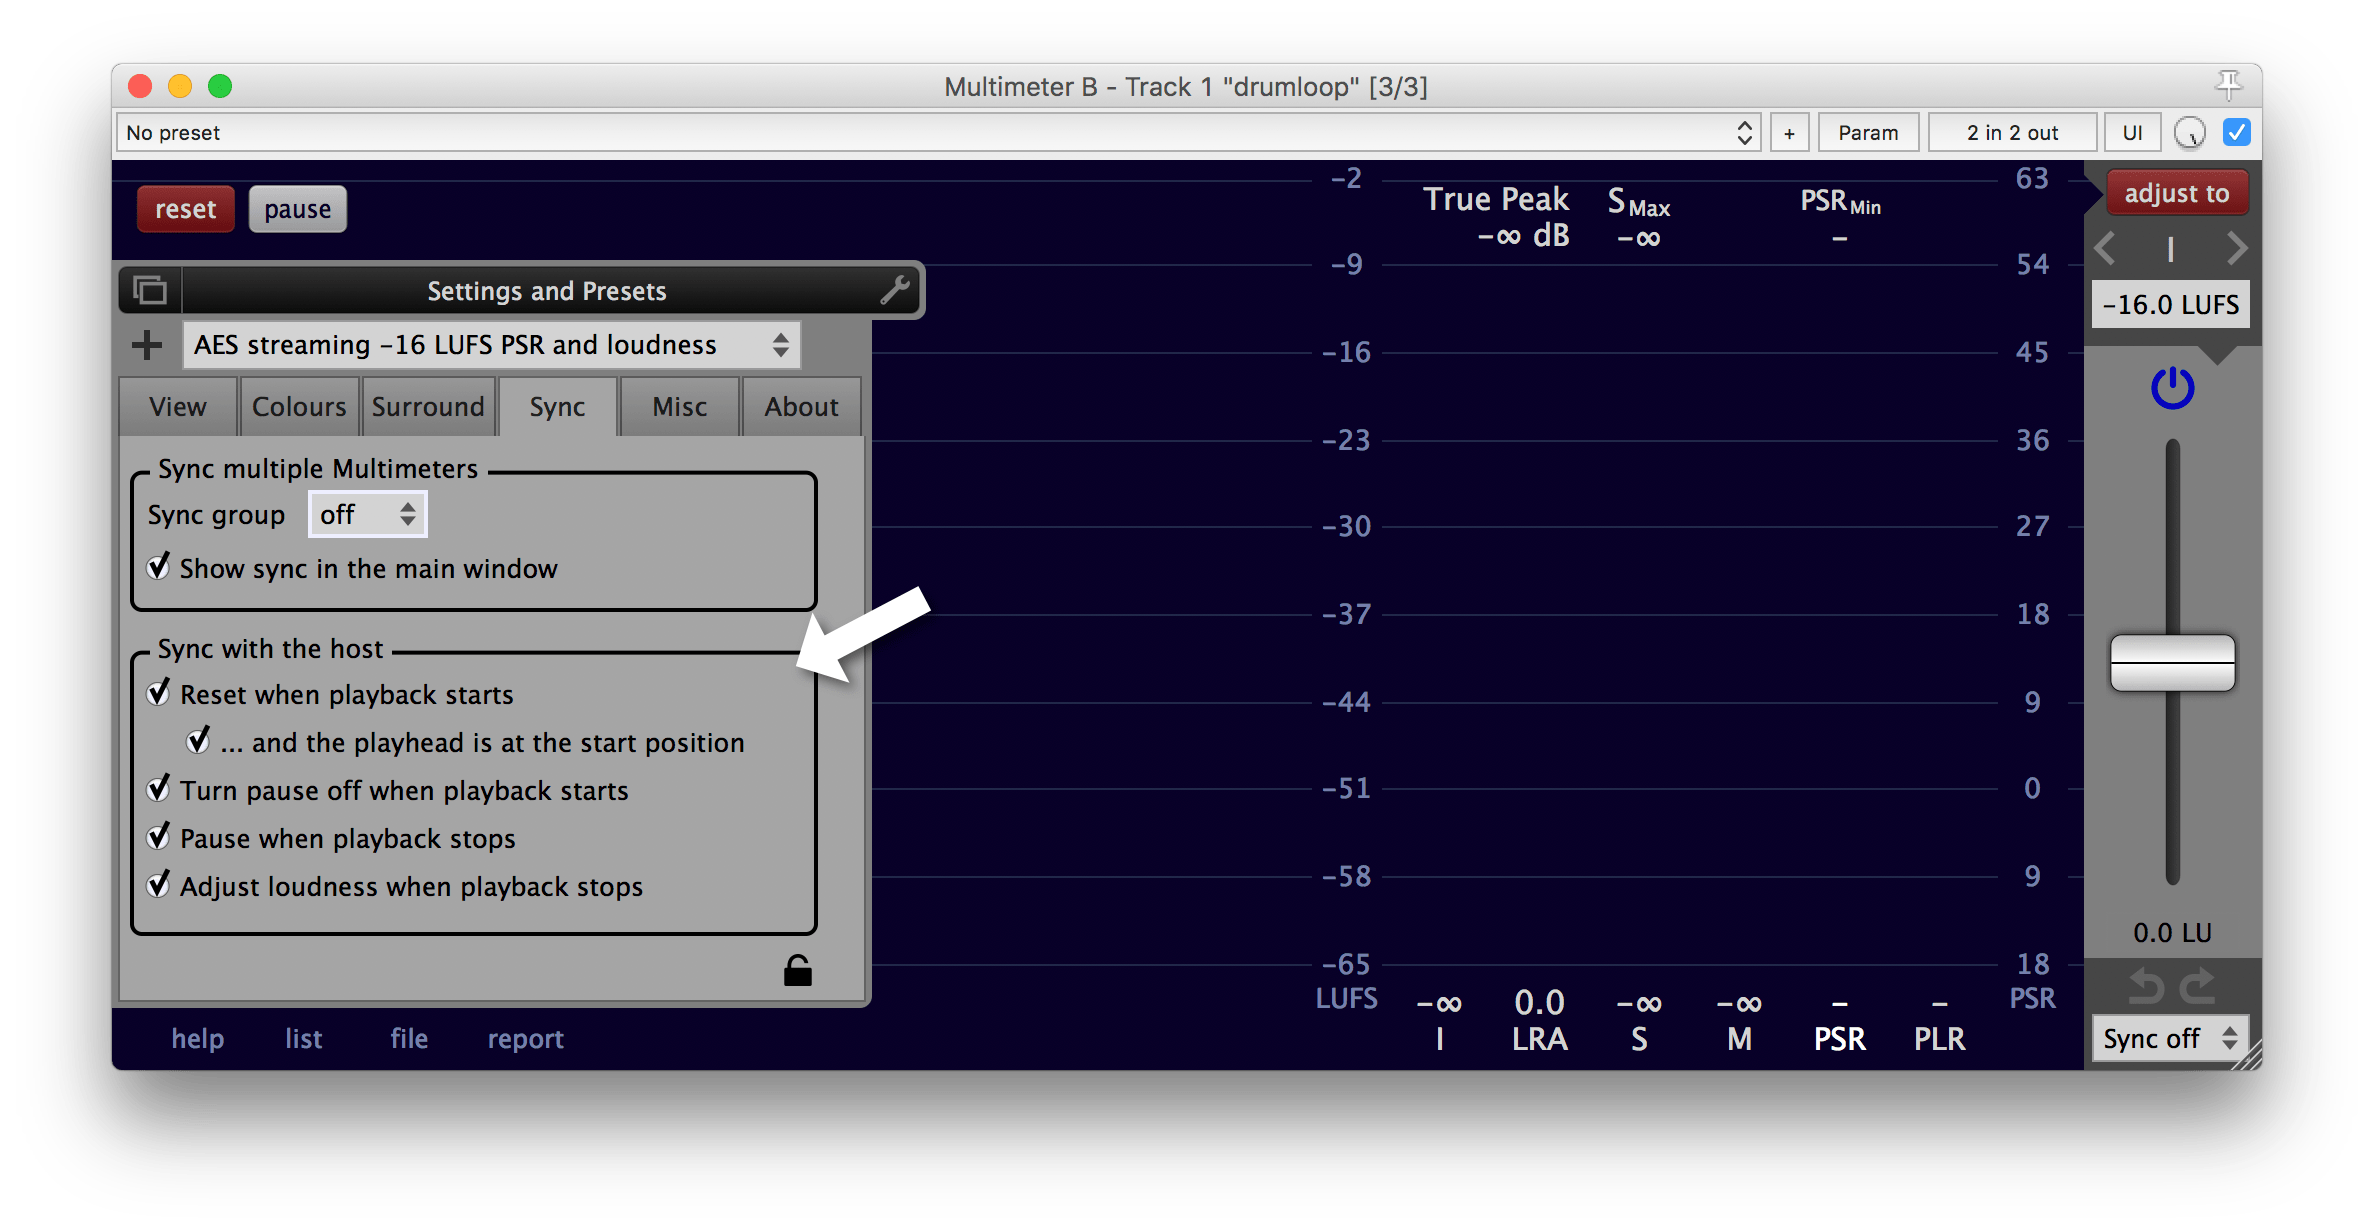
Tip 2: To avoid the need to have to repeatedly click the 'reset' button before and the 'adjust to' button after each measurement in the second Multimeter, check all options under Settings -> Sync -> Sync with the host. This will toggle 'reset', 'pause' and 'adjust to' automatically and simplifies multiple measurements.
In this example, an adjustment gain of 14.6 LU (I = -11 LUFS) in the first Multimeter...
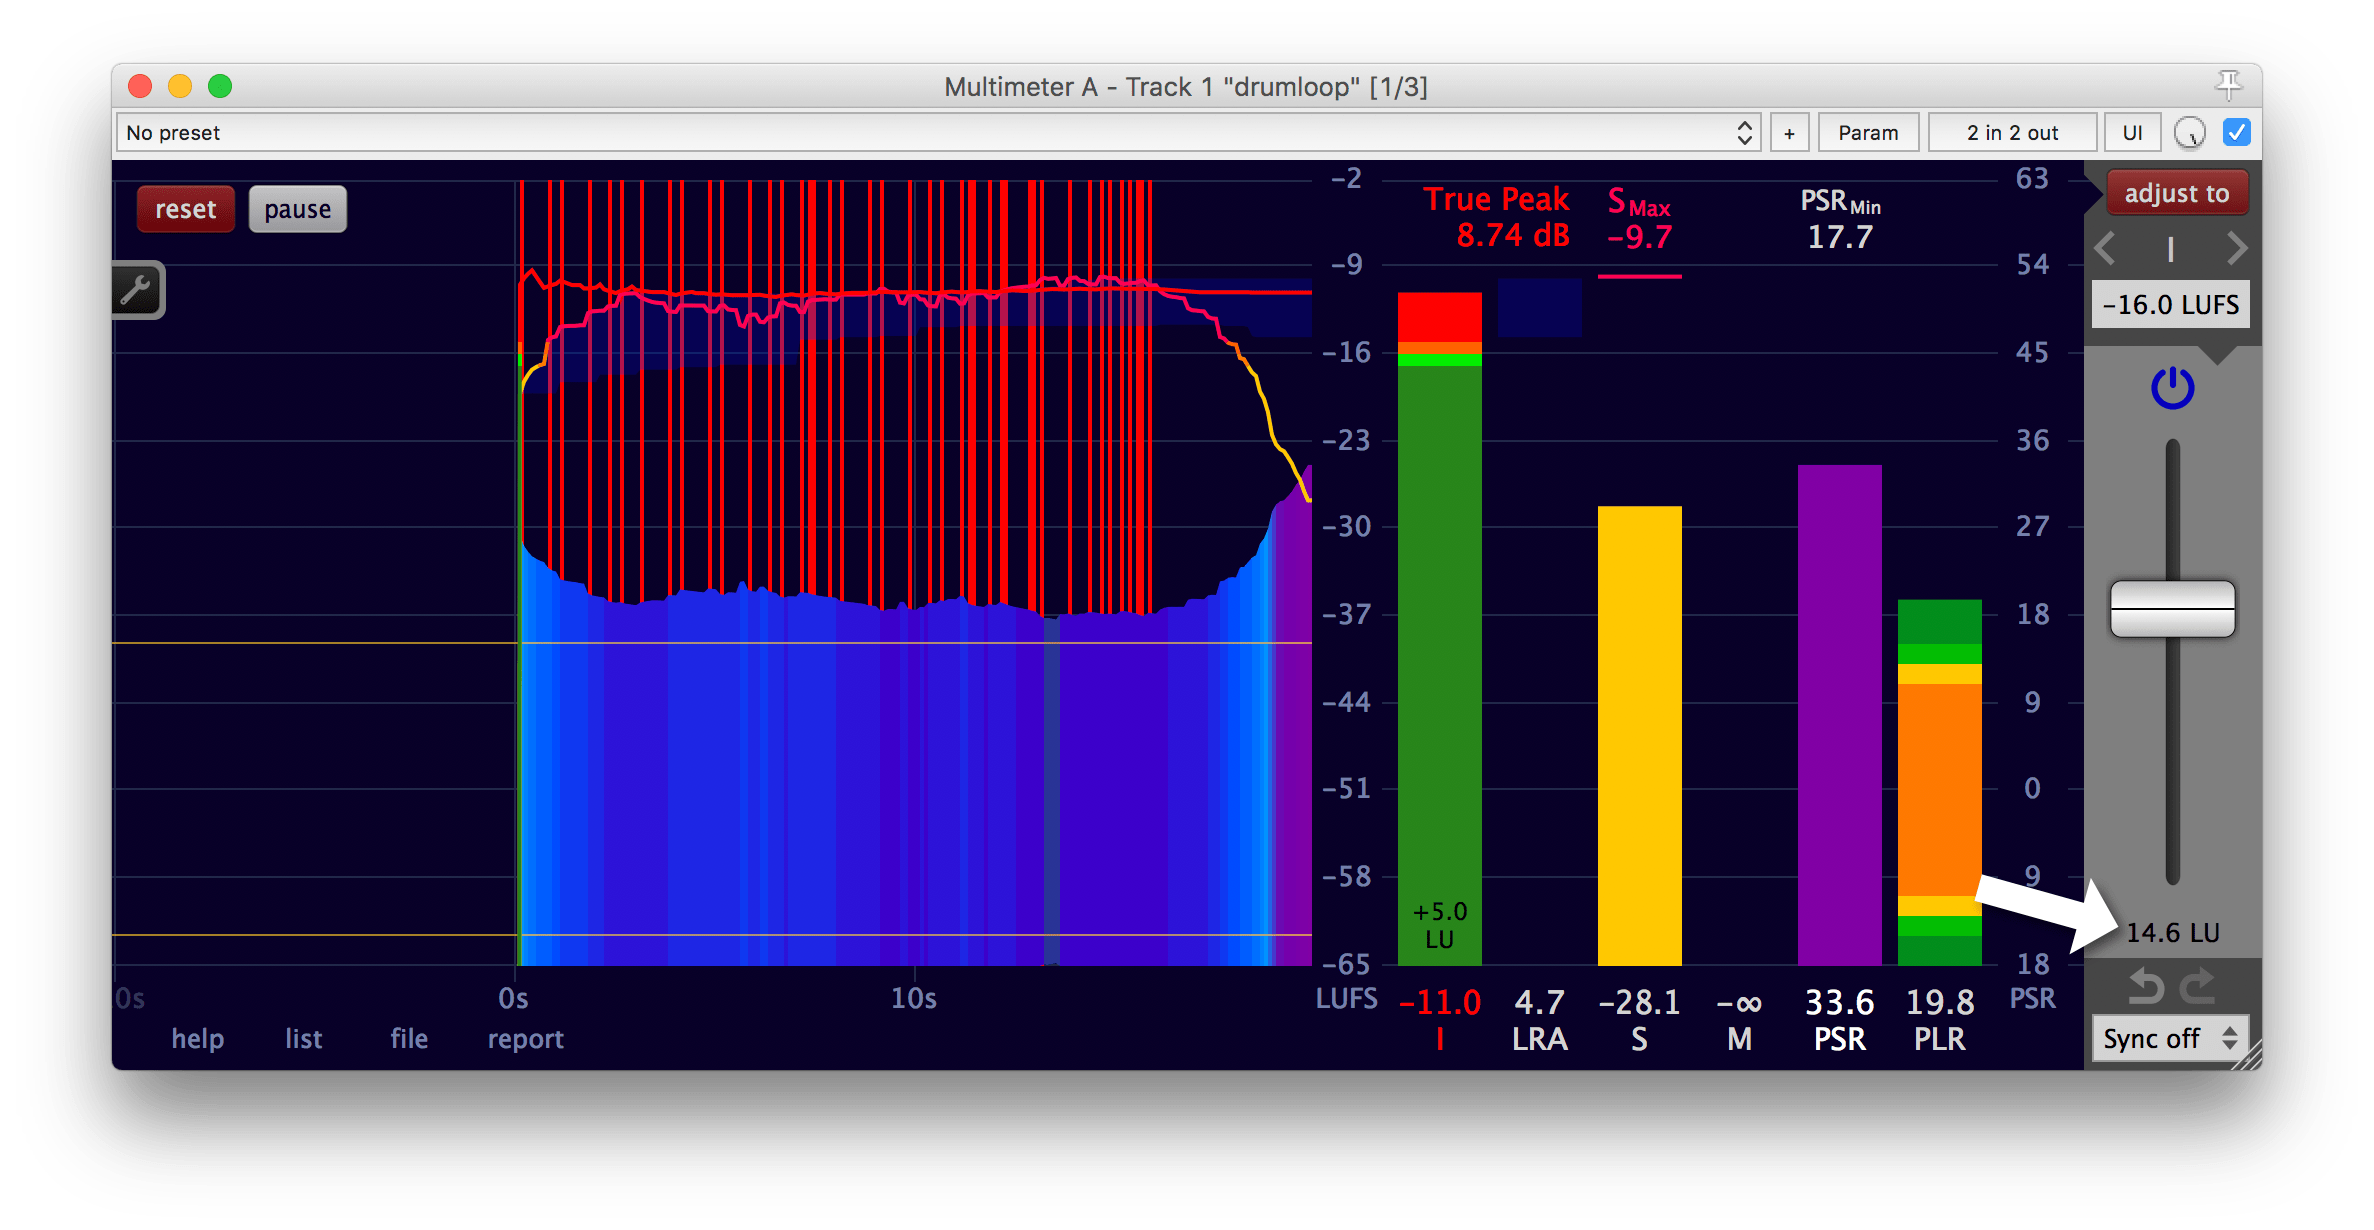
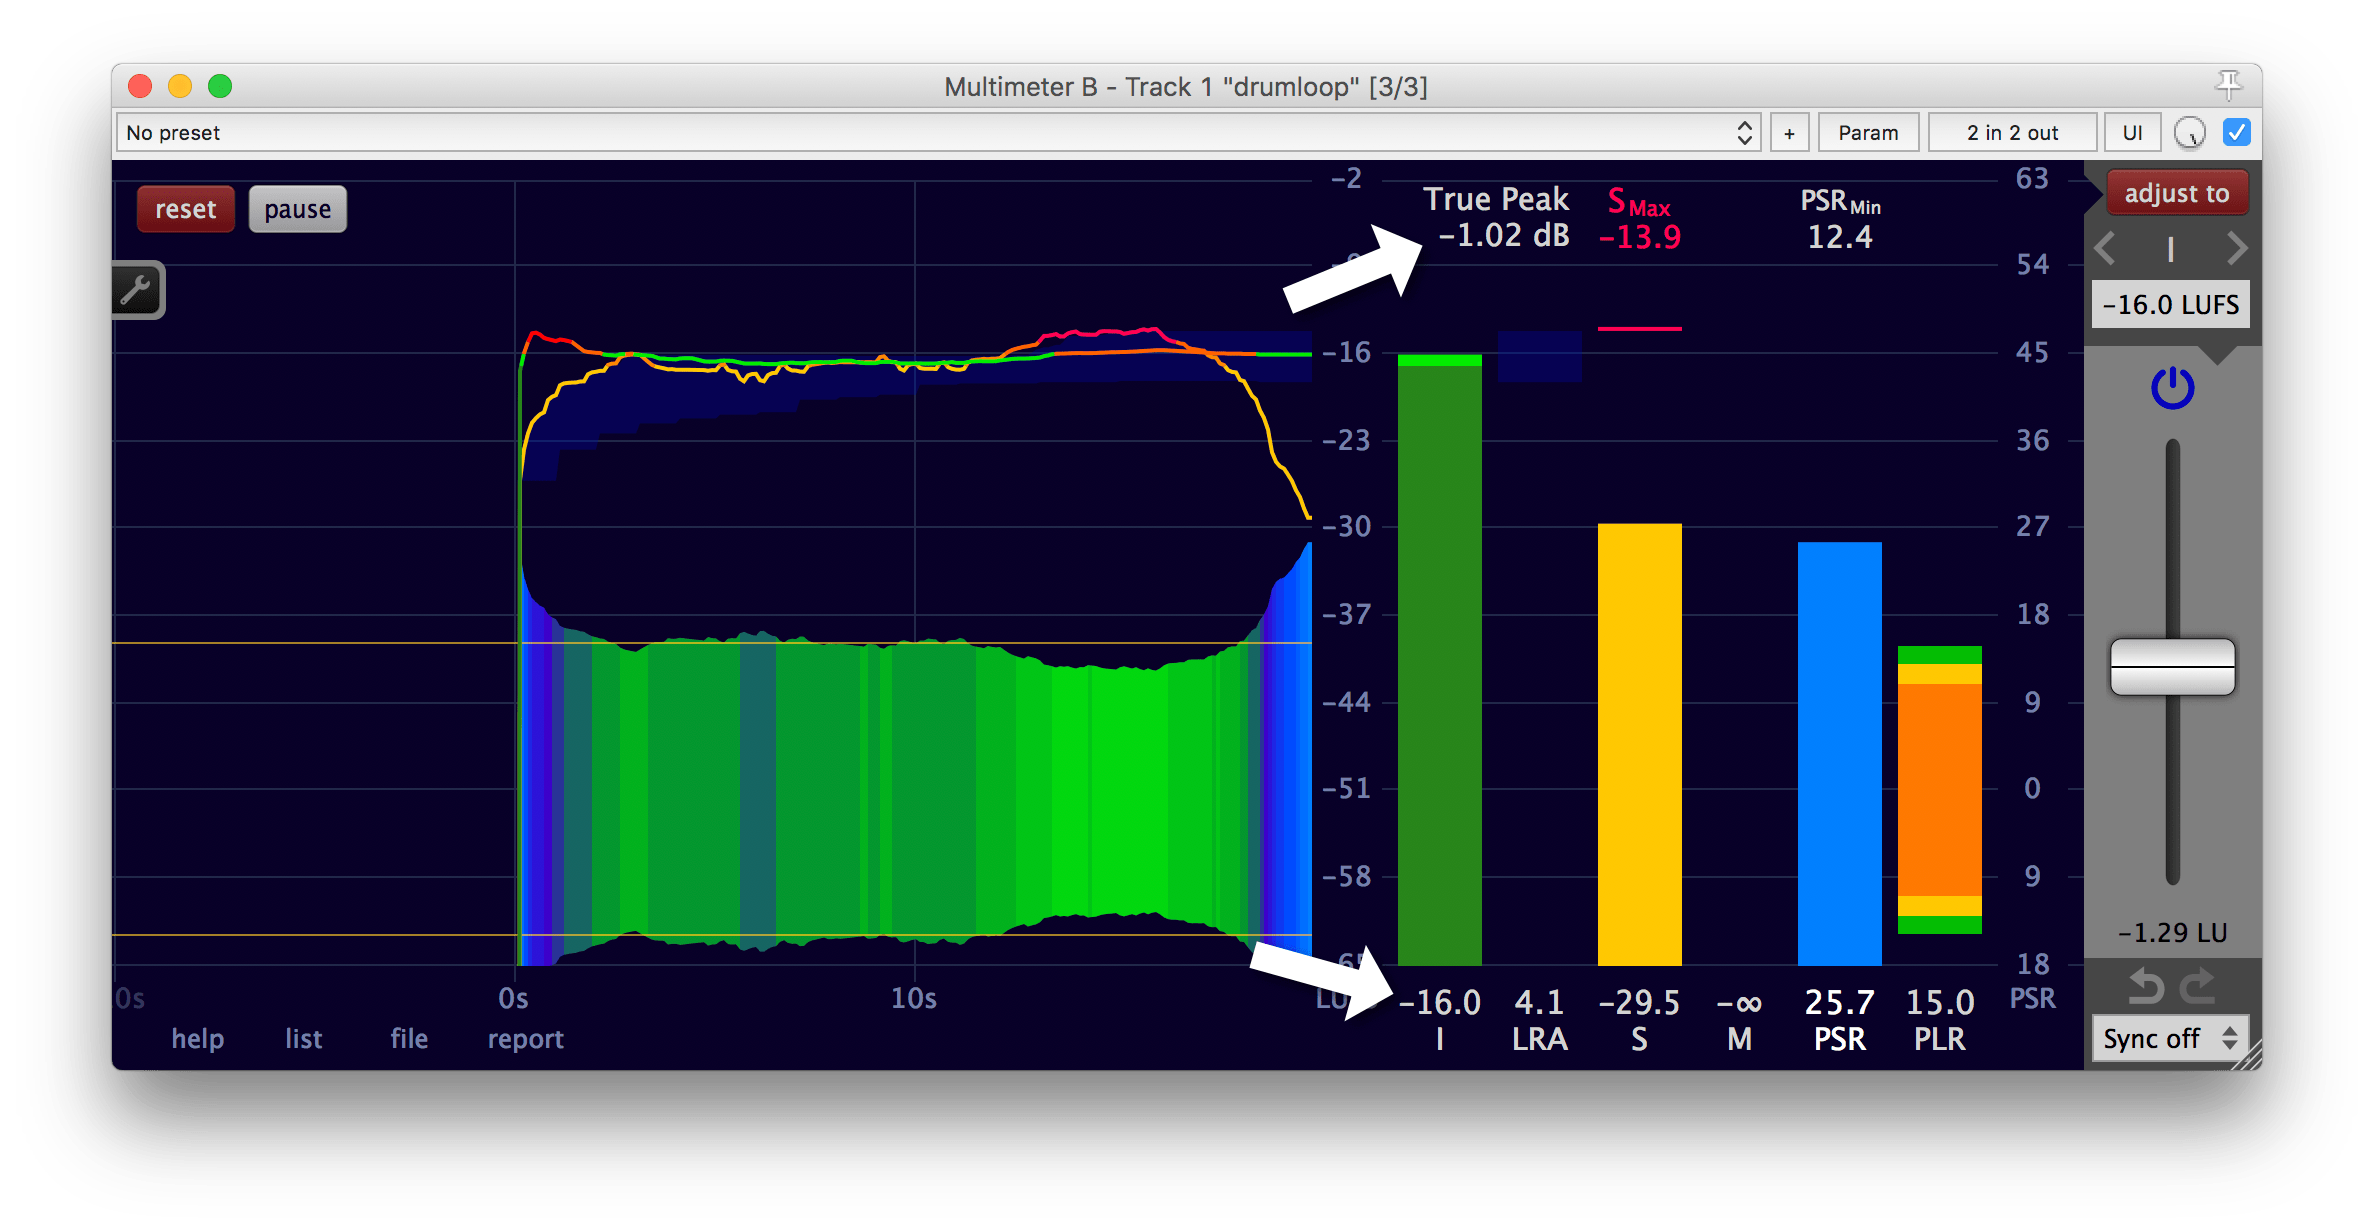
...results in the measurement of I = -16 LUFS and the true peak = -1.02 dB(TP) in the second Multimeter. (After the second Multimeter adjusted the loudness automatically to I = -16 LUFS.)
Even though it now complies to the desired specification, it is recommended to always tweak the parameters of a limiter until the output is as pleasing as possible for the given material. Remember that the technique described in Judge effects effectively is quite useful for such a task.
Loudness compliance for broadcast
When producing content for broadcasting or streaming services it is often required to deliver loudness compliant material.
Option 1: Utilise the file measurement facility
If your project length exeeds a few minutes, the fastest way to create loudness compliant content is to use the offline file measurement capability of the Multimeter.
- Work on your project in your editing application until it is ready for delivery.
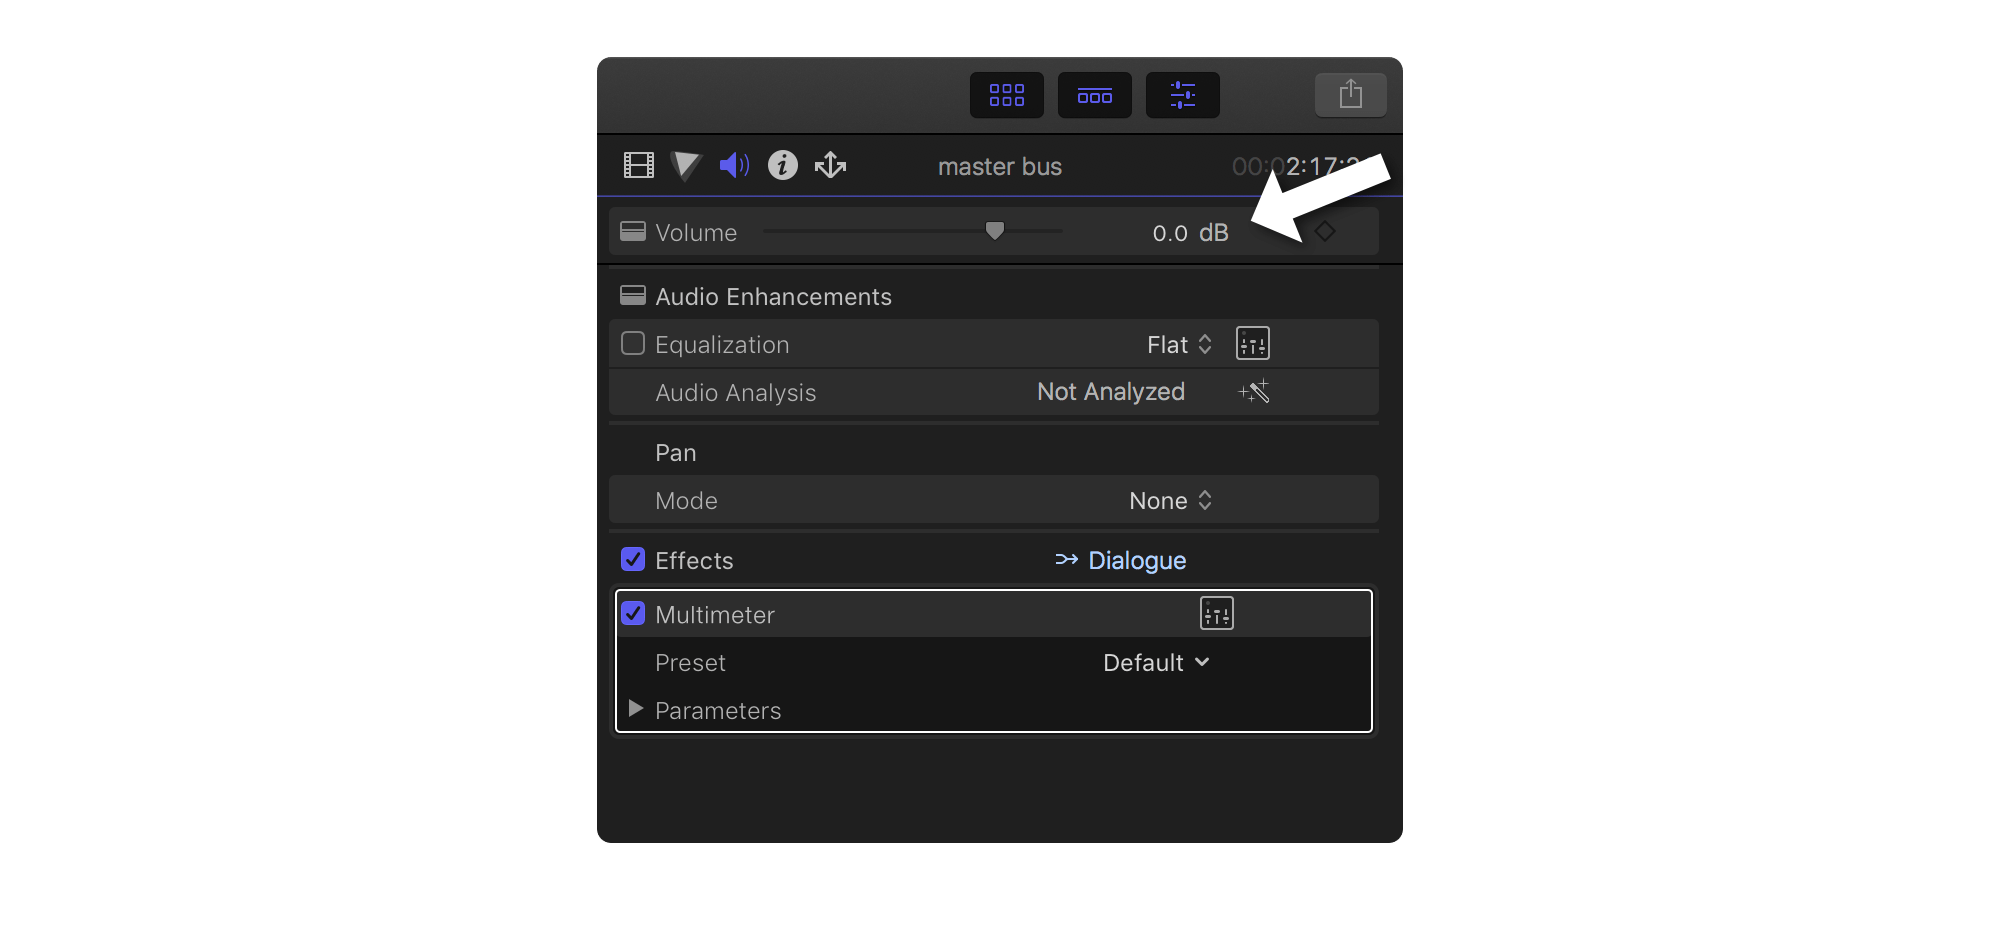
- Add the Multimeter plug-in to the master bus of your
editing application.
*
- It must be added as the last plug-in.
- The adjustment gain of the Multimeter must be set to 0 LU.
- The gain of the master bus must be set to 0 dB.
- Export the audio of the entire project to a file. **
- Open the interface of the Multimeter you've added
to the master bus in step 2.
***
Drag and drop the exported audio file over the interface of the Multimeter. The Multimeter will measure the loudness of this audio file as fast as possible. - Delete the exported audio file. It is not needed anymore.
- Set your desired loudness target (or true peak target) and click the 'adjust to' button.
Keep the pause of the Multimeter engaged - this way the Multimeter operates as a simple gain plug-in and doesn't perform any unnecessary measurements. Much less resources of your computer are used.
Your project is now loudness compliant and you can export the master file (audio or video with audio) from your editing application to deliver it to the client.
To create a loudness measurement report for your client, open the Multimeter standalone application and drag and drop your master file over the Multimeter. The Multimeter supports video files with embedded audio. All video formats your operating system provides to 3rd party applications are supported by the Multimeter. Afterwards click the 'report' button at the bottom of the Multimeter to save the report. More details are available in the sections about measuring a file and creating a report.
*If your video editing application doesn't have a master bus, add all clips on the timeline to a group to substitute the master bus. For example in Final Cut Pro X, select all clips in your timeline by pressing the Command-A keyboard shortcut...
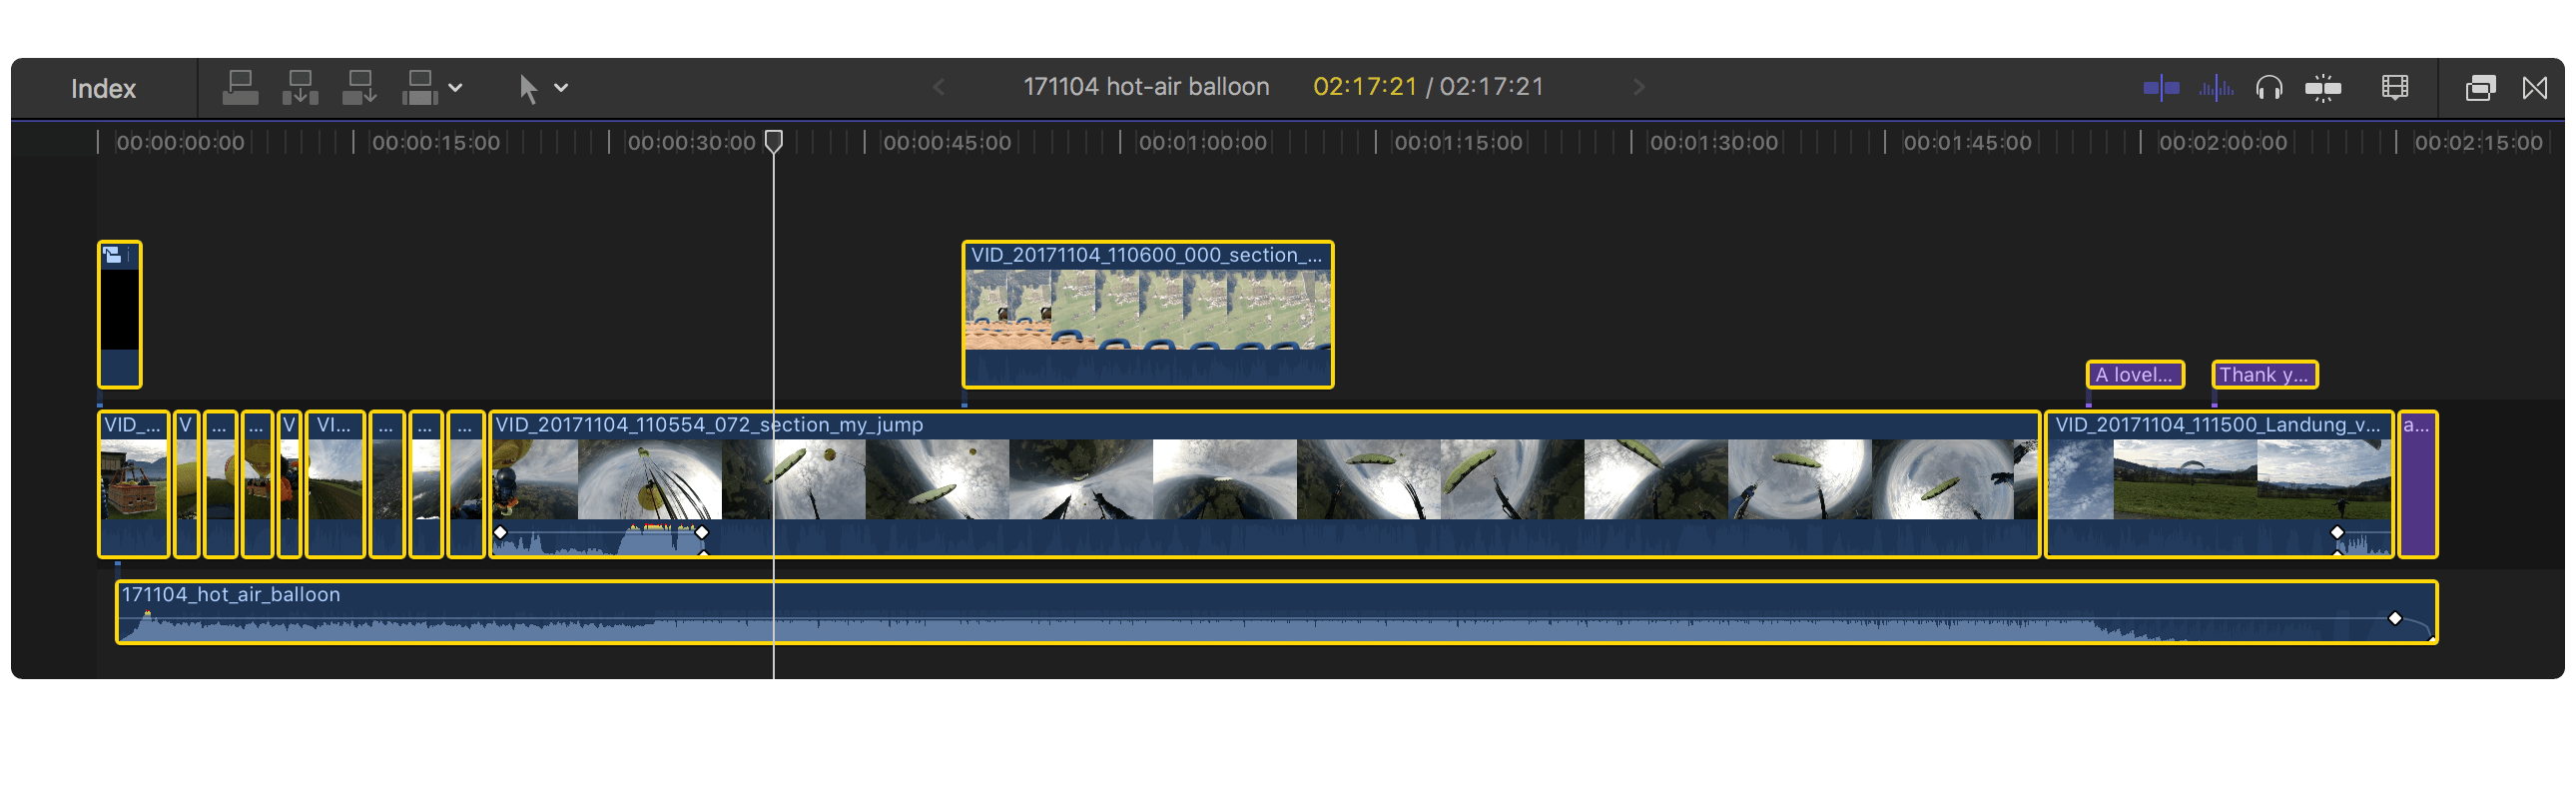
...and add them to a 'compound clip' by pressing Alt-G.
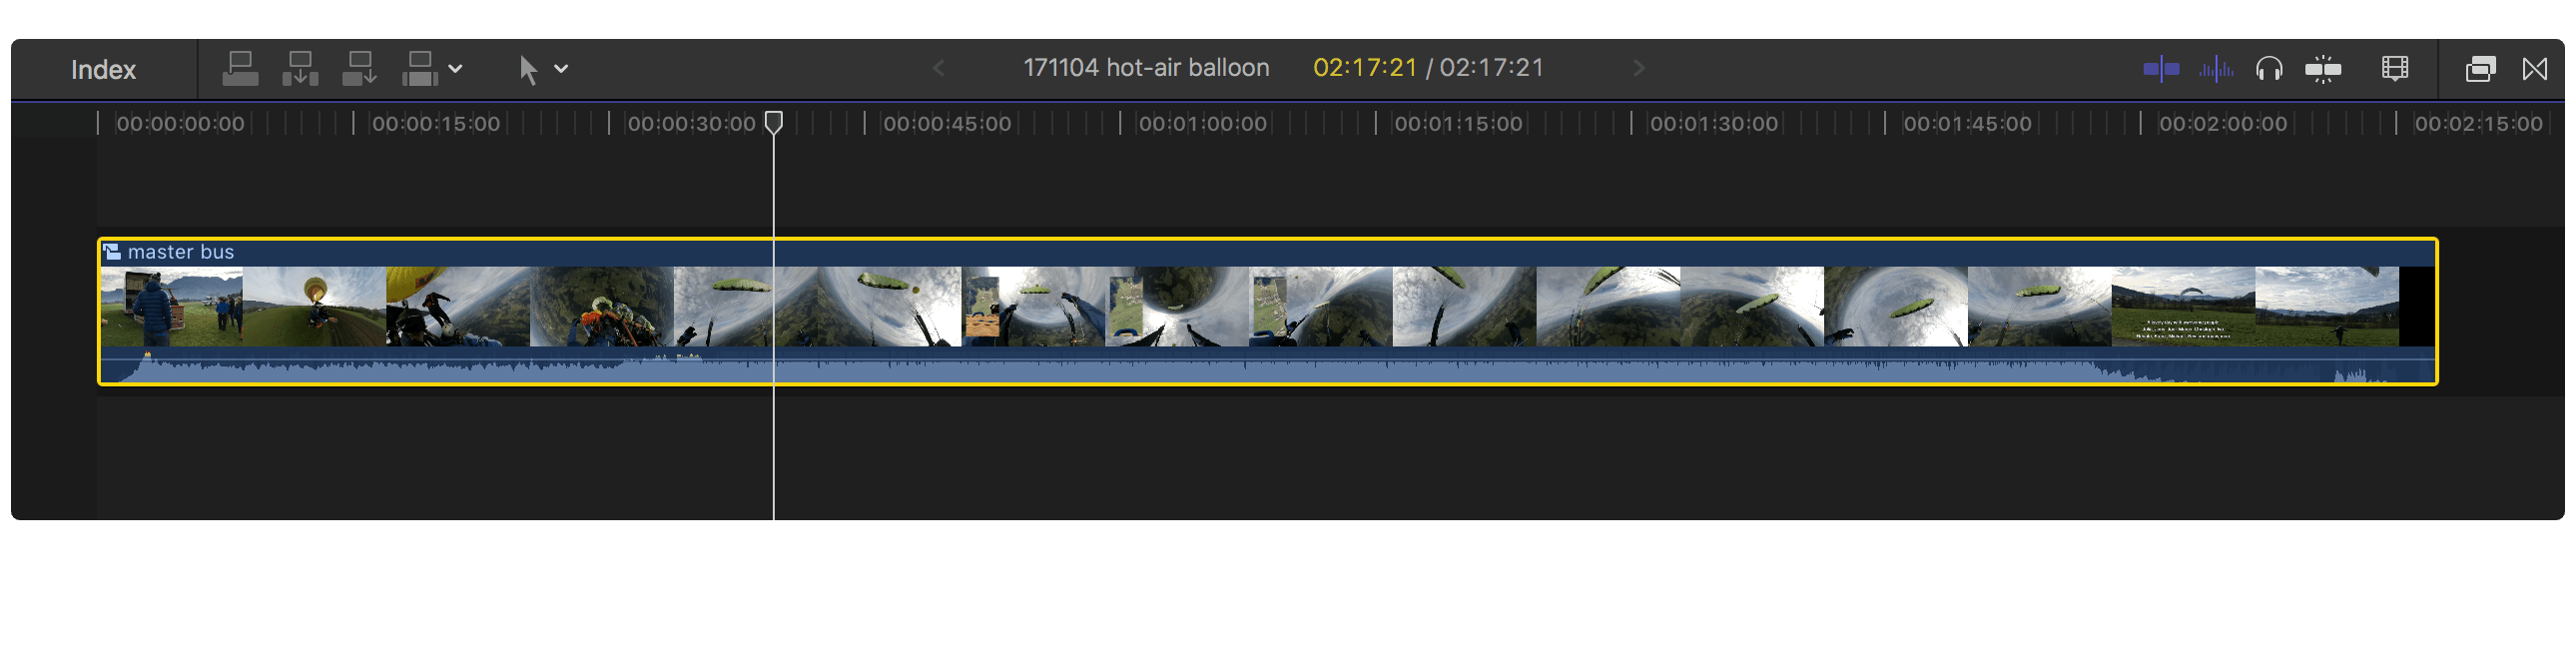
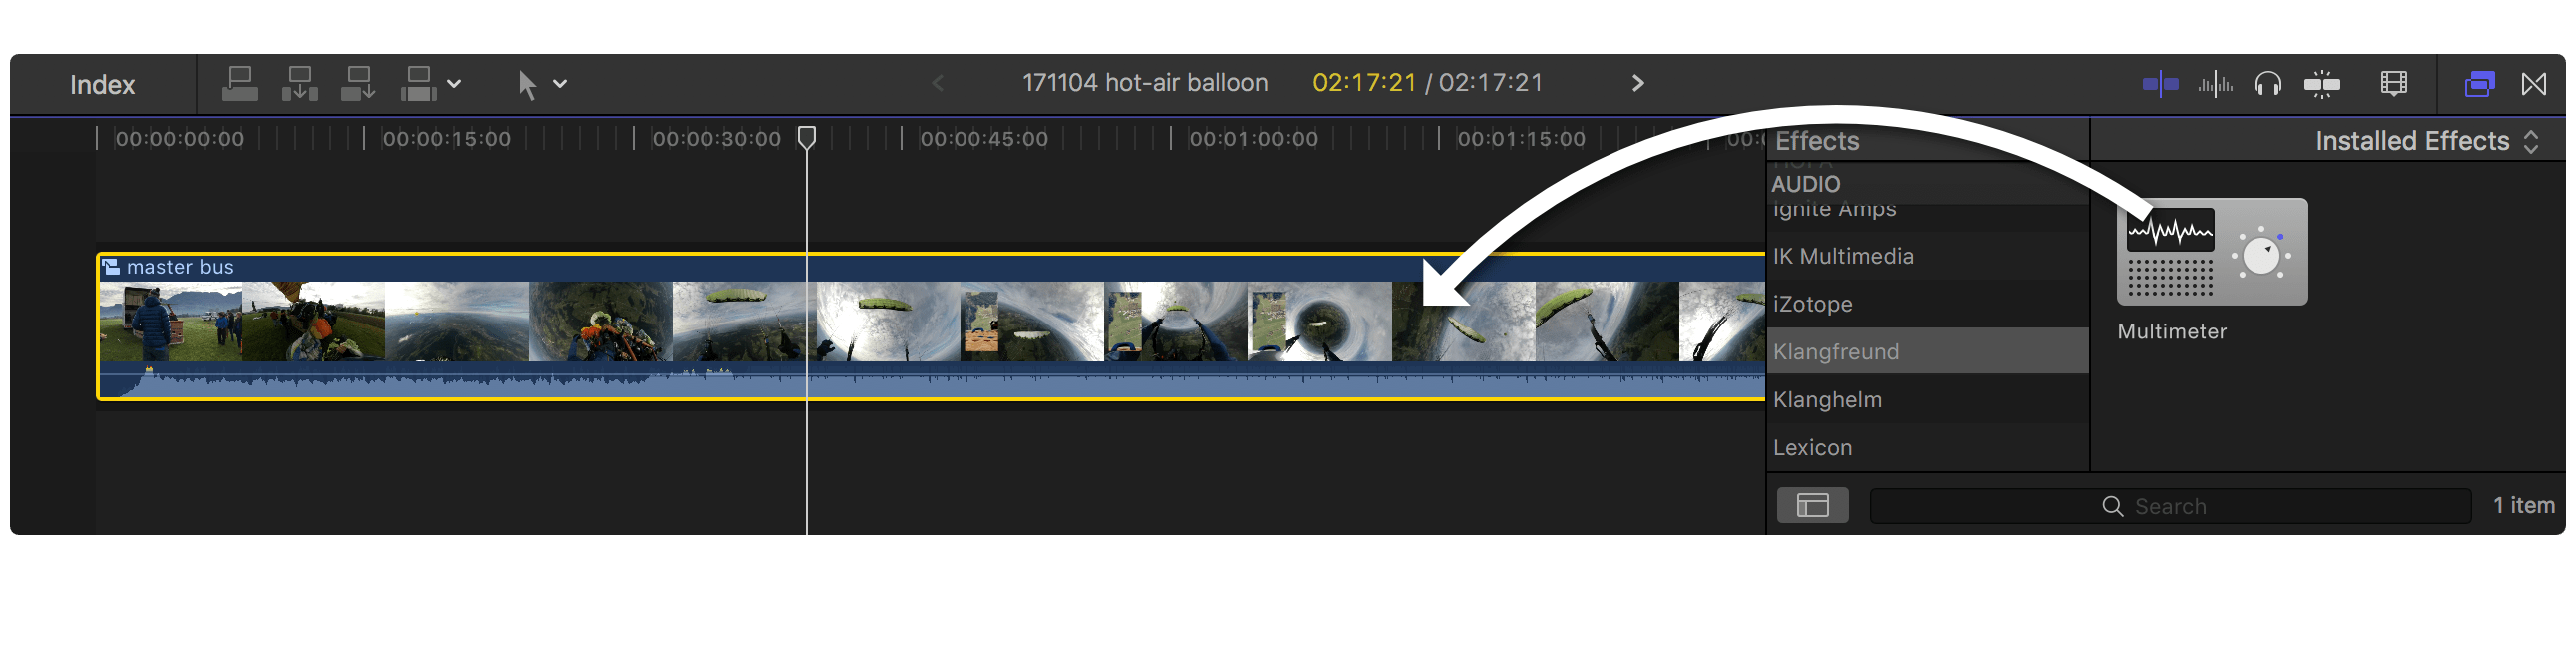
Drag and drop an instance of the Multimeter to this group.
**In Final Cut Pro X: Go to File -> Share -> Master File... and choose 'Audio only' in the export settings. Select a lossless format like WAV. This will create an audio file with a bit depth of 24 bit.
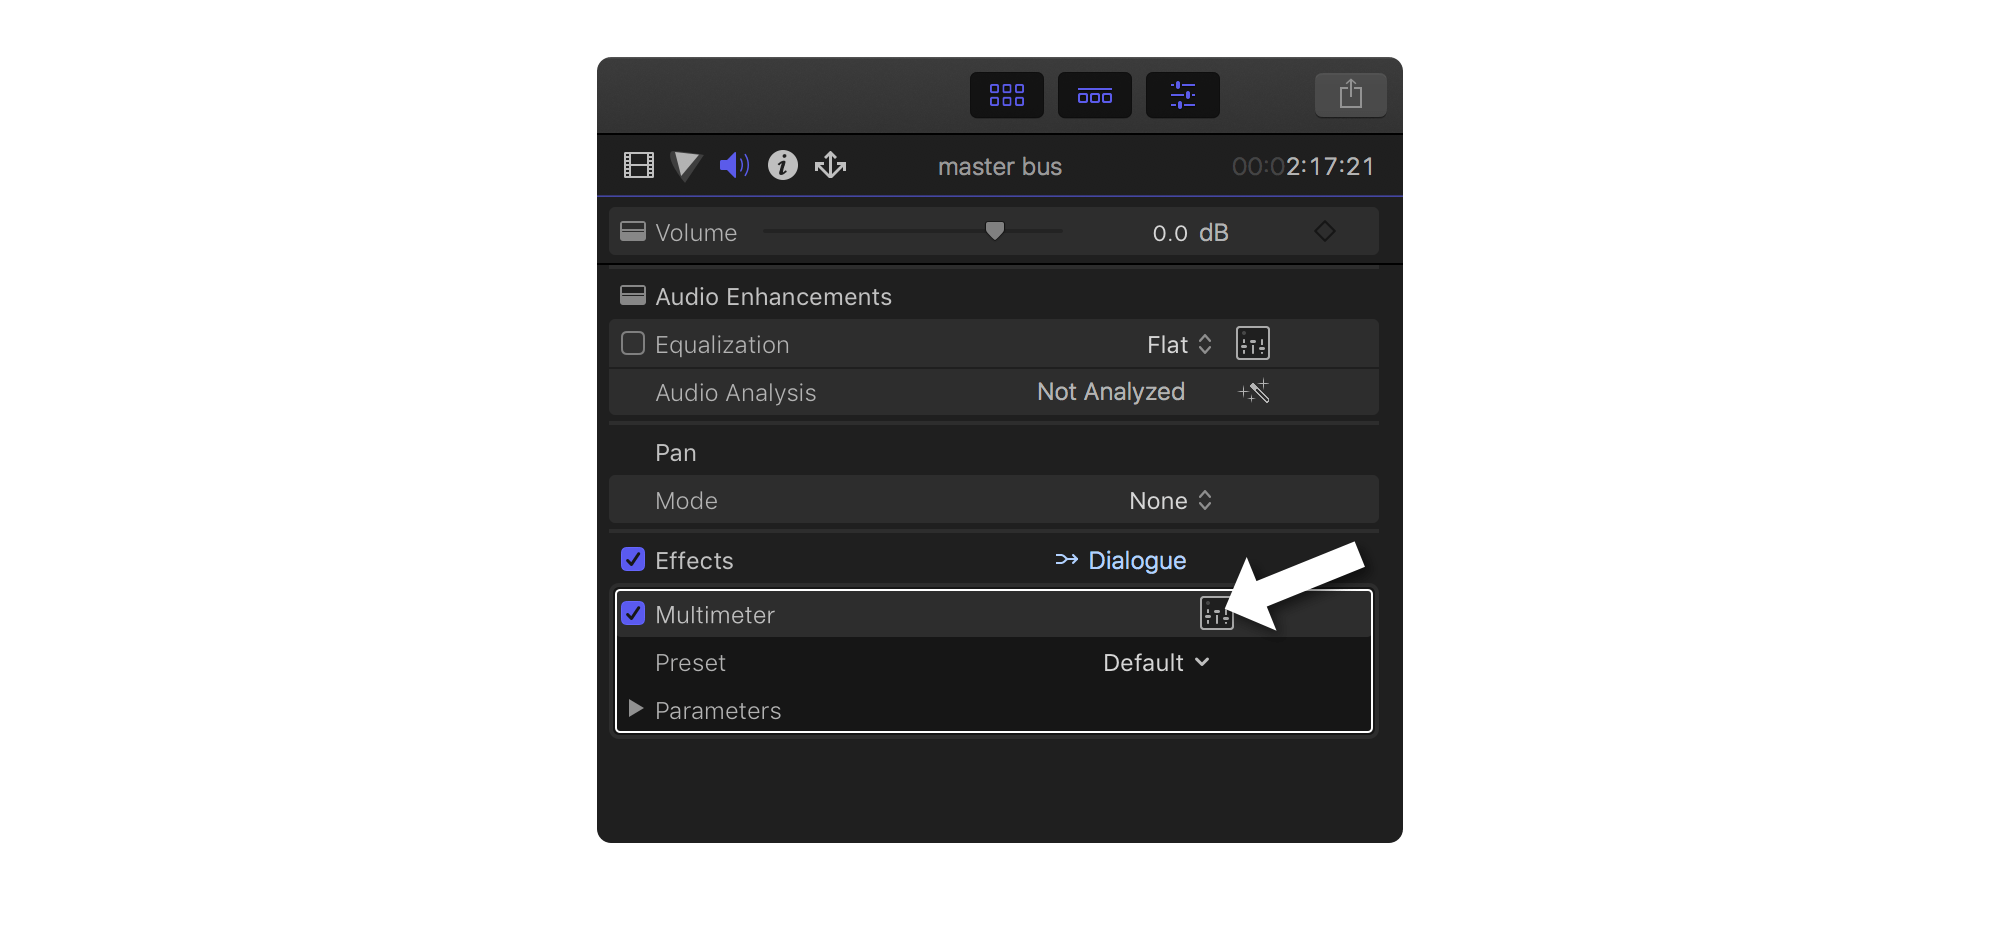
***In Final Cut Pro X: Select the compound clip and click the icon next to the 'Multimeter' title in the audio inspector.
Option 2: Work exclusively with the standalone Multimeter application
If you don't want or if your editing application simply doesn't support audio plug-ins like the Multimeter, the previous procedure can be slightly adapted to exclusively use the Multimeter as a standalone application.
- Work on your project in your editing application until it is ready for delivery.
- If your editing application doesn't have a master bus, create a group that contains all the clips in the timeline.
- Export the audio of the entire project to a file.
- Open the Multimeter standalone application and drag and drop the exported audio file over the interface of the Multimeter. The Multimeter will measure the loudness of this audio file as fast as possible.
- Inspect the integrated loudness. In the list viewer it is shown with a high precision. Lets say you need to deliver an integrated loudness of -23 LUFS, but the Multimeter tells you that the integrated loudness of your project is -21.28 LUFS. In this case you need to lower the loudness by 1.72 dB. The exported audio clip is not needed any more and can be deleted.
- Back in your editing application, change the overall loudness on the master bus accordingly. **** In this example lower the volume by 1.72 dB.
Your project is now loudness compliant and you can export the master file from your editing application to deliver it to the client.
****In Final Cut Pro X: Adjust the volume of the entire project in the audio inspector of the compound clip.
Option 3: Use the Multimeter plug-in without the fast file measurement
If your editing application doesn't have a master bus, group all clips in the timeline instead. As described before.
Drag and drop an instance of the Multimeter to this group.
Open the interface of the Multimeter. In Final Cut Pro X: Select the compound clip and click the icon next to the 'Multimeter' title in the audio inspector.
Now the project is ready to be measured and adjusted as described in previous chapters.
Note of caution for Final Cut Pro X: Make sure that the volume slider at the top of the audio inspector of this 'master bus compound clip' stays at 0 dB at all times. It operates on the audio signal after the Multimeter and therefore its effect is not detectable by the Multimeter. I.e. changing this volume will render the entire loudness measurement and adjustment useless.
Daisychained Multimeters
If multiple Multimeters are used in the same processing chain - e.g. if they are connected in series with some processing (like effects or channel faders) in between -, some care must be taken.
Don't measure and adjust on daisychained Multimeters simultaneously.
This can easily happen if daisychained Multimeters belong to the same sync group. Use different sync groups on daisychained Multimeters to prevent it.
An example of why simultaneously operated daisychained Multimeters can lead to an unexpected result
Lets assume a constellation like this:
track audio
-> track fx: Multimeter A
-> track fader
-> master fx: another plug-in
-> master fx: Multimeter B
-> master fader
-> output
where both Multimeters have their adjustment gain faders at 0 LU. To further simplify the example, lets assume that the faders are at unity gain (0dB) and the other plug-in doesn't change the audio at all:
track audio
-> track fx: Multimeter A
-> master fx: Multimeter B
-> output
For the loudness measurement, the track audio gets played from
start to finish. Let’s assume it has a loudness of I = -15 LUFS
and the adjustment target is -25 LUFS. After the playback, the
Multimeter A as well as the Multimeter B shows that
the audio that passed through them has a loudness of I = -15
LUFS. If you hit the ‘adjust to’ button of Multimeter A,
its adjustment gain will be set to -10 LU and the loudness of its
output will be I = -25 LUFS.
At this point of time, the Multimeter B has not yet heard
the audio with the applied adjustment of Multimeter A. Its
measurement is still at I = -15 LUFS. So if you also hit the
‘adjust to’ button of Multimeter B, its adjustment gain
will be set to -10 LU too. Because all it knows is that the last
time it received audio, it received audio with a loudness of I =
-15 LUFS. It does not know that the next time the audio gets
played back, its loudness will be 10 LU lower.
If you now play the audio back, it will have a loudness of I = -15 LUFS at the input of the Multimeter A, a loudness of I = -25 LUFS at the input of Multimeter B and a loudness of I = -35 LUFS at the output of Multimeter B. Even though the adjustment target of Multimeter B is set to -25 LUFS.
(If you measure the loudness of the incoming audio of Multimeter B again and hit the ‘adjust to’ button of Multimeter B afterwards, its output will now also be at -25 LUFS, as originally desired.)
Multiple sync groups
Here are two use cases for multiple sync groups.
One sync group can be used for all the Multimeters coming first on each audio track in a project - for the gain staging. Another sync group can be used for all the Multimeters that are placed as the last plug-in on each audio track - for the faders up mix.
It can also be quite useful to have a separate sync group of Multimeters for a section of instruments that belong together. To e.g. create a faders up mix for all the violas in an arrangement.
Settings and presets
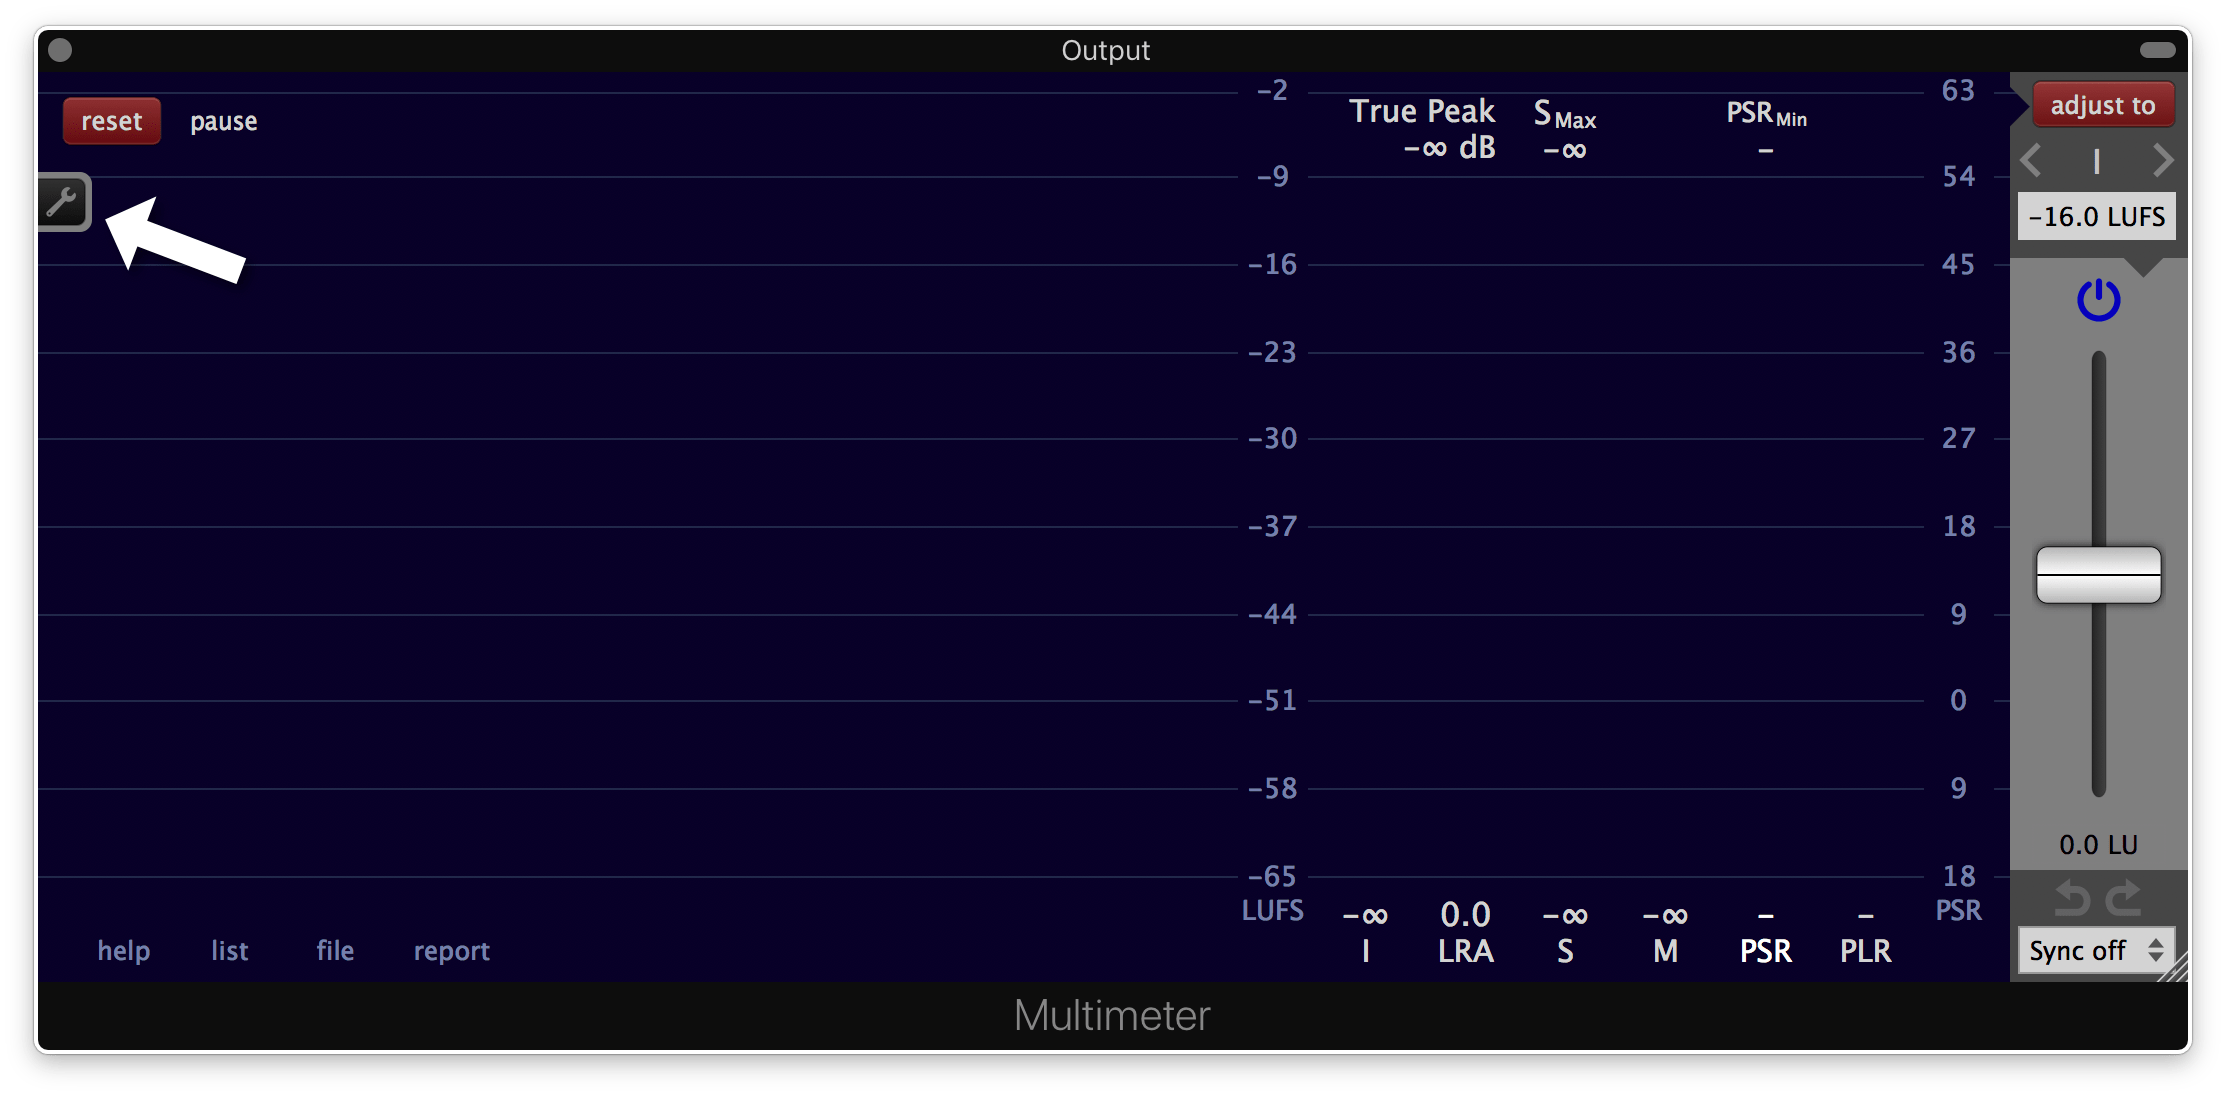
Click the wrench symbol on the left to show or hide the 'settings and presets' panel.
The 'settings and presets' panel can be opened in its own window by clicking the rectangular button on the left side.

Presets
A preset is a snapshot of all settings. It also contains the size of the plug-in window.
The Multimeter comes with a selection of presets for different use cases. They are called factory presets. Factory presets can't be changed or deleted.
Newly created presets are called user presets. Each user preset is stored in a separate file. These files are located at
- macOS:
/Users/<your user name>/Music/Audio Music Apps/Klangfreund/Multimeter/UserPresets/ - Windows:
C:\Users\<your user name>\AppData\Roaming\Klangfreund\Multimeter\UserPresets\ - Linux:
~/.config/Klangfreund/Multimeter/UserPresets/
Load a preset
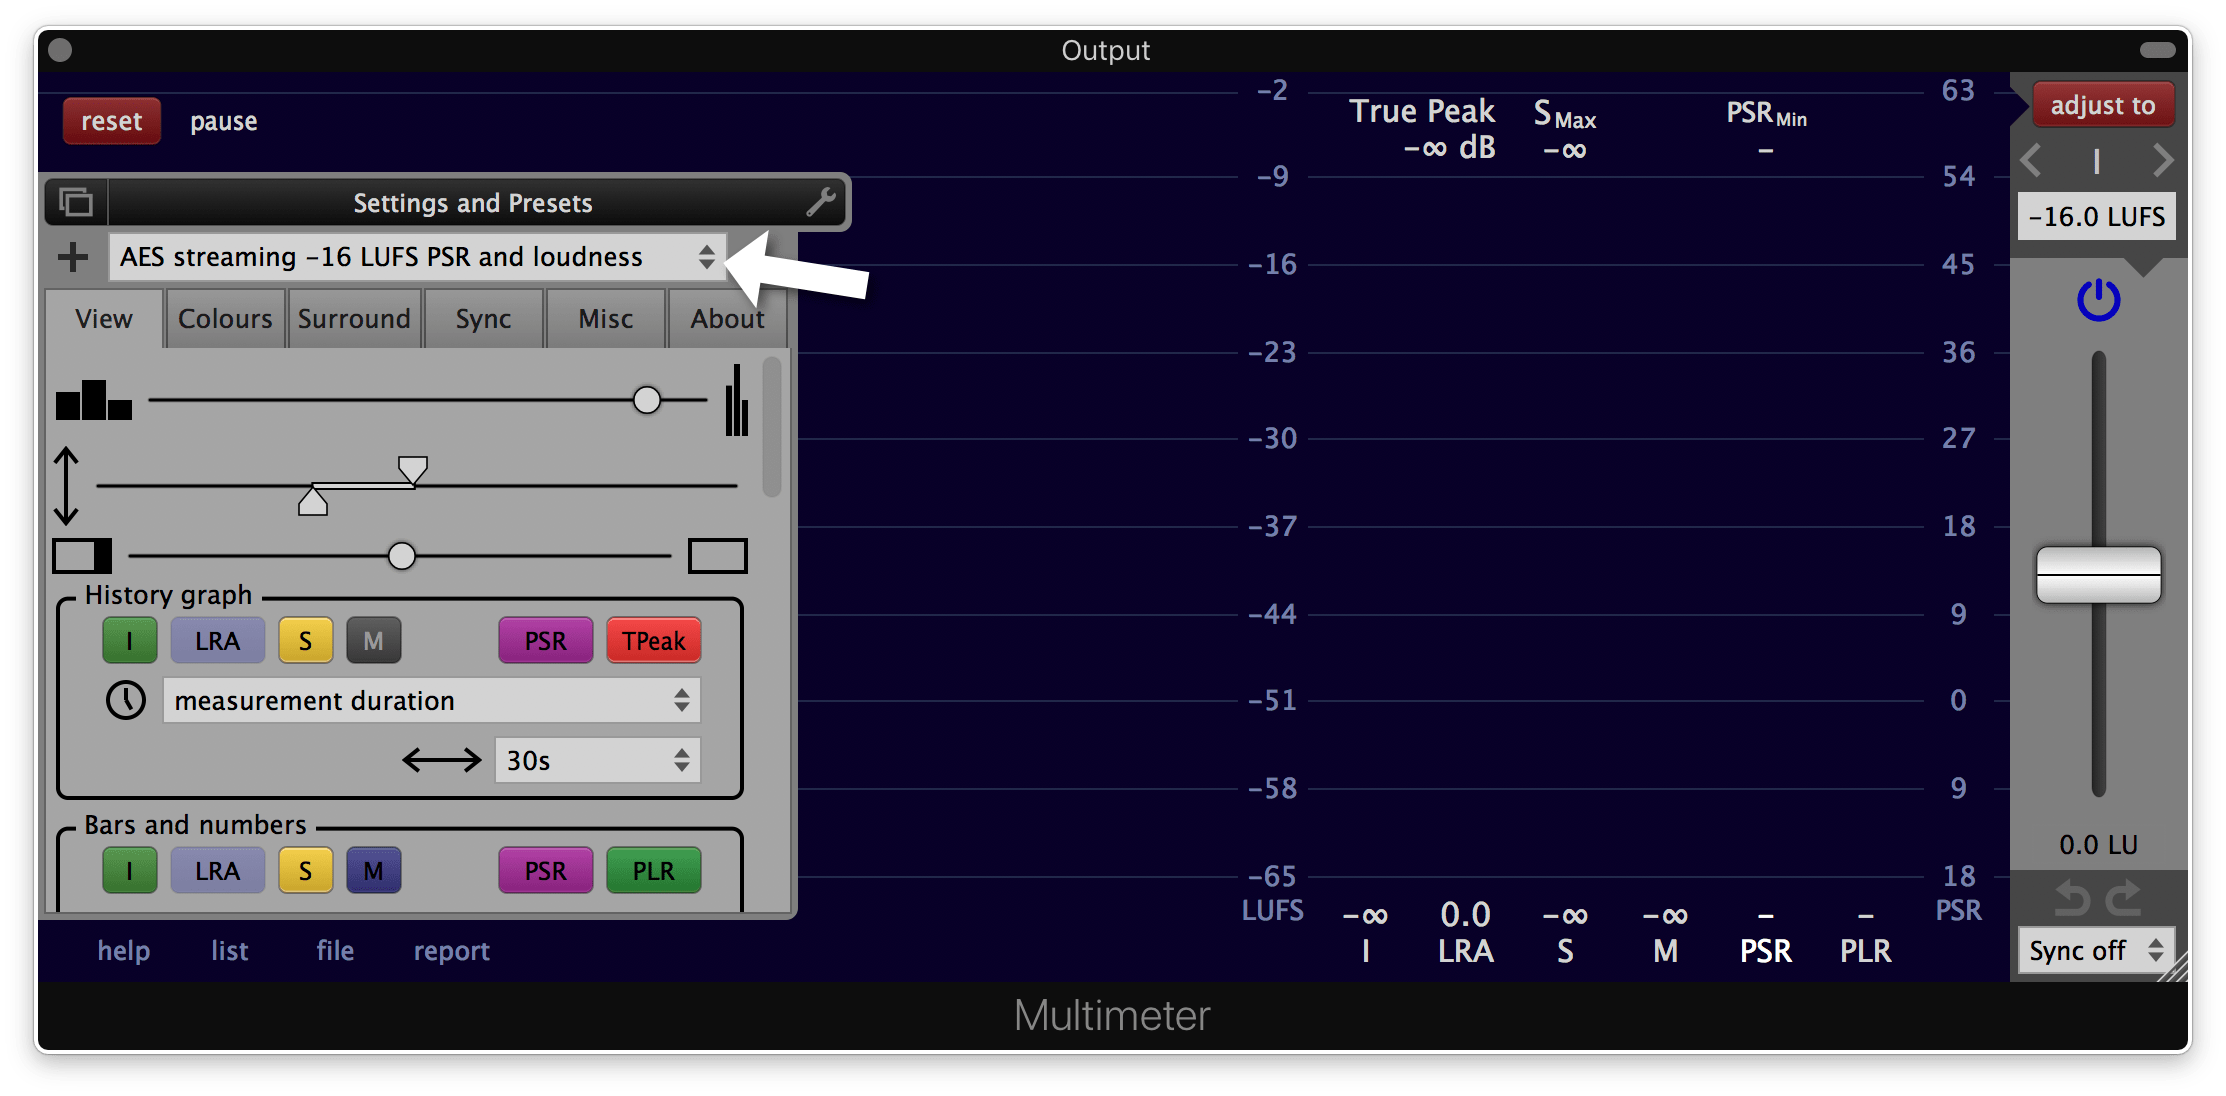
Select a preset from the preset list at the top of the preferences panel to load it.
Each settings section can be protected from being changed when a preset gets loaded. To enable or disable this protection, click the lock icon at the bottom right of the settings section. A protected settings section has a yellowish background colour.
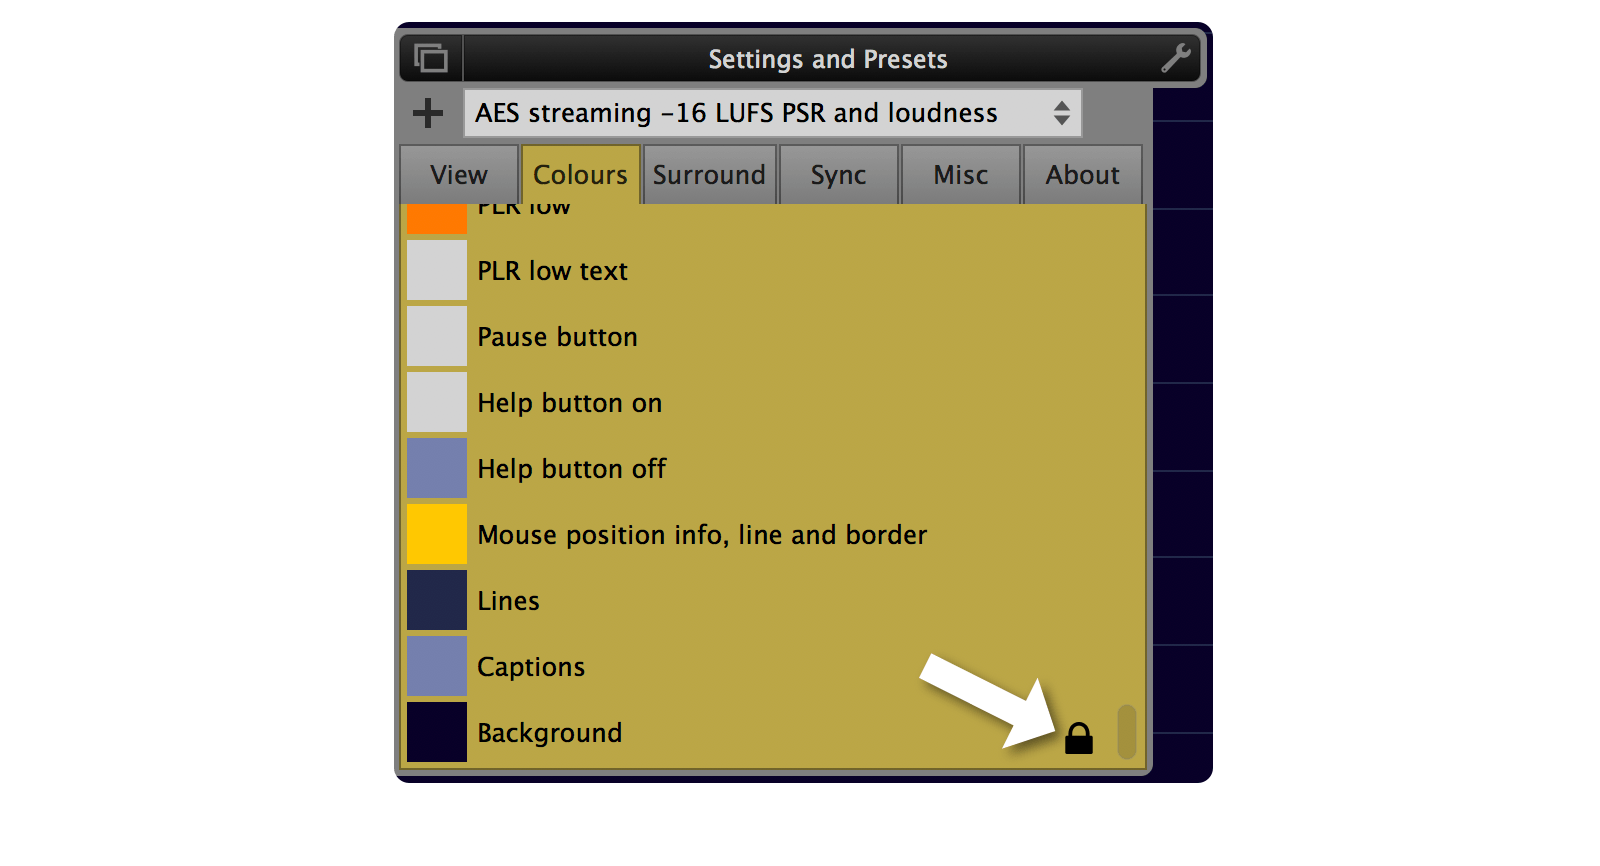
This makes it possible to e.g. switch between different presets while keeping the current interface colours.
Save a preset
Click the '+' button to save the current settings to a new or existing preset.

A dialog with multiple options will appear:

- Create a new preset...
- ... It can be named in the field on the right.
- Replace the current preset. Factory presets can't be replaced. But a user preset with the same name can be created instead.
- Save as the startup preset. The startup preset will be loaded when the Multimeter launches. It is stored as a user preset named 'startup'.
Delete a preset

To delete a preset click the '-' button. This button isn't visible when a factory preset is loaded because a factory preset can't be deleted.

A confirmation dialog will appear. Once confirmed, the file of this preset will be deleted from the disk.
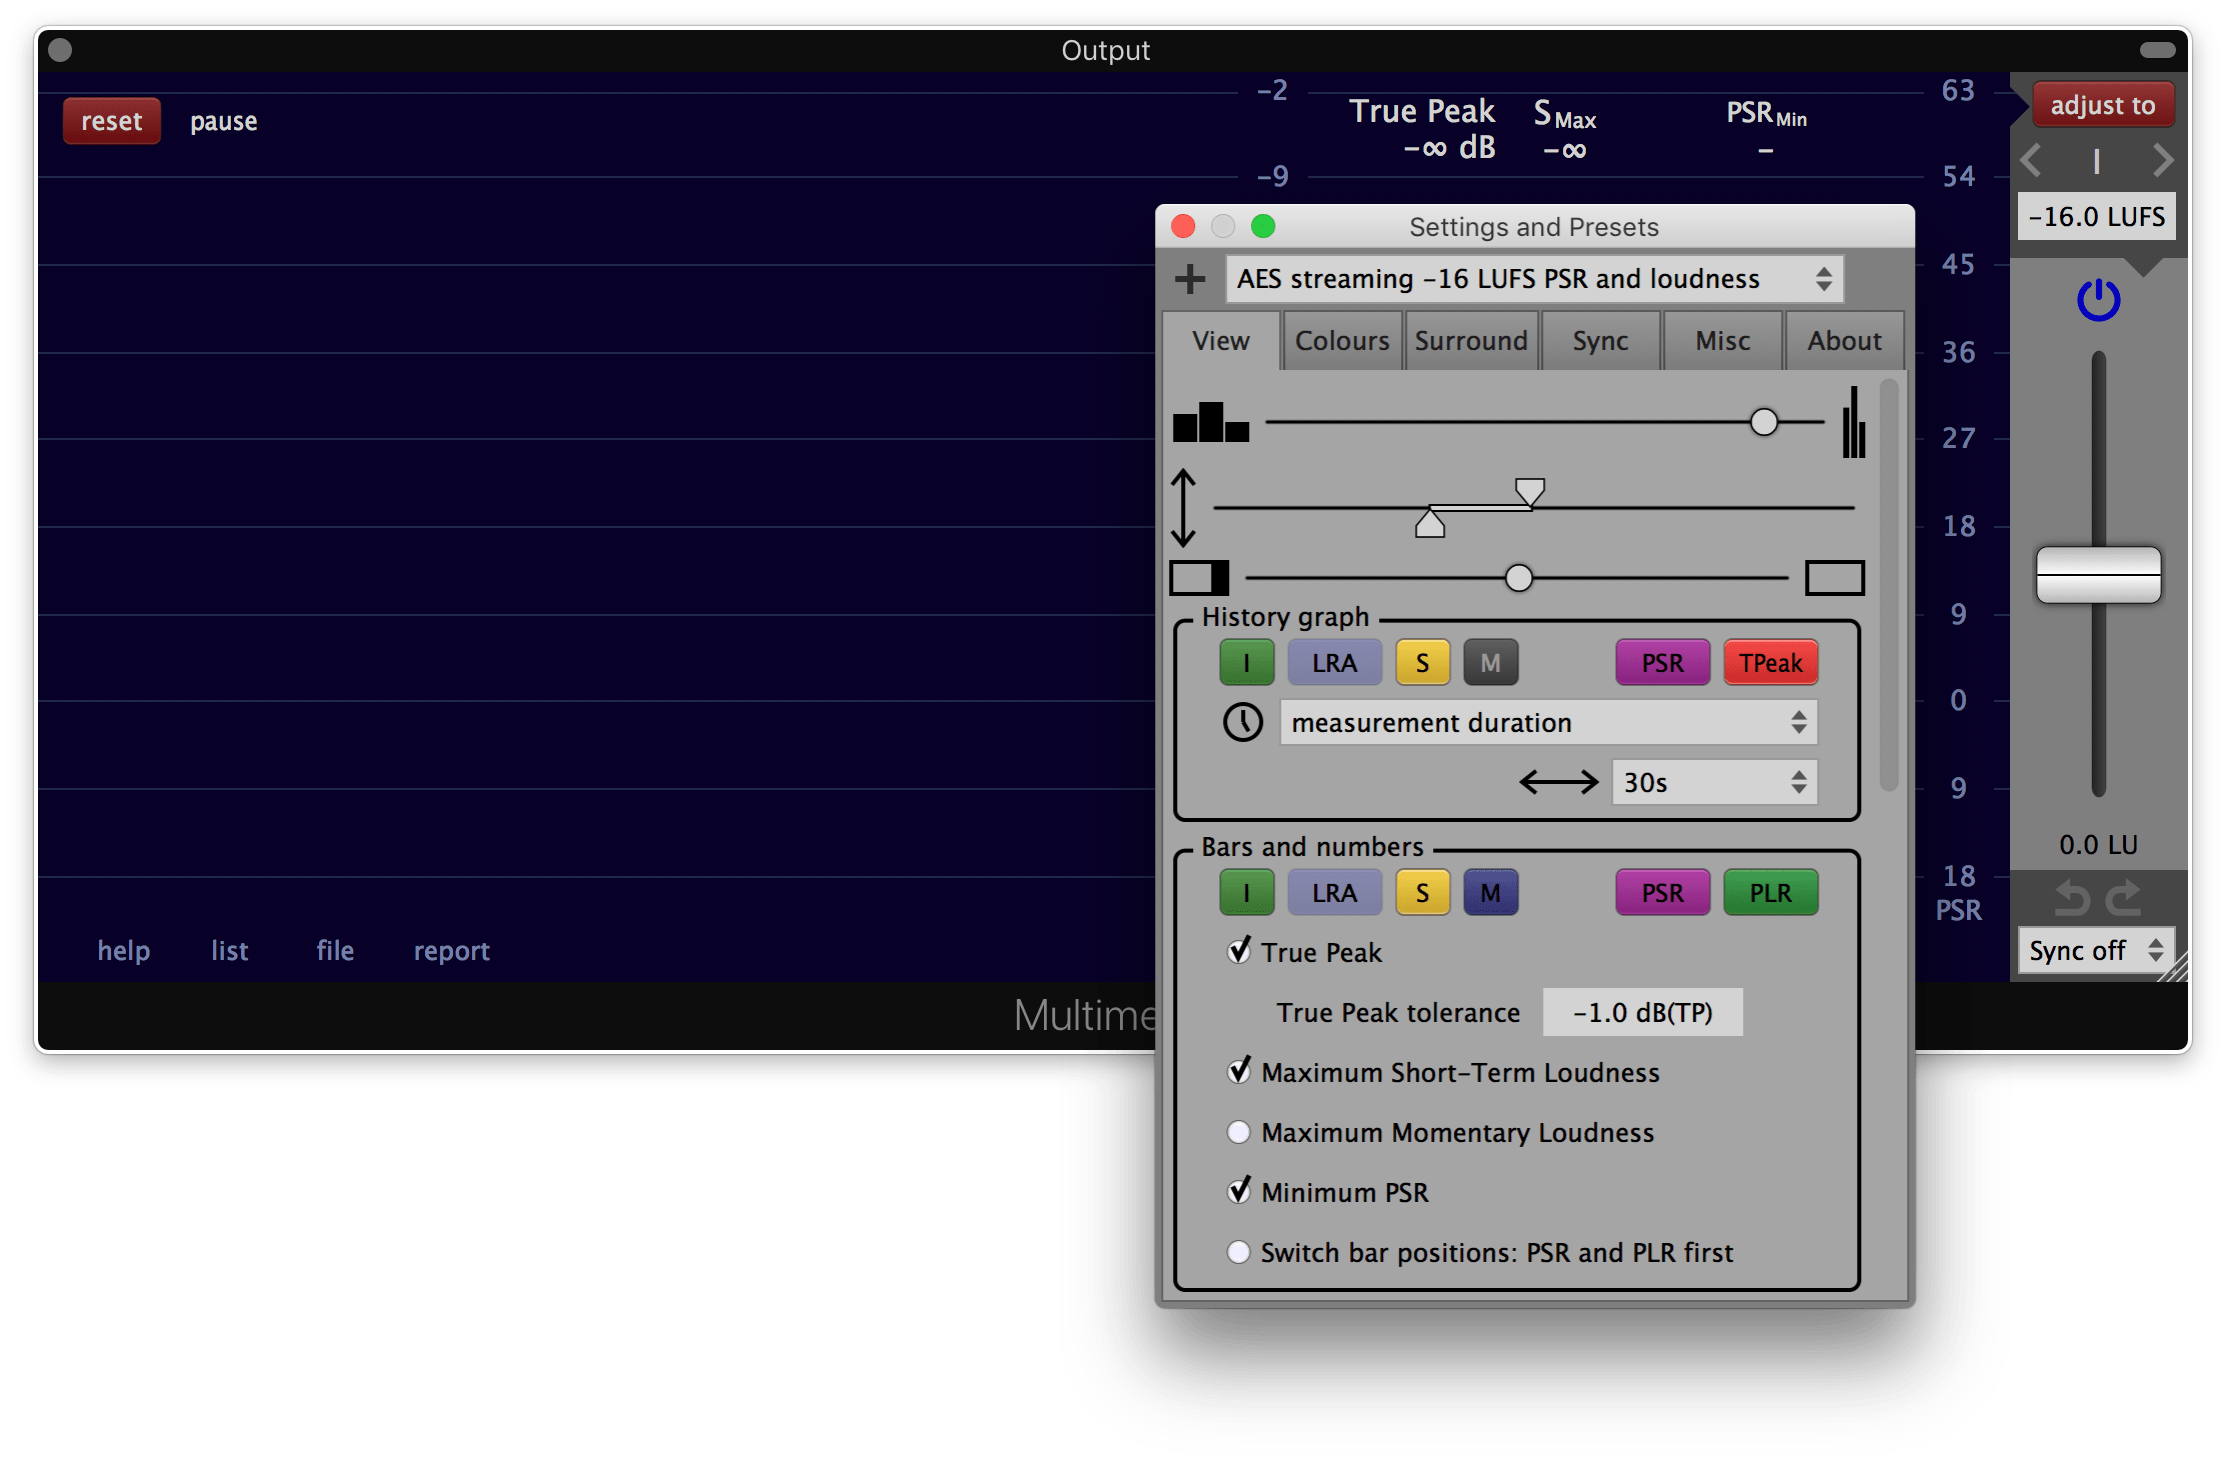
View settings
- Loudness bars size.
Sets the size of the loudness bars as well as the size of the text below them. The size of the entire interface can be changed with the 'Interface size' at the end of this settings section (27). - Loudness range.
Specifies the visible loudness range for the loudness bars as well as for the loudness history graph. Can also be changed by click and drag on the loudness caption between the history graph and the bars. - Adjustment section size.
Sets the size of the loudness adjustment section on the right side. If pulled all the way to the right, the adjustment section will be entirely hidden. - Shows or hides the individual measurement graphs
in the history graph.
To show the PSR and the true peak, the true peak calculation has to be enabled in the Misc section. - Time caption.
Specifies how the time will be displayed in the history graphs. The available options are
'measurement duration',
'time from host: bars, beats, ticks' and
'time from host: seconds'. - Time range.
Sets the visible time range of the history graph. Can also be changed by placing the mouse over the history graph and click and drag vertically with the mouse or by using the mouse wheel. - Shows or hides the individual measurement bars and
numbers.
- Displays the true peak value.
To display the true peak value, the true peak calculation has to be enabled in the Misc section. - Maximum true peak tolerance.
Sets the threshold at which the colour of the true peak value will change. The maximum true peak tolerance is given in most loudness specifications. If 'auto' is selected, the tolerance is set to the value where an exeeding true peak could actually lead to clipping in the continuous time signal. This is dependent on the sample rate and the oversampling factor used for the true peak calculation. The auto tolerance is equal to the negative maximum true peak deviation set in the true peak area in the Misc section. - Shows the maximum short-term loudness
at the top of the short-term loudness bar.
This value is important for short measurement periods (<2min) according to EBU R 128 s1. - Shows the maximum momentary loudness at the top of the momentary loudness bar.
- Minimum PSR.
Shows the minimum peak to short-term ratio at the top of the peak to short-term bar. Needs the true peak calculation to be enabled (in the Misc section). - Switch bar positions: PSR and PLR first.
If enabled, the PSR and PLR bars are displayed left of the loudness bars. Otherwise, they are displayed on the right of the loudness bars. Needs the true peak calculation to be enabled (in the Misc section). - Upper tolerance for the integrated loudness.
With the upper and the lower tolerance a target interval can be specified to visually highlight the area around the integrated loudness target. Particularly useful in live applications. - Integrated loudness target.
Sets the integrated loudness target. - Lower tolerance for the integrated loudness.
With the upper and the lower tolerance a target interval can be specified to visually highlight the area around the integrated loudness target. Particularly useful in live applications. - Upper tolerance for the short-term loudness.
With the upper and the lower tolerance a target interval can be specified to visually highlight the area around the short-term loudness target. Particularly useful in live applications. - Short-term loudness target.
Sets the short-term loudness target. - Lower tolerance for the short-term loudness.
With the upper and the lower tolerance a target interval can be specified to visually highlight the area around the short-term loudness target. Particularly useful in live applications. - Relative scale.
To use the absolute LUFS scale set this to 0 LUFS. To use a relative LU scale instead, specify where 0 LU should be on the LUFS loudness scale. - Zero position for PSR and PLR.
The vertical position for a PSR or PLR value of zero. Needs the true peak calculation to be enabled (in the Misc section).
Can also be changed by click and drag vertically on the 'PSR and PLR caption' next to the PSR and PLR bars. - Range of the PSR and PLR.
To zoom in or out on the PSR and PLR scale. Needs the true peak calculation to be enabled (in the Misc section).
Can also be changed by click and drag horizontally on the 'PSR and PLR caption' next to the PSR and PLR bars. - PSR reference.
To visually indicate a reference PSR. It is drawn as a horizontal line in the history graph. Needs the true peak calculation to be enabled (in the Misc section). - High peak to loudness ratio threshold.
With the three threshold values for the peak to loudness ratio, different colour areas can be defined to provide visual feedback on the PLR bar, dependent on the value of the PLR. Needs the true peak calculation to be enabled (in the Misc section). - Middle peak to loudness ratio threshold.
With the three threshold values for the peak to loudness ratio, different colour areas can be defined to provide visual feedback on the PLR bar, dependent on the value of the PLR. Needs the true peak calculation to be enabled (in the Misc section). - Low peak to loudness ratio threshold.
With the three threshold values for the peak to loudness ratio, different colour areas can be defined to provide visual feedback on the PLR bar, dependent on the value of the PLR. Needs the true peak calculation to be enabled (in the Misc section). - Interface size.
To change the size of the entire interface. This is a global setting that stays the same for all presets and all plug-in instances. Its purpose is to set a size that is confortable to work with on your screen. - Preset load protection.
If engaged, all parameters in this view section as well as the size of the Multimeter won't be changed when a preset is loaded.
Colours settings
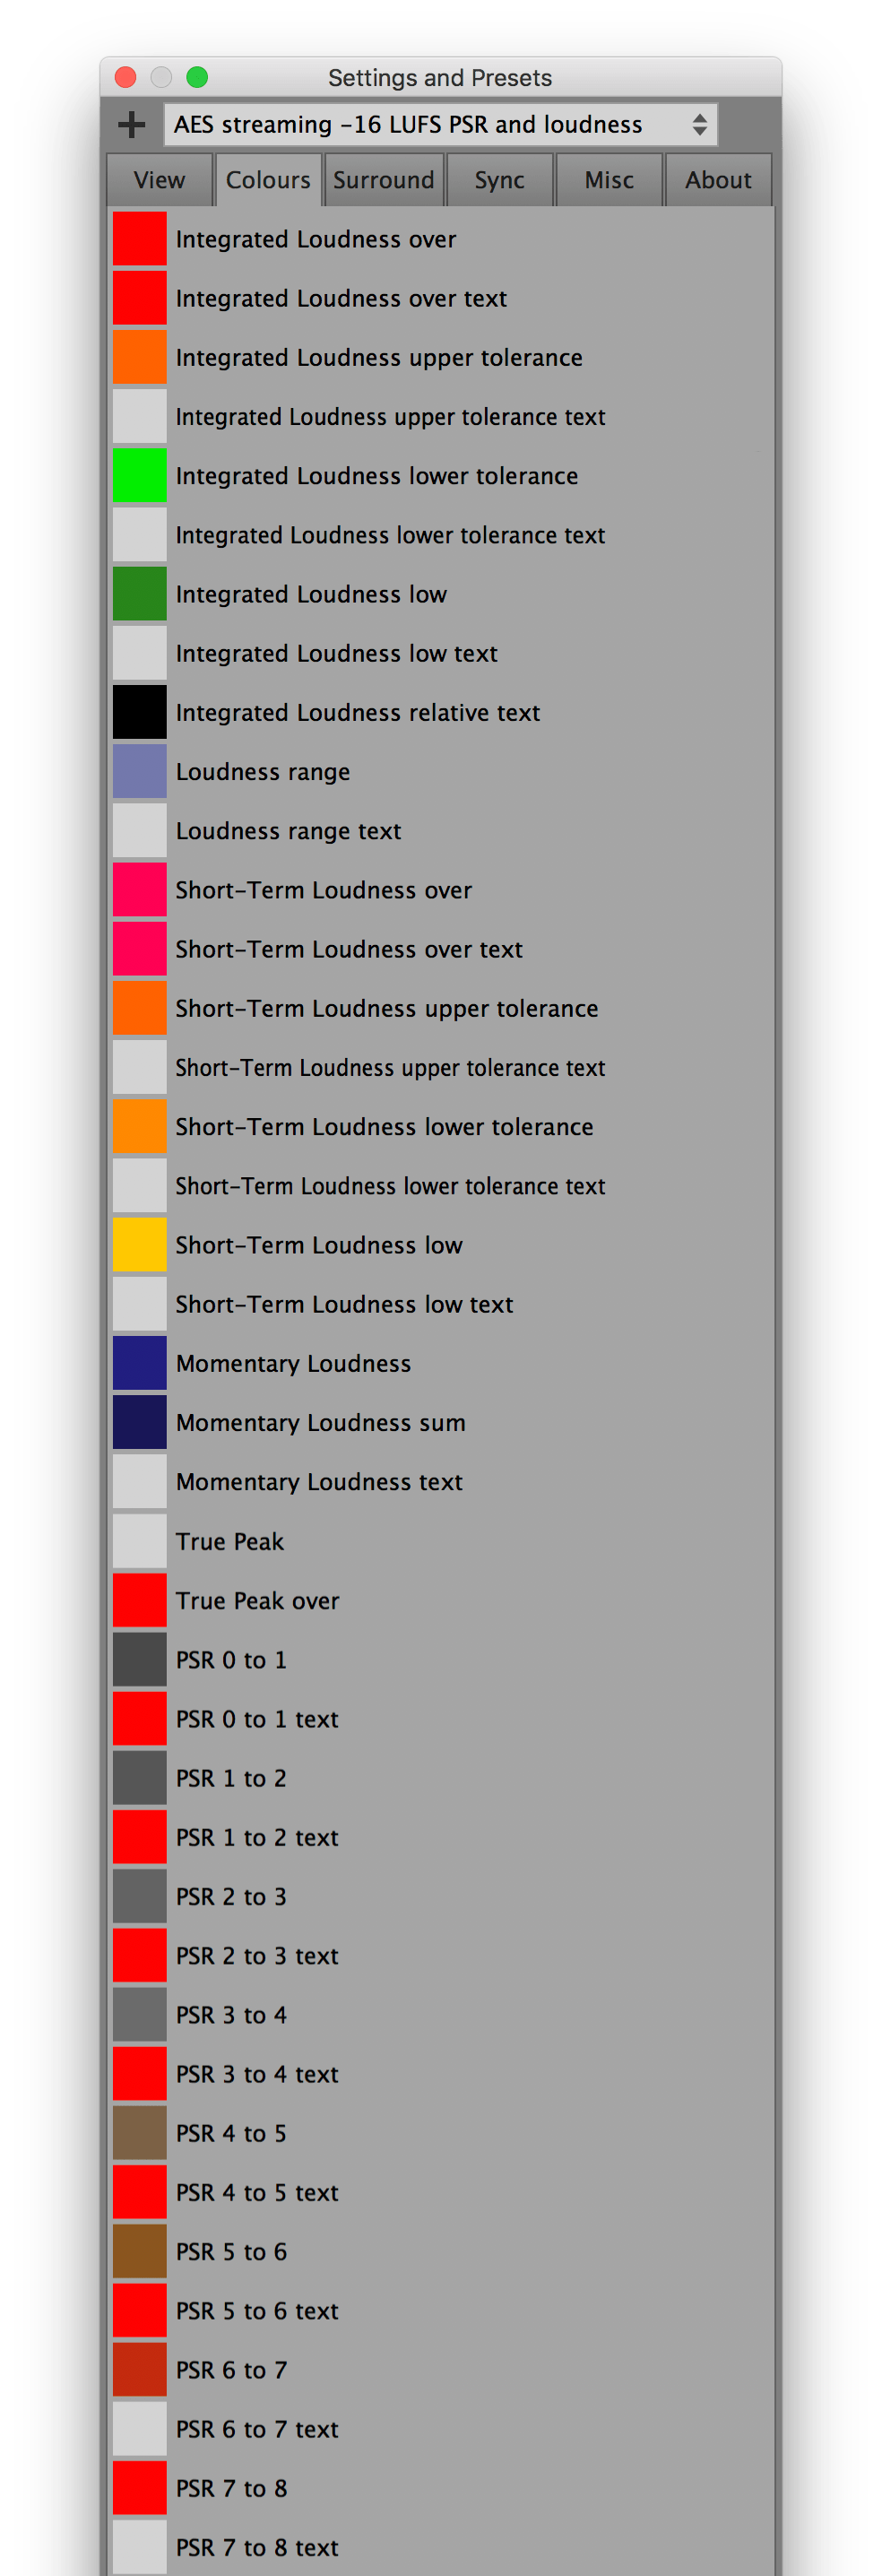
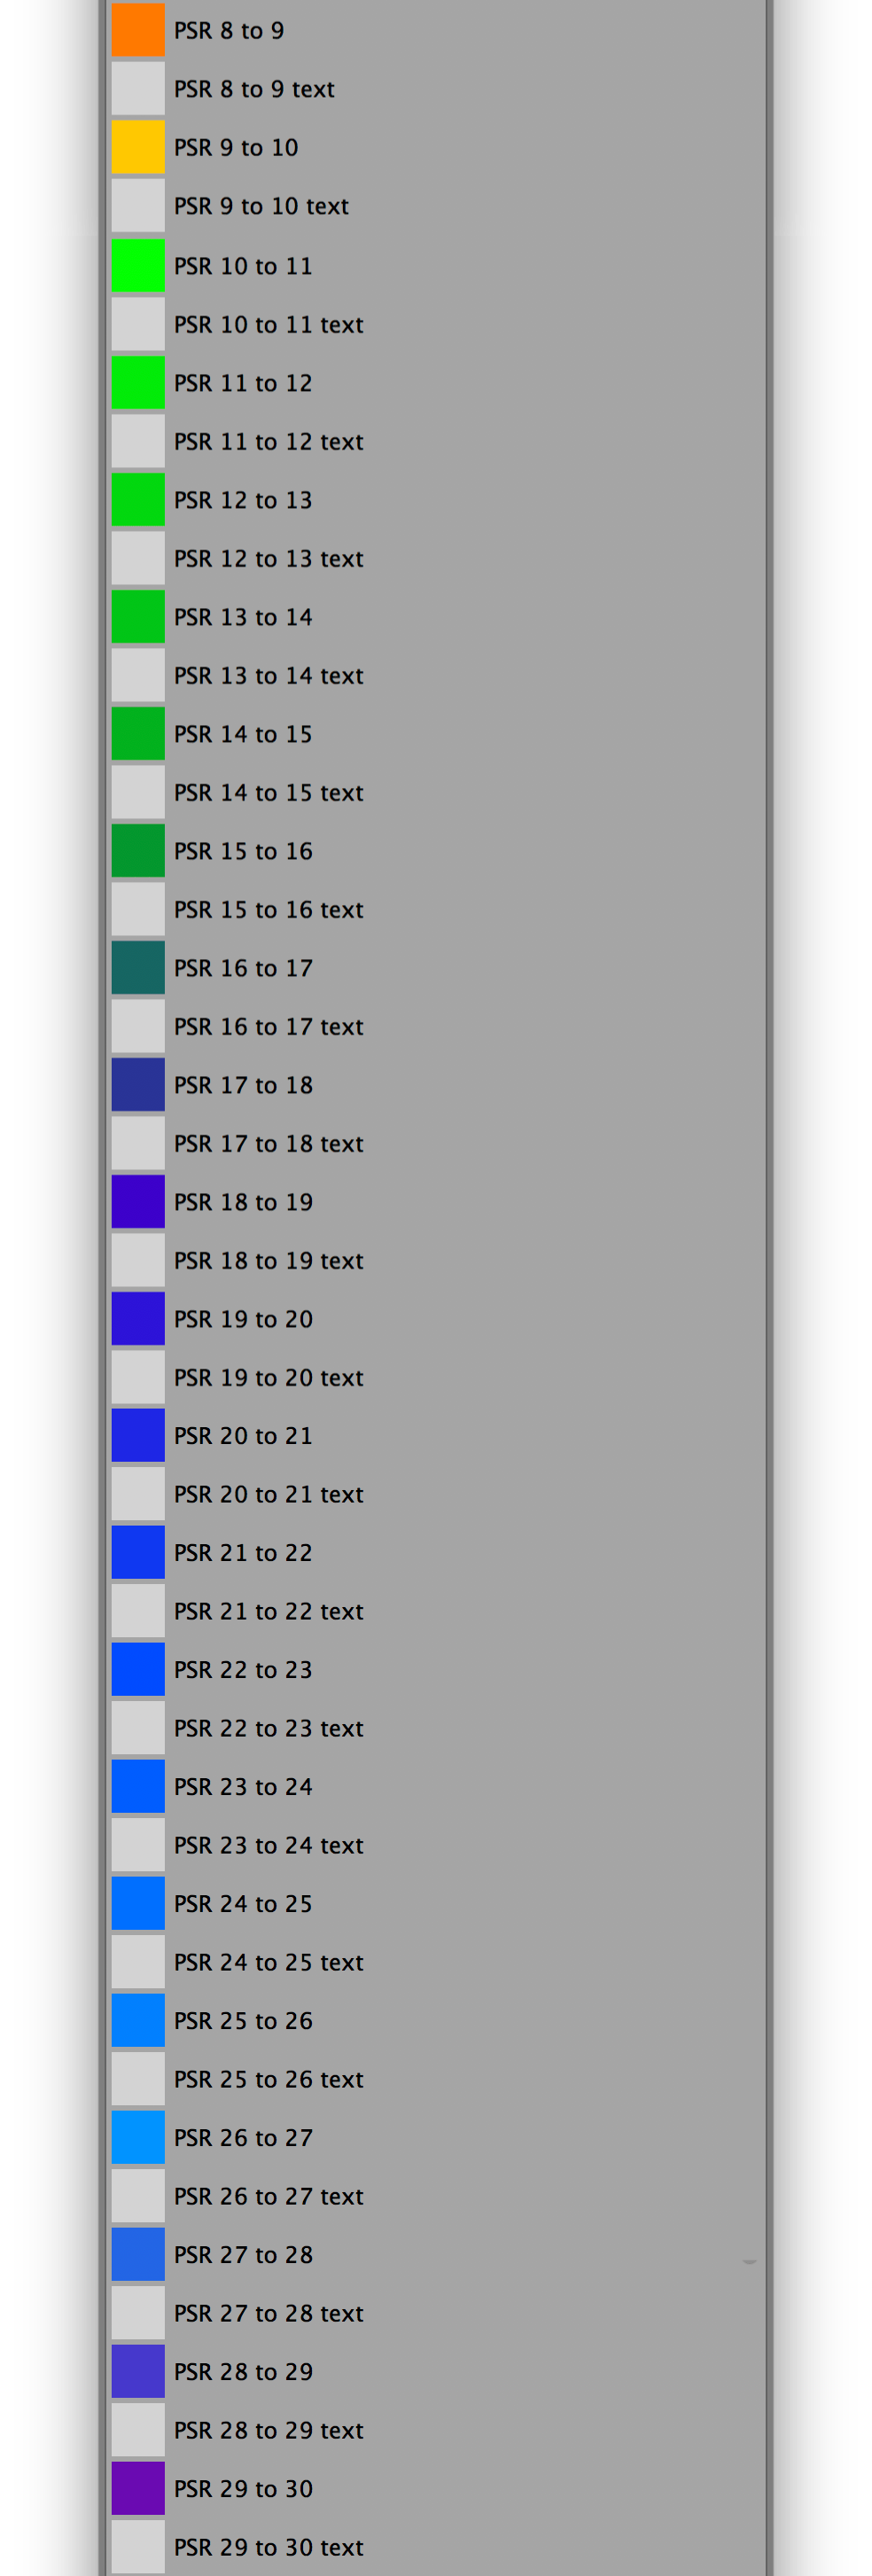
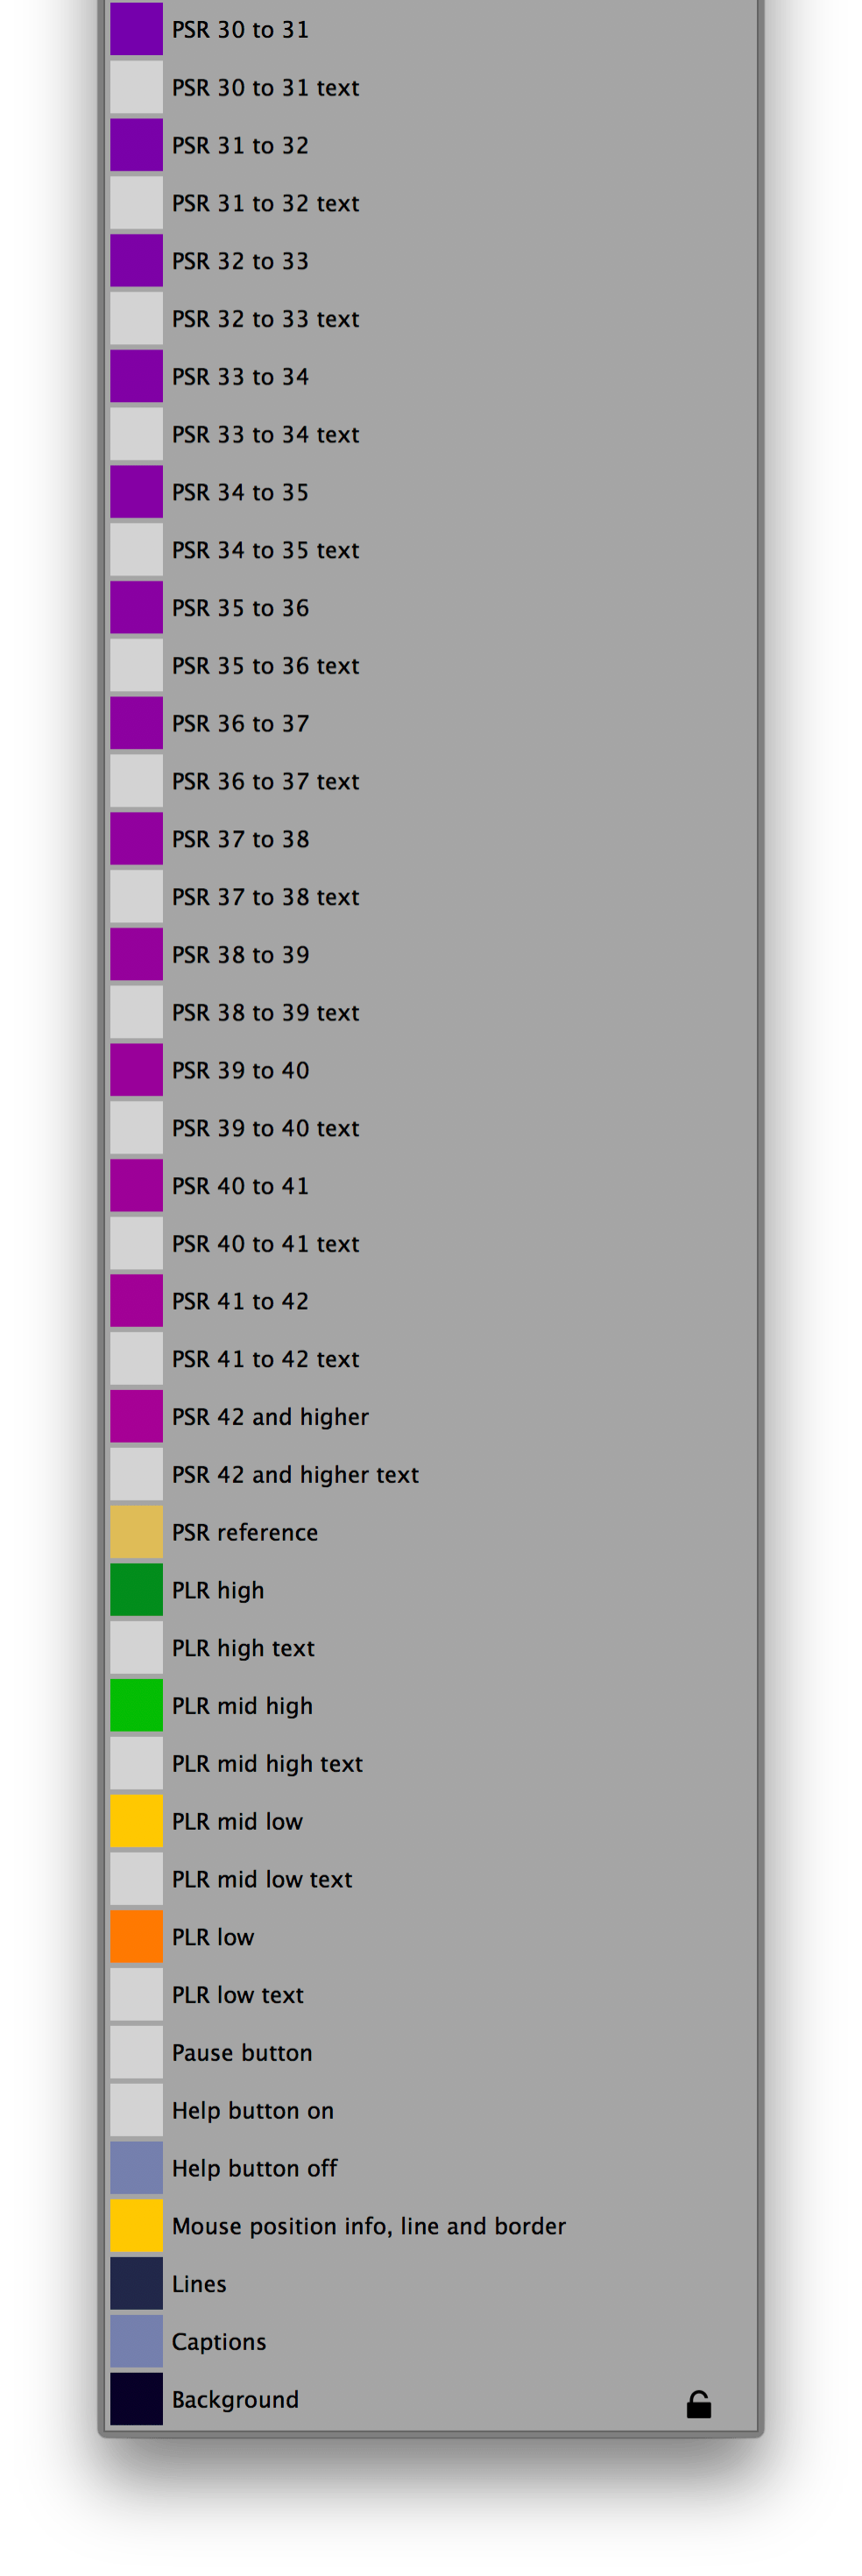
In the colours settings section, the colours of the Multimeter can be customized.
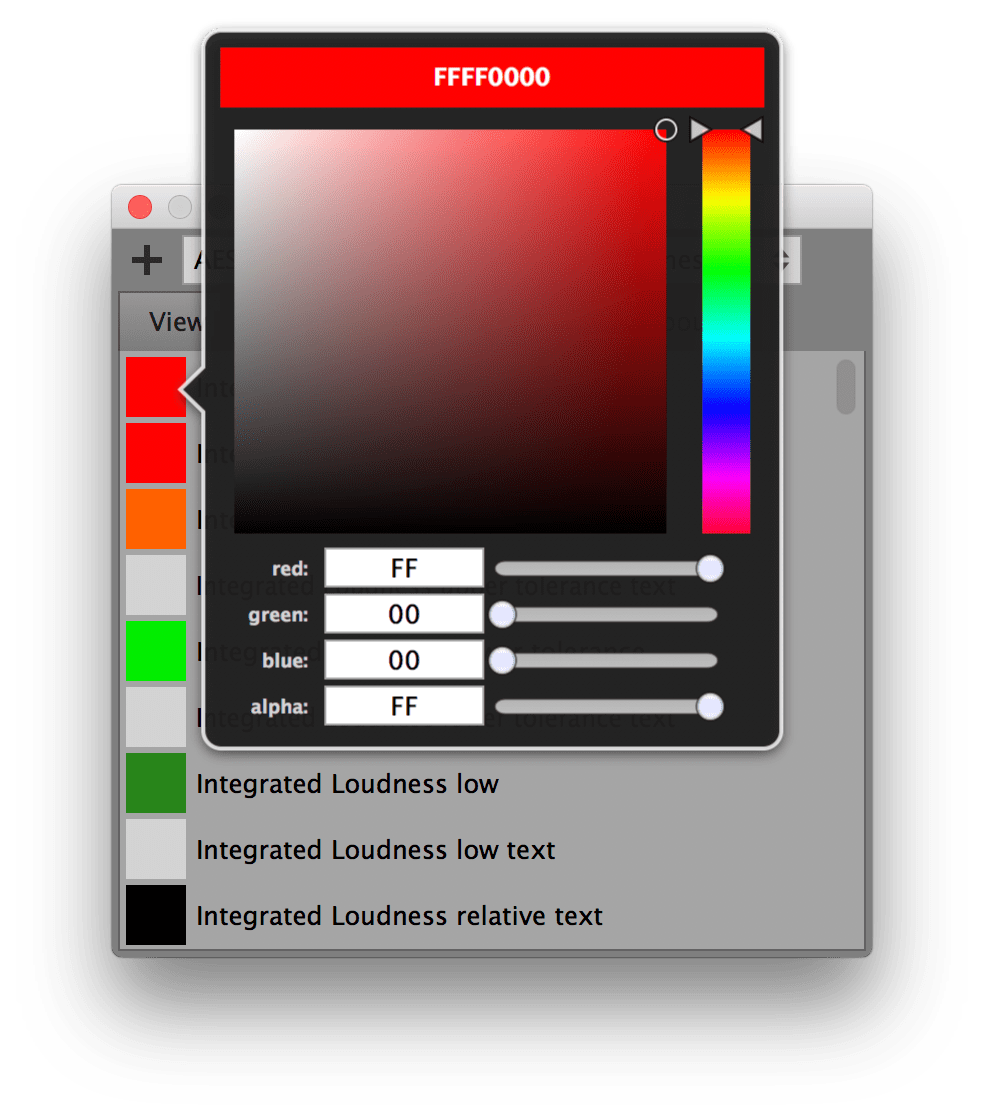
To change the colour of an item click the coloured square left to the items description. A colour selector will appear.
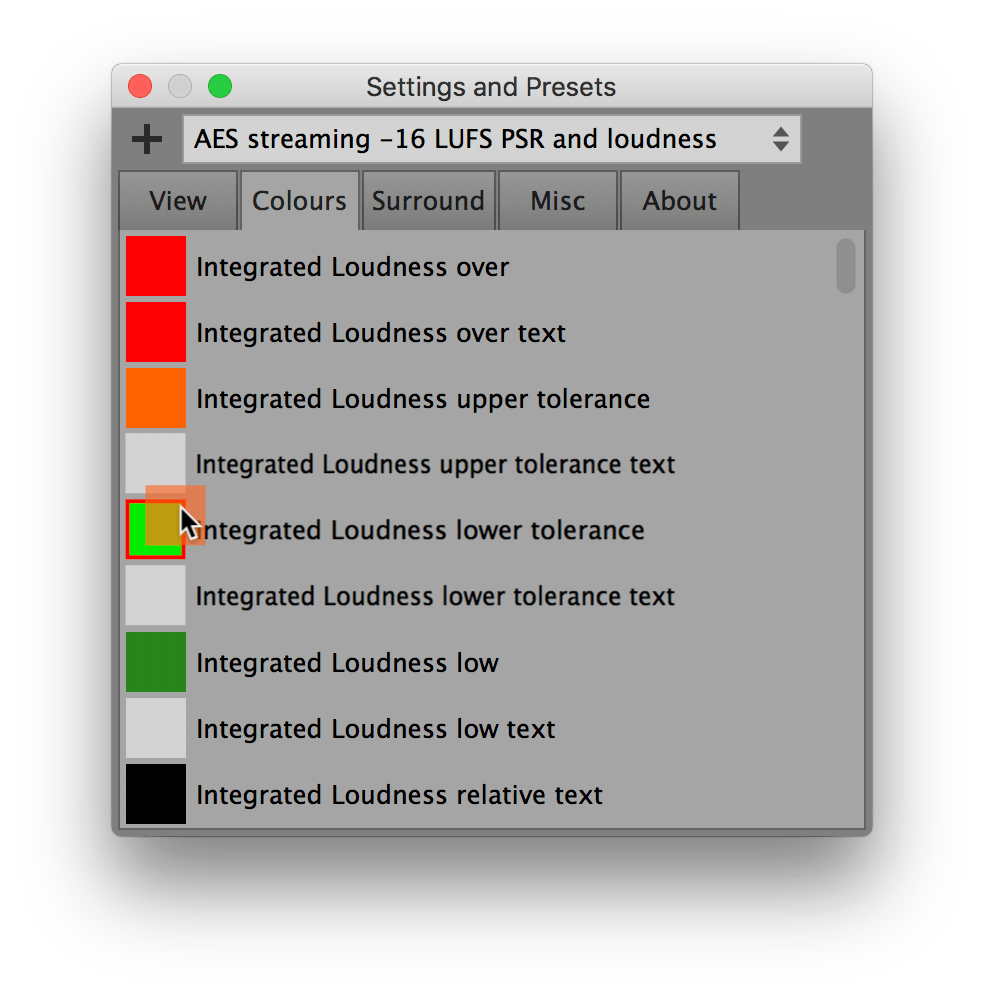
To use the exact same colour on multiple items, a coloured square can be drag and dropped over another one, to copy its colour over.
The colour settings section has a padlock icon at the bottom, like the view settings. If engaged, the current colour settings won't be altered if a preset gets loaded.
Hide the bottom buttons
If you turn the alpha value of the 'Help button off and bottom buttons' colour down to zero, the help, list, file and report buttons won't be visible anymore. You can also apply this technique to other elements of the Multimeter.
Surround settings
The channel weights as well as the names of the channels can be set in the surround settings. The channel weights determine how much each channel influences the loudness measurement (I, S, M, PSR and PLR). They don't affect the true peak measurement.
According to ITU-R BS.1770-4 p.13:
"The weightings are used to allow for the fact sounds arriving
from behind a listener may be perceived to be louder than sounds
arriving from in front of the listener."
ITU-R BS.1770-4 provides the channel weighting recommendation
for 5.1 surround:
0 dB for left, right and centre.
1.5 dB for left surround and right surround.
-∞ for the LFE.
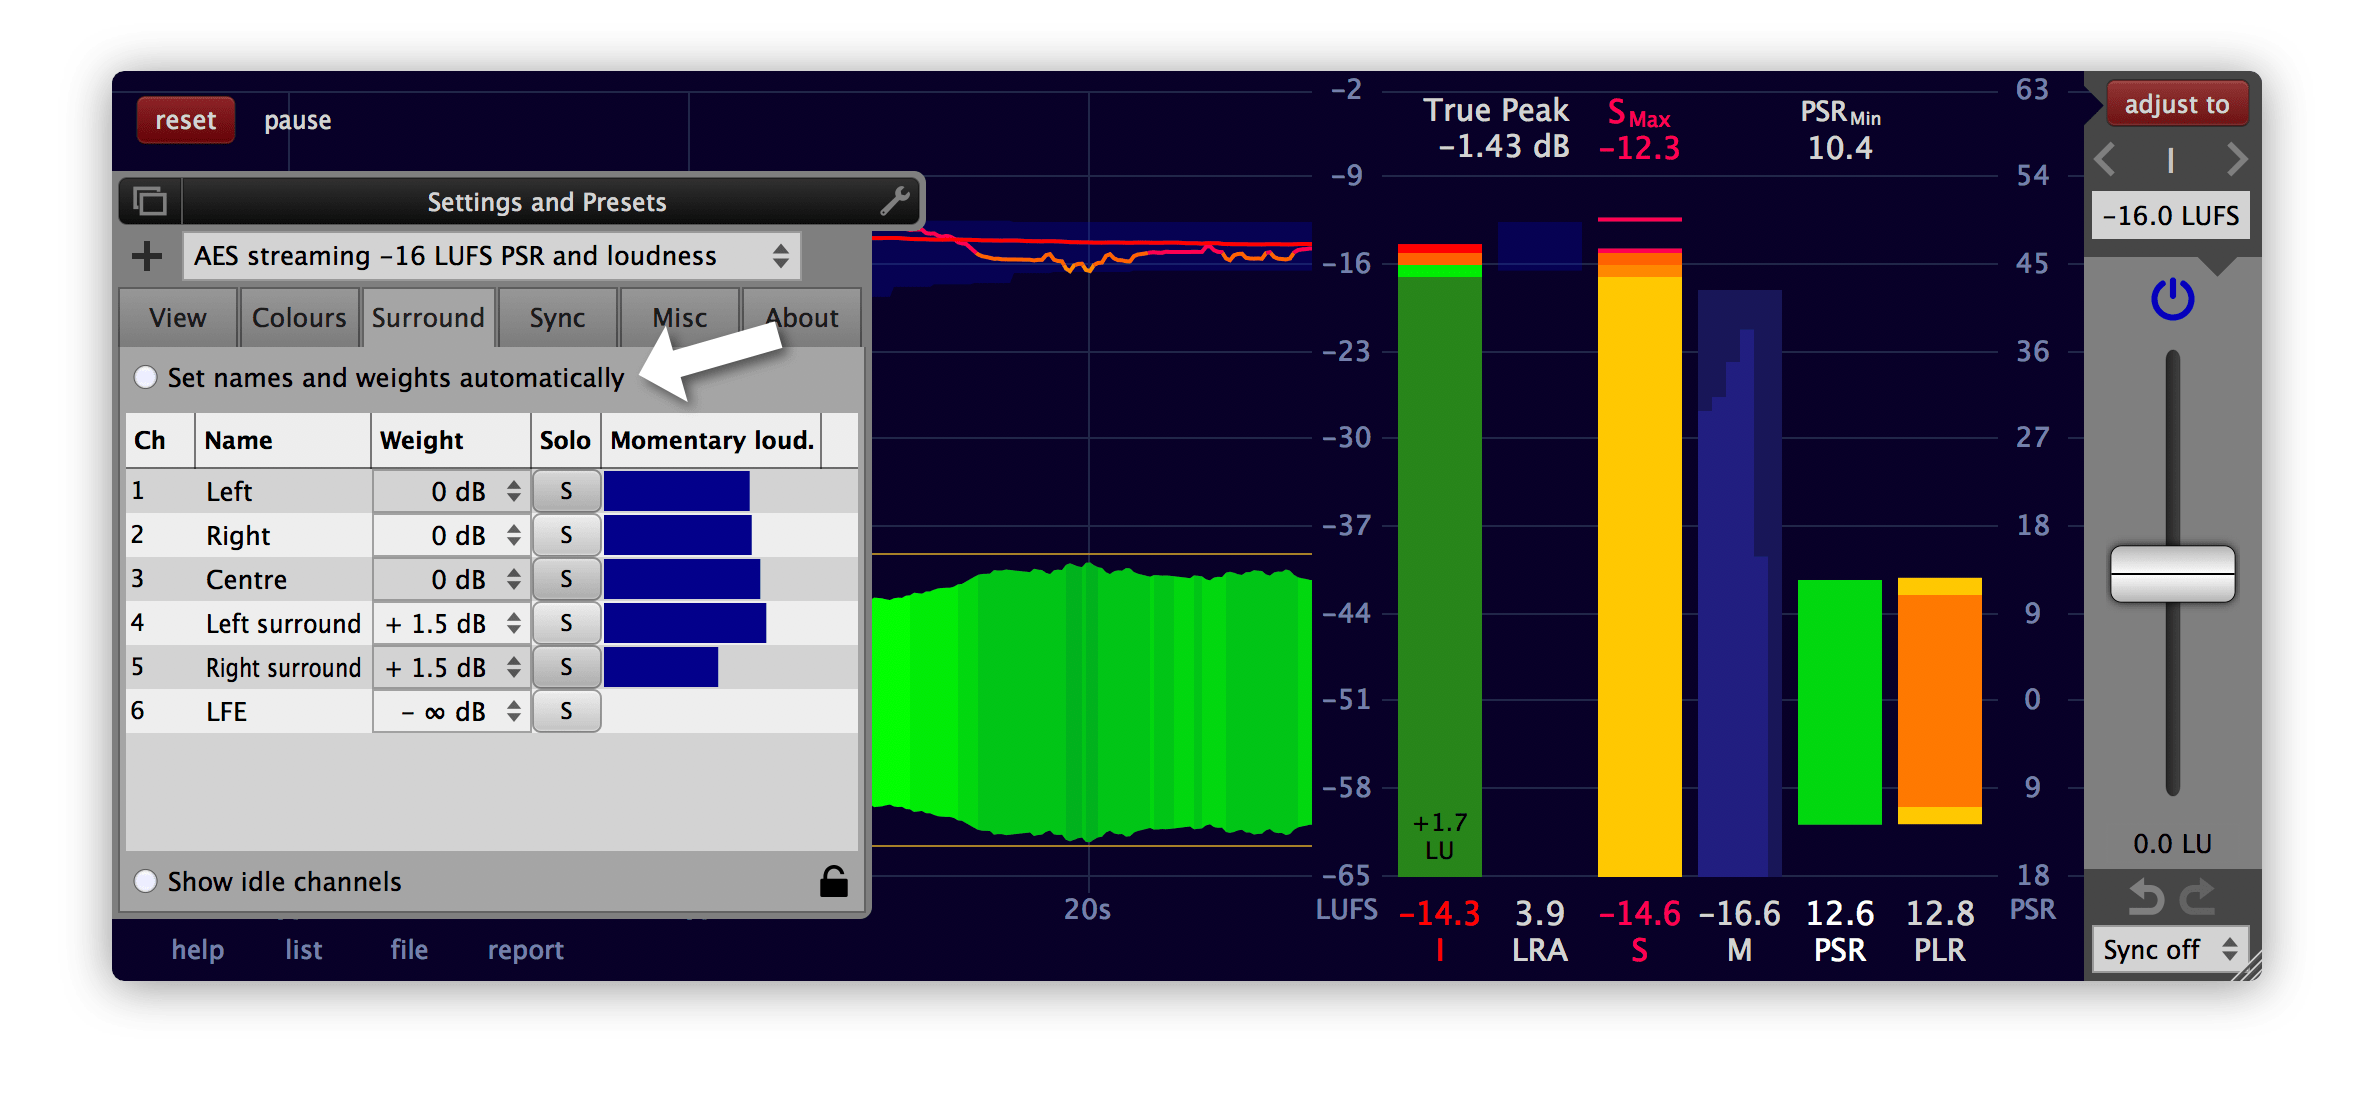
If 'Set names and weights automatically' is enabled, the Multimeter obtains the channel names from...
- ...the host - if the Multimeter operates as a plug-in.
- ...the meta data of a file - if a file is measured that contains meta data.
If 'Set names and weights automatically' is enabled, the channel weights are set based on the channel names.
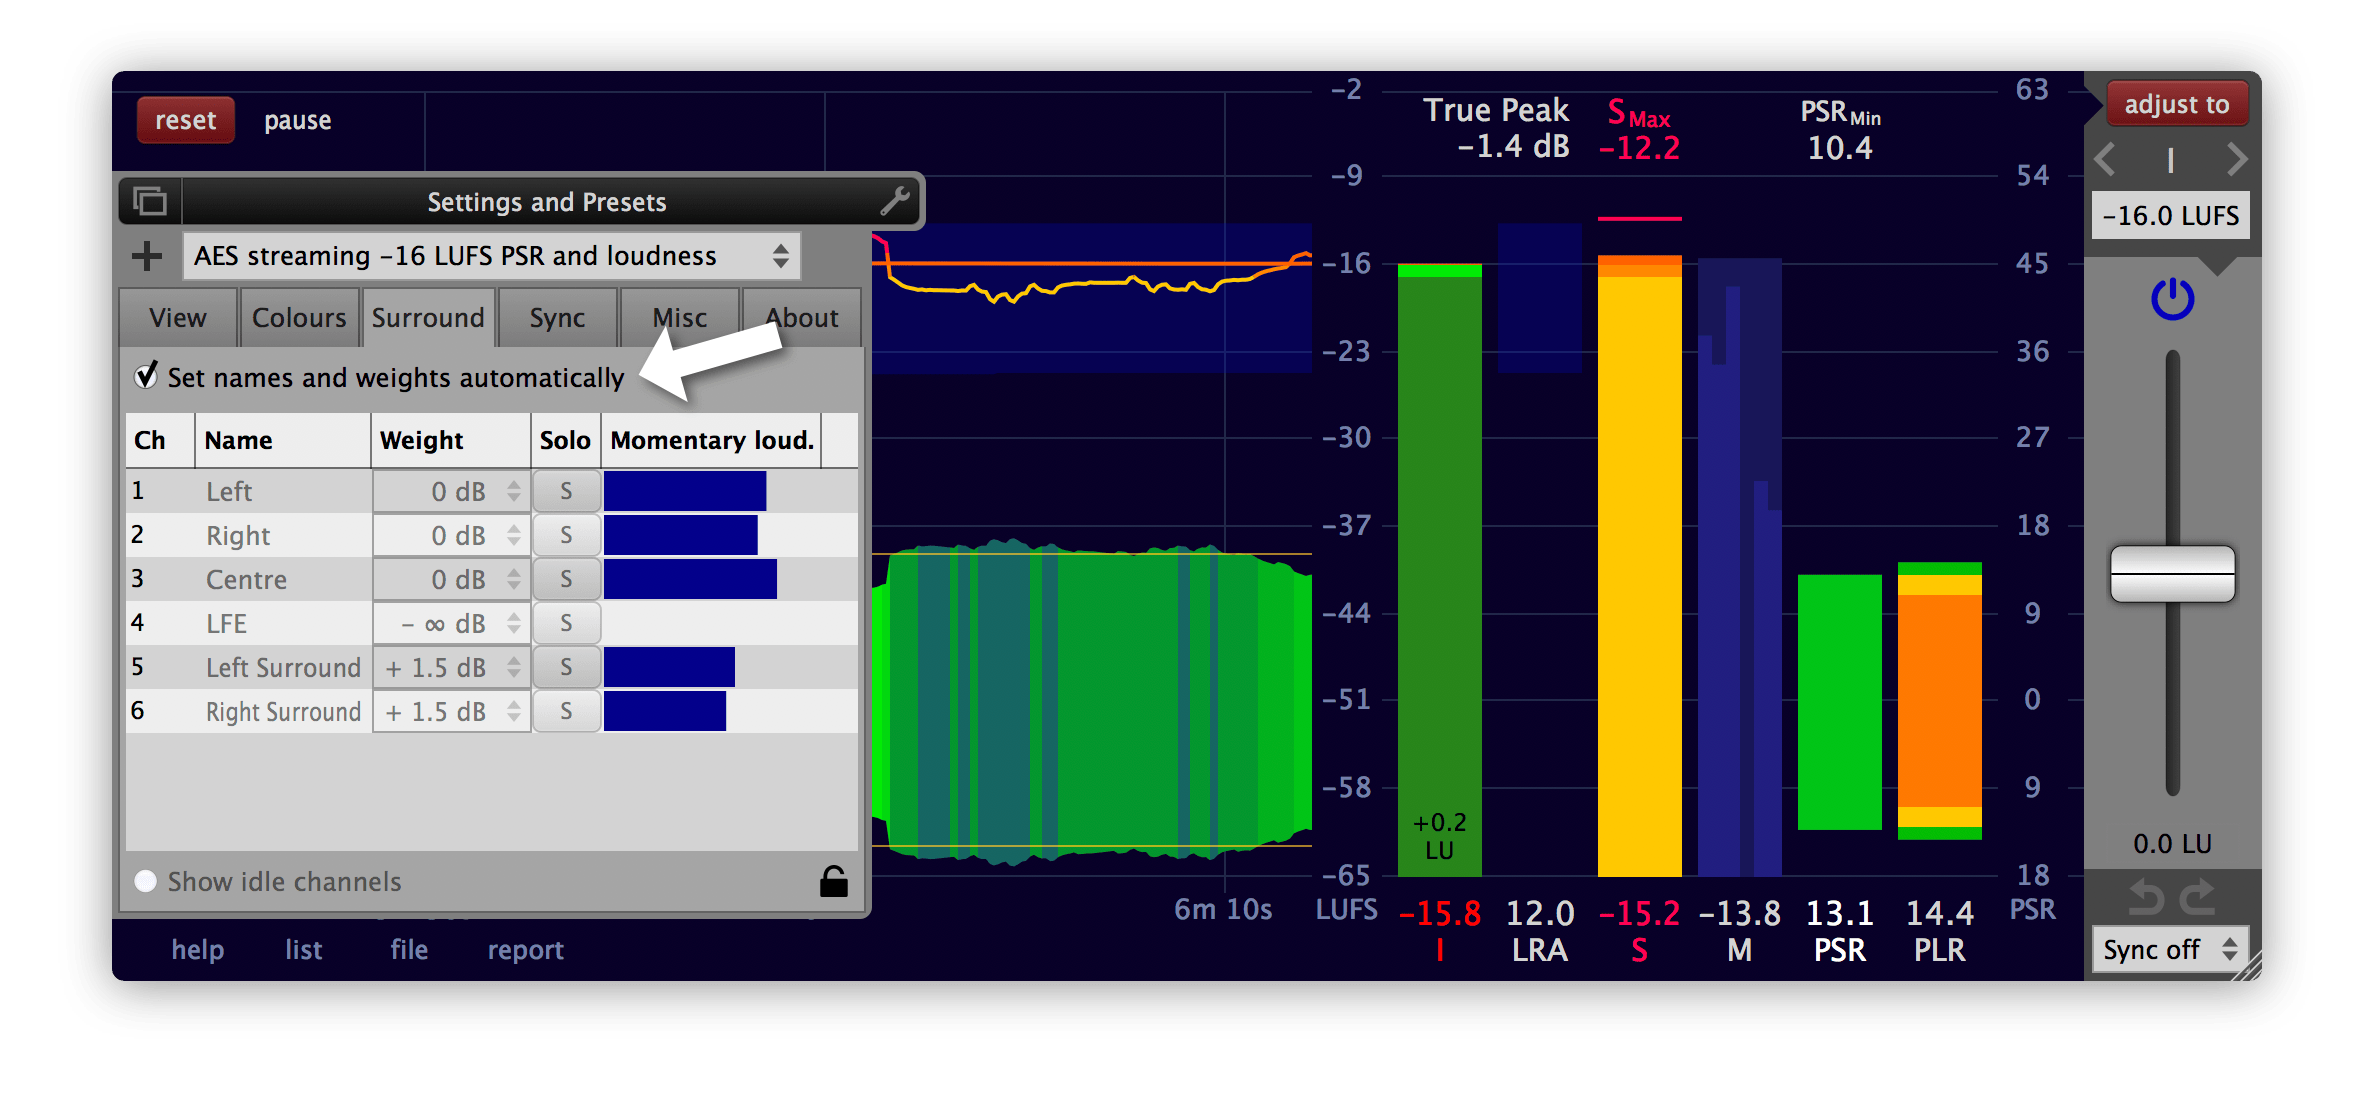
The momentary loudness of each channel is displayed in the surround settings window as well as in the main momentary loudness bar in the main interface of the Multimeter. The visualisation represents the momentary loudness of each channel after the channel weighting.
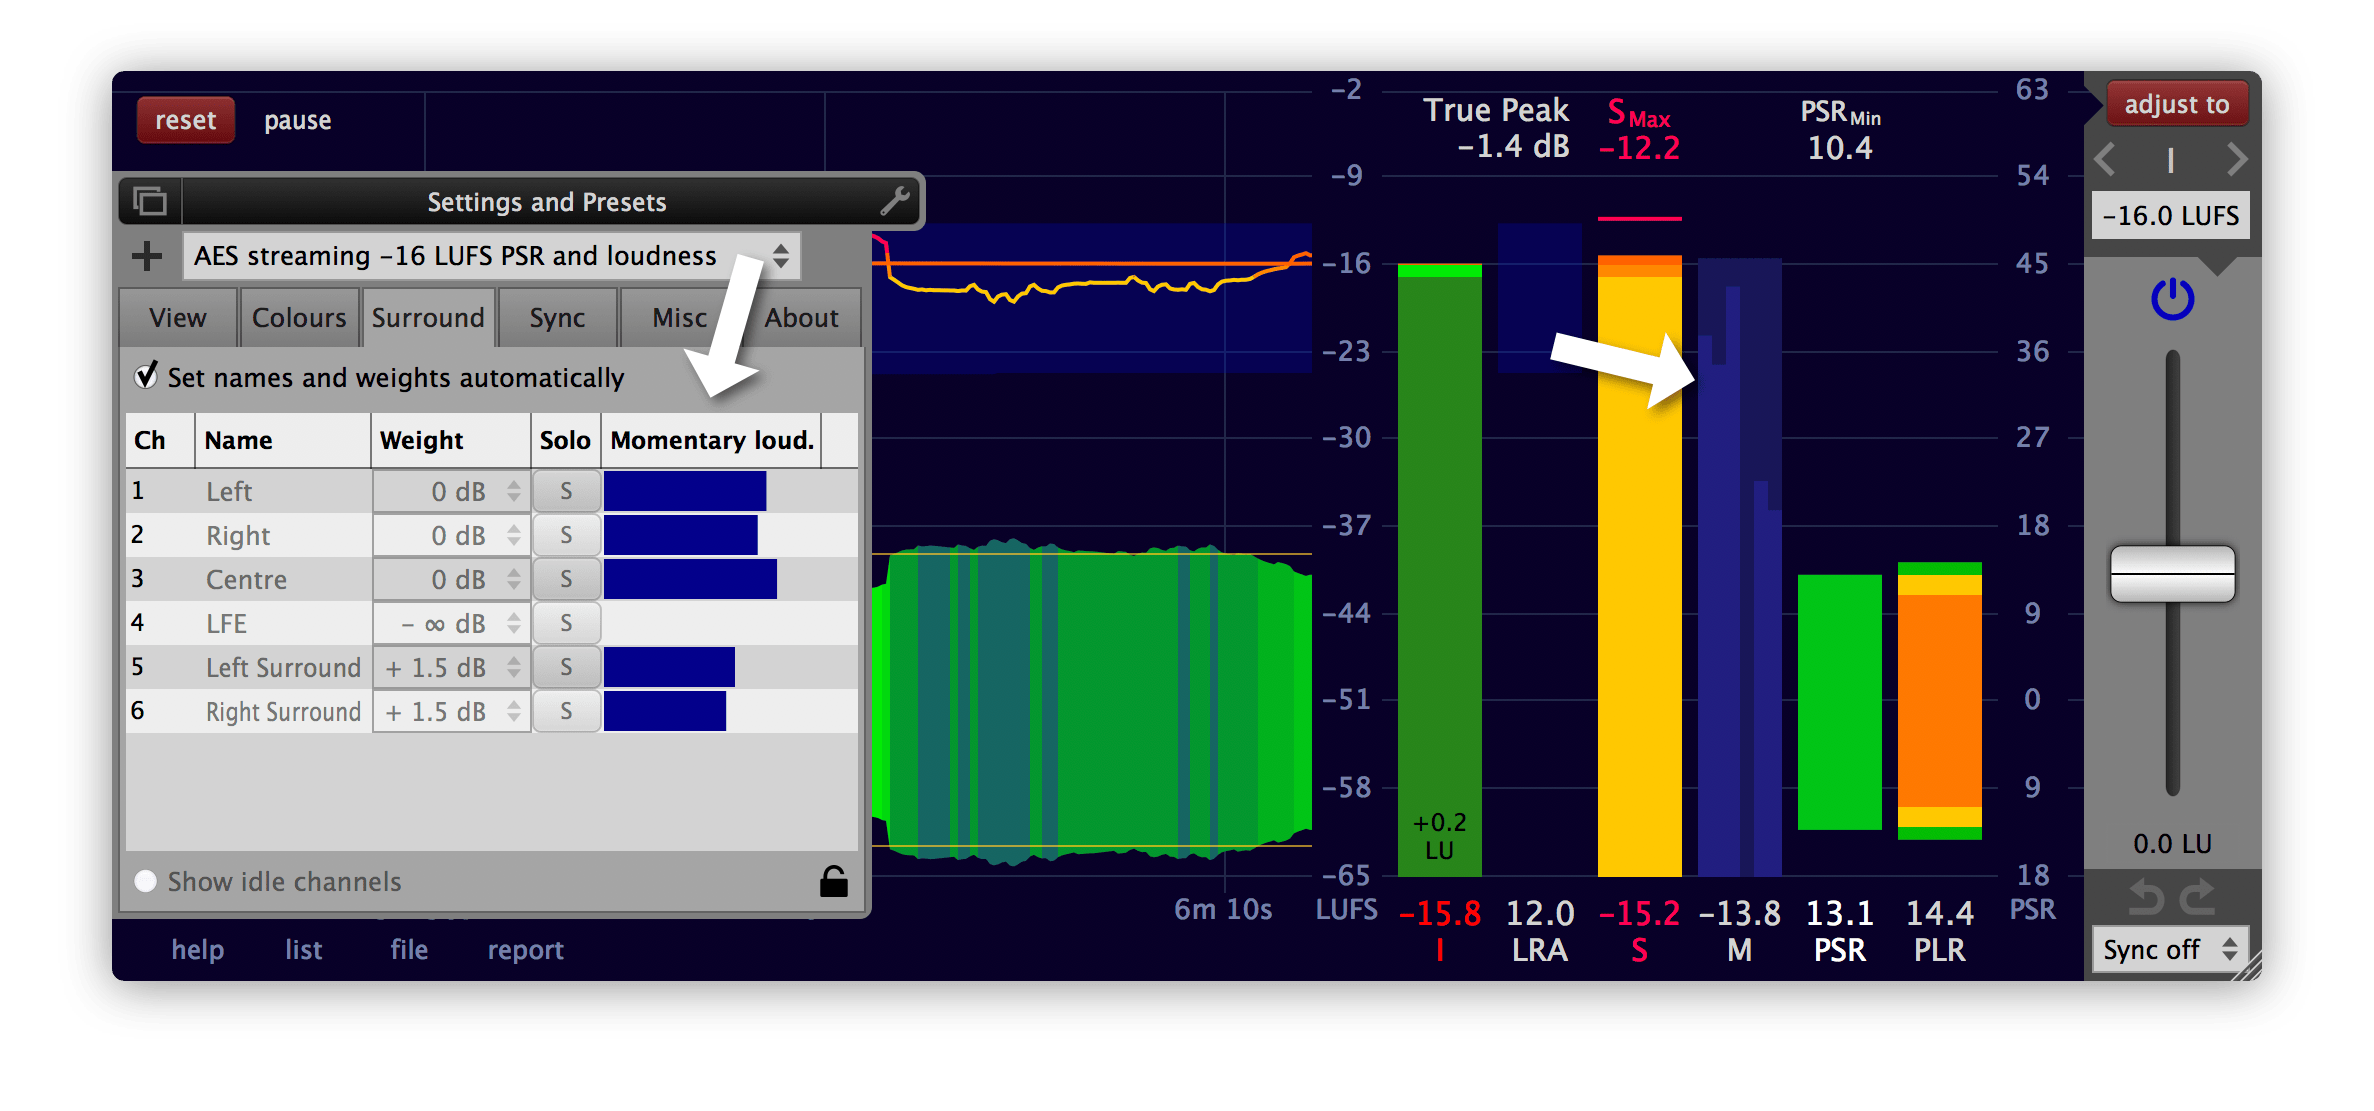
If 'Set names and weights automatically' is disabled, the channel names and the weights can be set manually.
With a channel weight of -∞ dB the corresponding channel is not taken into account in the loudness measurement. To e.g. measure the loudness of a single channel of a surround track, set all channel weights to -∞ dB except the one you are interested in.
To listen to a channel in isolation, use the solo button next to the channel weight. This helps when working with large speaker arrays, to figure out which channel belongs to which speaker. Be aware that using a solo button alters the loudness measurement and therefore solo shouldn't be used while a measurement is running.
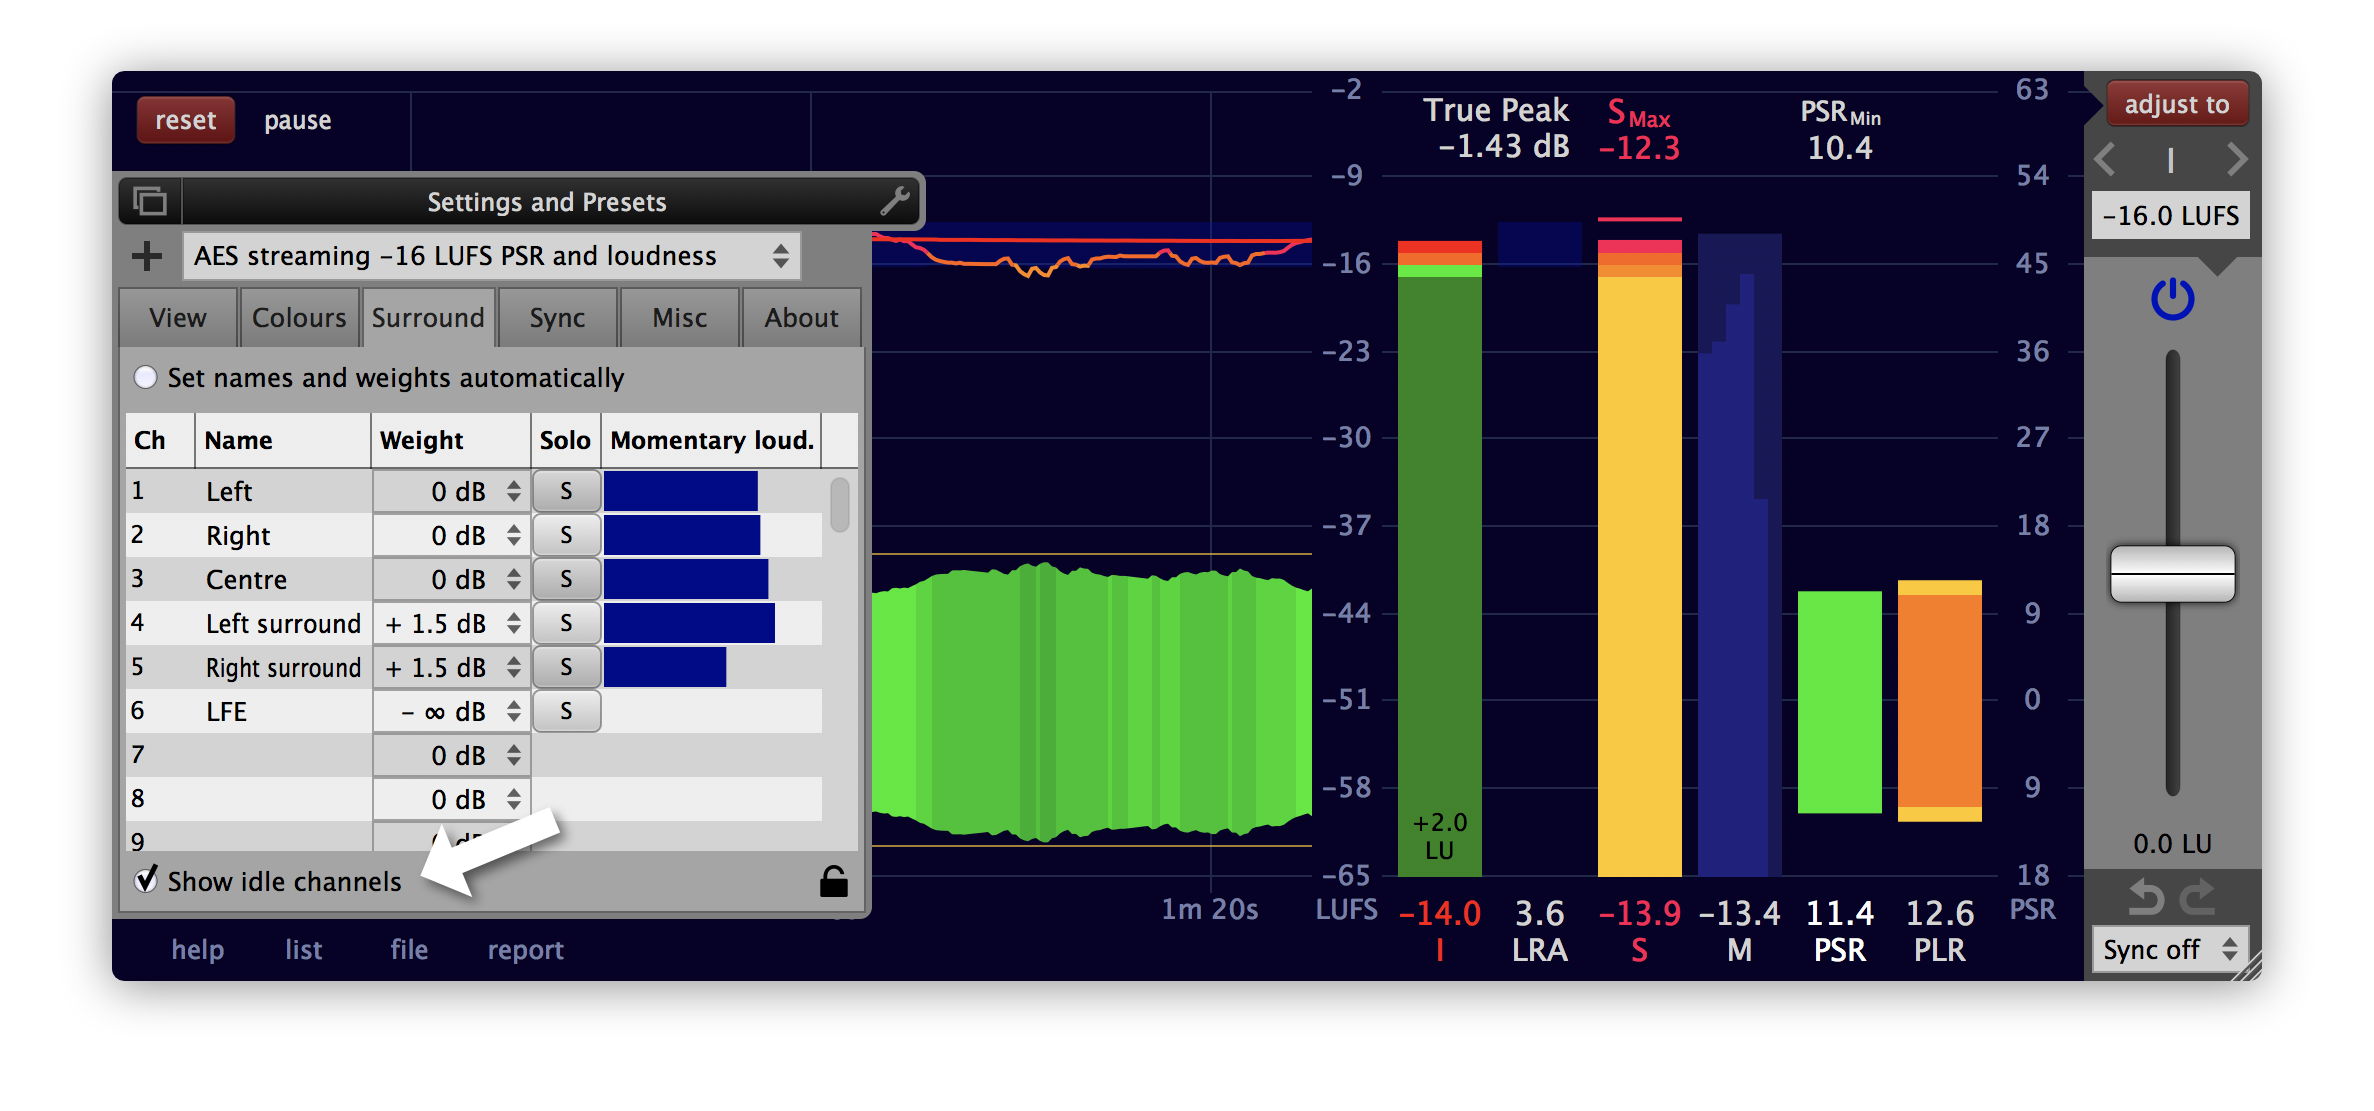
If the 'Show idle channels' at the bottom of the surround settings is engaged, all 64 channels the Multimeter supports are displayed. Even if not all of them are currently in use. This makes it possible to prepare for a file measurement if the file doesn't contain meta data about the channel configuration. It also enables the creation of a preset with a channel number different to the currently used one.
Sync settings
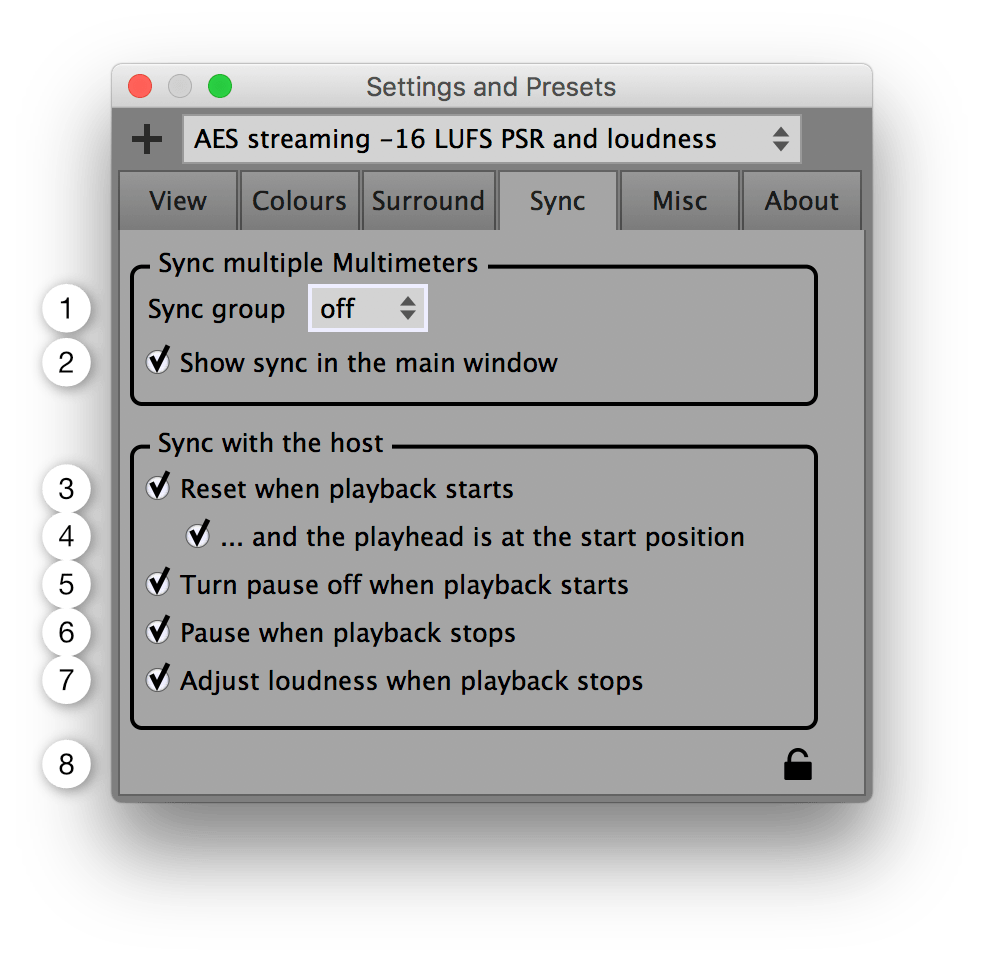
- Assigns a sync group
to this instance of the Multimeter.
- Shows or hides the sync group combo box at the bottom right on the main Multimeter window. If you use sync a lot, this makes it more accessible.
- Resets the measurement each time the playback is started in the host.
- Only resets the measurement when the playhead of the host is at the start position, i.e. at time 0.
- If pause has been enabled, it will be disabled when the playback starts.
- Pauses the measurement each time the playback is stopped in the host.
- Adjusts the loudness each time the playback is stopped in the host.
- Preset load protection.
If engaged, the sync settings won't be changed when a preset is loaded.
Misc settings
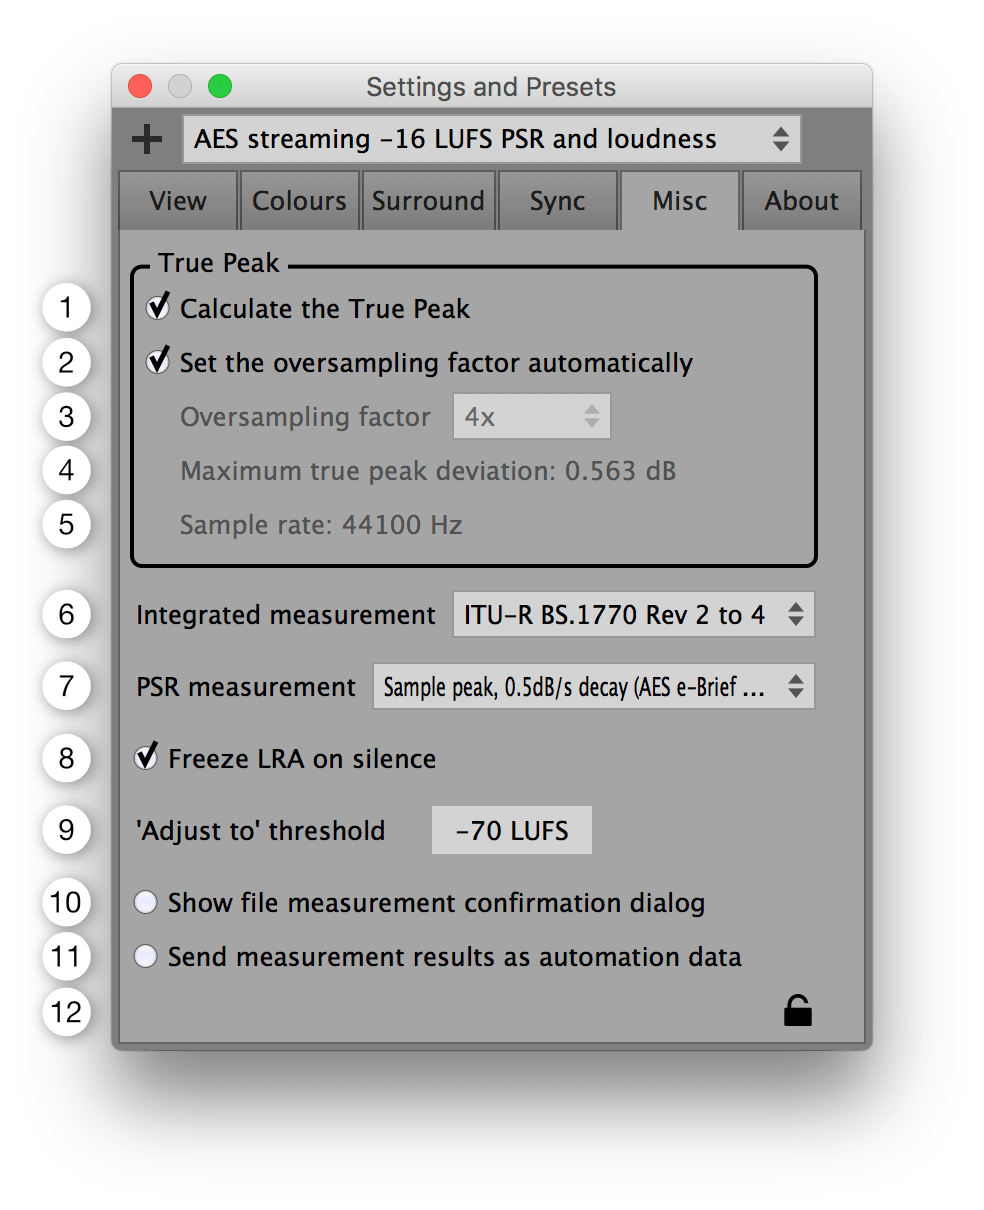
- Enables or disables the true peak calculation.
To measure the true peak, this needs to be enabled before the measurement takes place.
It is recommended to turn it off when not needed because the involved oversampling calculations are quite CPU intense. - When enabled, the oversampling factor for the true peak calculation is set automatically, in accordance with ITU-R BS.1770-4.
- The oversampling factor used for the
true peak calculation.
The desired oversampling factor needs to be set before the measurement takes place. - The maximal possible difference between the
true-peak and the
true peak (= the estimate of
the true-peak).
The maximum true peak deviation can be achieved with a pure 20kHz sine wave with a phase such that the peaks will be aligned exactly between the sampling times of the oversampled signal.
- The currently used sample rate.
If the Multimeter operates as a plug-in, the sample rate is set by the host application.
If the Multimeter operates as a standalone application, the sample rate can be changed in the audio settings window. To open it, click the 'Audio settings...' button in this same misc settings section. This button is only available in the standalone application. - Integrated measurement algorithm.
The document ITU-R BS.1770 specifies how to measure the integrated loudness. It has been changed multiple times over the years.- ITU-R BS.1770 Rev 1 specifies neither overlapping audio blocks nor a gating procedure.
- ITU-R BS.1770 Rev 2 to 4 all specify the exact same way on how to calculate the integrated loudness. Overlapping audio blocks and a gating procedure is used. If in doubt, choose this one.
- Peak to short-term ratio (PSR) measurement algorithm.
The PSR is defined as PSR = peak - 'short-term loudness'. The short-term loudness is exactly defined, but it's not clearly defined (yet) what kind of peak to use for the calculation of the PSR. That's why the Multimeter offers multiple options.- 'Sample peak of the last 3s':
The peak (the biggest absolute sample value) that occurred in the previous 3 seconds. - 'True peak of the last 3s':
The true peak that occurred in the previous 3 seconds. - 'Sample peak, 0.5dB/s decay (AES e-Brief 373)':
The continuously updated peak with an instant rise and a 0.5dB/s decay. The AES e-Brief 373 (October 18-21 2017) recommends this method to detetermine the PSR. Be aware that peaks occurring prior to 3 seconds in the past can have an influence on the current PSR value. - 'True peak, 0.5dB/s decay':
The continuously updated true peak with an instant rise and a 0.5dB/s decay. Be aware that true peaks that occurred prior to 3 seconds in the past can have an influence on the current PSR value.
- 'Sample peak of the last 3s':
- When a short measurement is followed by silence, the LRA
value will change. This is in accordance to the definition
of the LRA.
If enabled, the LRA value before a silent section will be displayed during the silence. This is especially useful at the end of a measurement, when you would like to know the exact LRA of your piece but don't want to include the trailing silence in the measurement.
The LRA measurement continues in the background and as soon as the silence is over, the display of the LRA gets updated again. - When clicking the 'adjust to' button, the loudness
will only be adjusted if the measured integrated
loudness is above this threshold.
Thanks to this, muted or very quiet tracks won't be boosted to dangerously high levels. - If enabled, a confirmation gets displayed before the measurement of a file starts. This protects the previous measurement of being accidentally replaced.
- If
enabled, the measurement results are continuously sent to
the host as automation parameters. Depending on the host it
might be necessary to also keep the Multimeter window
open.
If the automation data gets recorded (written) by the host, the measurement results will be available as automation curves in the timeline.
If disabled, the corresponding automation parameters are still available in the host. But the Multimeter doesn't update them.
Manually changing these measurement automation parameters in the host and sending them to the Multimeter doesn't have any effect on the Multimeter. The measurement automation parameters don't automate anything of the Multimeter - the Multimeter ignores them. They are exclusively used to provide an option to send the measurement data to the host.
- Preset load protection.
If engaged, the misc settings won't be changed when a preset is loaded.
About section
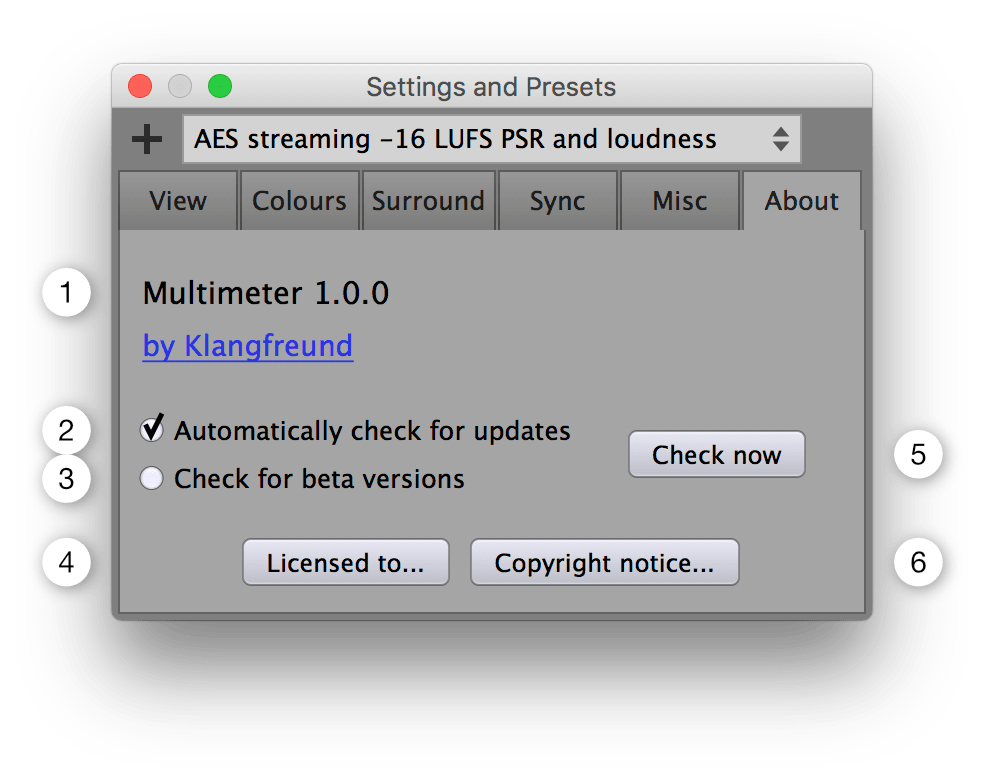
- The current version of the Multimeter.
- Automatically check for updates.
The Multimeter will check once a week if there is a new version available at klangfreund.com. - Beta versions will also be considered when checking for new Multimeter versions.
- Displays the licensing details.
- To manually check if there is a new version available at klangfreund.com.
- Displays the copyright notice.
Appendix
Accuracy of the Multimeter
To verify the accuracy of a loudness meter, the ITU and the EBU provide test files. The Multimeter passes all these tests.
Files
macOS
The locations of the files for the different plug-in formats and the standalone application are listed below. During the installation you've chosen which ones to install (By default, all are installed).
- /Applications/Multimeter.app
- /Library/Application Support/Avid/Audio/Plug-Ins/Multimeter.aaxplugin
- /Library/Audio/Plug-Ins/Components/Multimeter.component
- /Library/Audio/Plug-Ins/VST/Multimeter.vst
- /Library/Audio/Plug-Ins/VST/Multimeter 1ch.vst
- /Library/Audio/Plug-Ins/VST/Multimeter 2ch.vst
- /Library/Audio/Plug-Ins/VST/Multimeter 6ch.vst
- /Library/Audio/Plug-Ins/VST/Multimeter 10ch.vst
- /Library/Audio/Plug-Ins/VST3/Multimeter.vst3
The file containing the unlock information is located at
- /Users/Shared/Music/Audio Music Apps/Klangfreund/Multimeter/Multimeter key.xml
Global settings for the Multimeter are written to the file
- /Users/<your user name>/Music/Audio Music Apps/Klangfreund/Multimeter/Multimeter settings.xml
Presets created by the user are stored in the folder
- /Users/<your user name>/Music/Audio Music Apps/Klangfreund/Multimeter/User Presets/
This folder gets created when the first preset is saved by the user. Each preset is stored in a separate XML file. The startup preset is stored in the startup.xml file. The factory presets are not stored as files, they are contained in the plug-in.
Windows
In contrast to macOS, the 32 and 64 bit VST plug-in formats don't have a well defined file location on Windows. That's why you can choose the location for them in the installer. To help find these locations later, the installer saves a list of all created files to
- C:\Program Files\Multimeter\InstallationLogFile.log
If you haven't altered the paths during installation, these files were installed to
- C:\Program Files\Common Files\Avid\Audio\Plug-Ins\Multimeter.aaxplugin
- C:\Program Files\Common Files\VST2\Multimeter.dll
- C:\Program Files\Common Files\VST2\Multimeter 1ch.dll
- C:\Program Files\Common Files\VST2\Multimeter 2ch.dll
- C:\Program Files\Common Files\VST2\Multimeter 6ch.dll
- C:\Program Files\Common Files\VST2\Multimeter 10ch.dll
- C:\Program Files\Common Files\VST3\Multimeter.vst3
- C:\Program Files (x86)\Common Files\Avid\Audio\Plug-Ins\Multimeter.aaxplugin
- C:\Program Files (x86)\Common Files\VST2\Multimeter (32 Bit).dll
- C:\Program Files (x86)\Common Files\VST2\Multimeter 1ch (32 Bit).dll
- C:\Program Files (x86)\Common Files\VST2\Multimeter 2ch (32 Bit).dll
- C:\Program Files (x86)\Common Files\VST2\Multimeter 6ch (32 Bit).dll
- C:\Program Files (x86)\Common Files\VST2\Multimeter 10ch (32 Bit).dll
- C:\Program Files (x86)\Common Files\VST3\Multimeter (32 Bit).vst3
Under Windows XP, the file containing the unlock information is located at
- C:\Documents and Settings\All Users\Application Data\Klangfreund\Multimeter\Multimeter key.xml
Under newer versions of Windows, the file containing the unlock information is located at
- C:\ProgramData\Klangfreund\Multimeter\Multimeter key.xml
Global settings for the Multimeter are written to the file
- C:\Users\<your user name>\AppData\Roaming\Klangfreund\Multimeter\Multimeter settings.xml
Presets created by the user are stored in the folder
- C:\Users\<your user name>\AppData\Roaming\Klangfreund\Multimeter\User Presets\
This folder gets created when the first preset is saved by the user. Each preset is stored in a separate XML file. The startup preset is stored in the startup.xml file. The factory presets are not stored as files, they are contained in the plug-in.
Linux
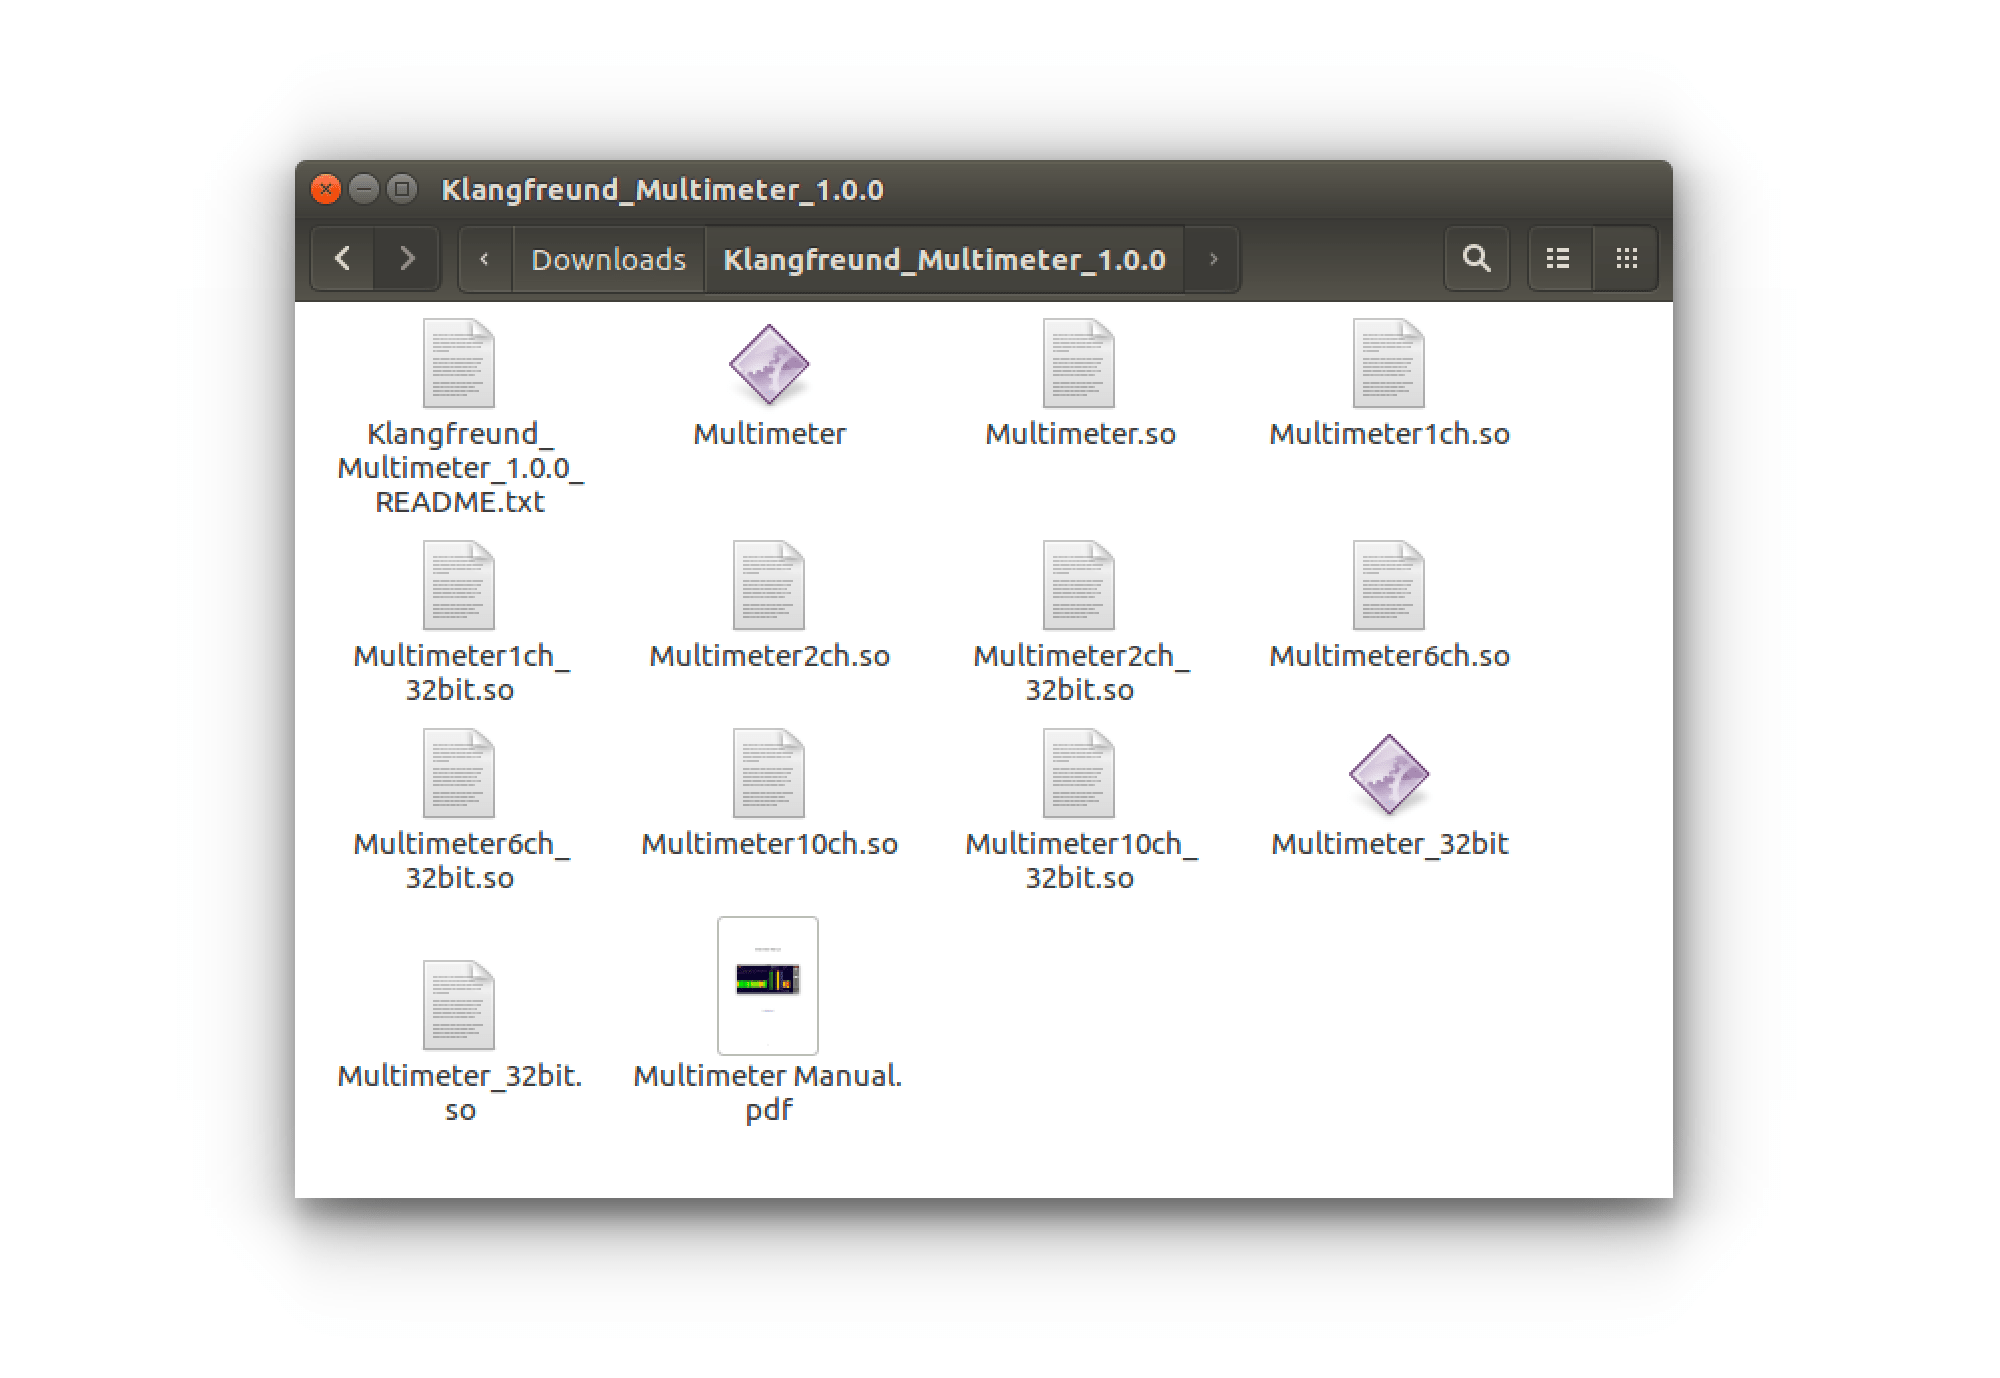
The README file provided by Klangfreund suggests to put the standalone application and the plug-in files to
- /opt/Multimeter
- /opt/Multimeter_32bit
- ~/.vst/Multimeter.so
- ~/.vst/Multimeter_32bit.so
- ~/.vst/Multimeter_1ch.so
- ~/.vst/Multimeter_1ch_32bit.so
- ~/.vst/Multimeter_2ch.so
- ~/.vst/Multimeter_2ch_32bit.so
- ~/.vst/Multimeter_6ch.so
- ~/.vst/Multimeter_6ch_32bit.so
- ~/.vst/Multimeter_10ch.so
- ~/.vst/Multimeter_10ch_32bit.so
But you might have placed them somewhere else.
The file containing the unlock information is located at
- ~/.config/Klangfreund/Multimeter/Multimeter key.xml
Global settings for the Multimeter are written to
- ~/.config/Klangfreund/Multimeter/Multimeter settings.xml
Presets created by the user are stored in the folder
- ~/.config/Klangfreund/Multimeter/User Presets/
This folder gets created when the first preset is saved by the user. Each preset is stored in a separate XML file. The startup preset is stored in the startup.xml file. The factory presets are not stored as files, they are contained in the plug-in.
Troubleshooting
Hardware changes
If you completely reinstall the whole operating system or if you entirely switch to a new computer, the Multimeter needs to be unlocked again. In some cases it is also needed after a change or upgrade of the hardware of your computer.
After a certain amount of unlocks (depending on the number of licenses you own), you will run out of unlock slots. To reclaim unlock slots, deactivate old unlock slots you no longer need in your personal account.
Restore write access to unlock the Multimeter
When unlocking the Multimeter, it writes the unlocking information to a key file on disk, such that it stays unlocked in the future. If the Multimeter detects that this key file can't be written it displays a warning.
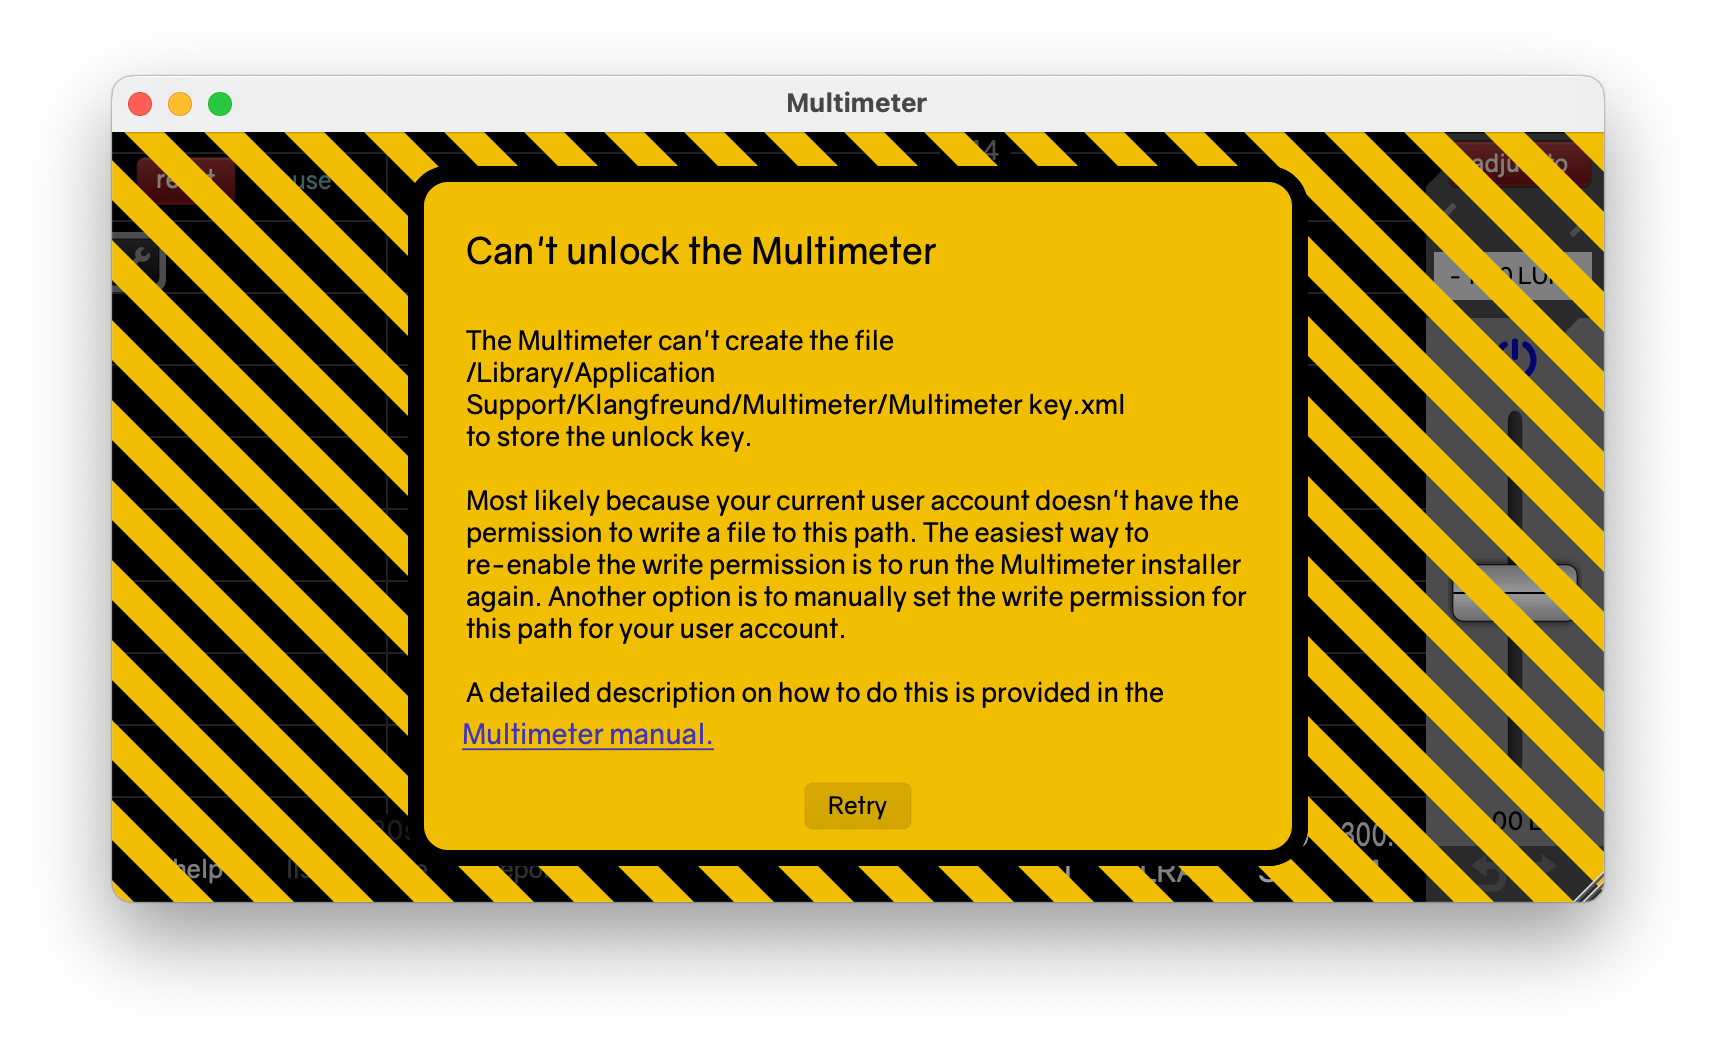
With your current user account you most likely don't have write access to the specific path anymore. You need to restore the write access.
Restore write access under macOS
To restore write access for the key file, such that the Multimeter can be unlocked, open the Finder. Navigate to the deepest folder in the path
- /Users/Shared/Music/Audio Music Apps/Klangfreund/Multimeter/
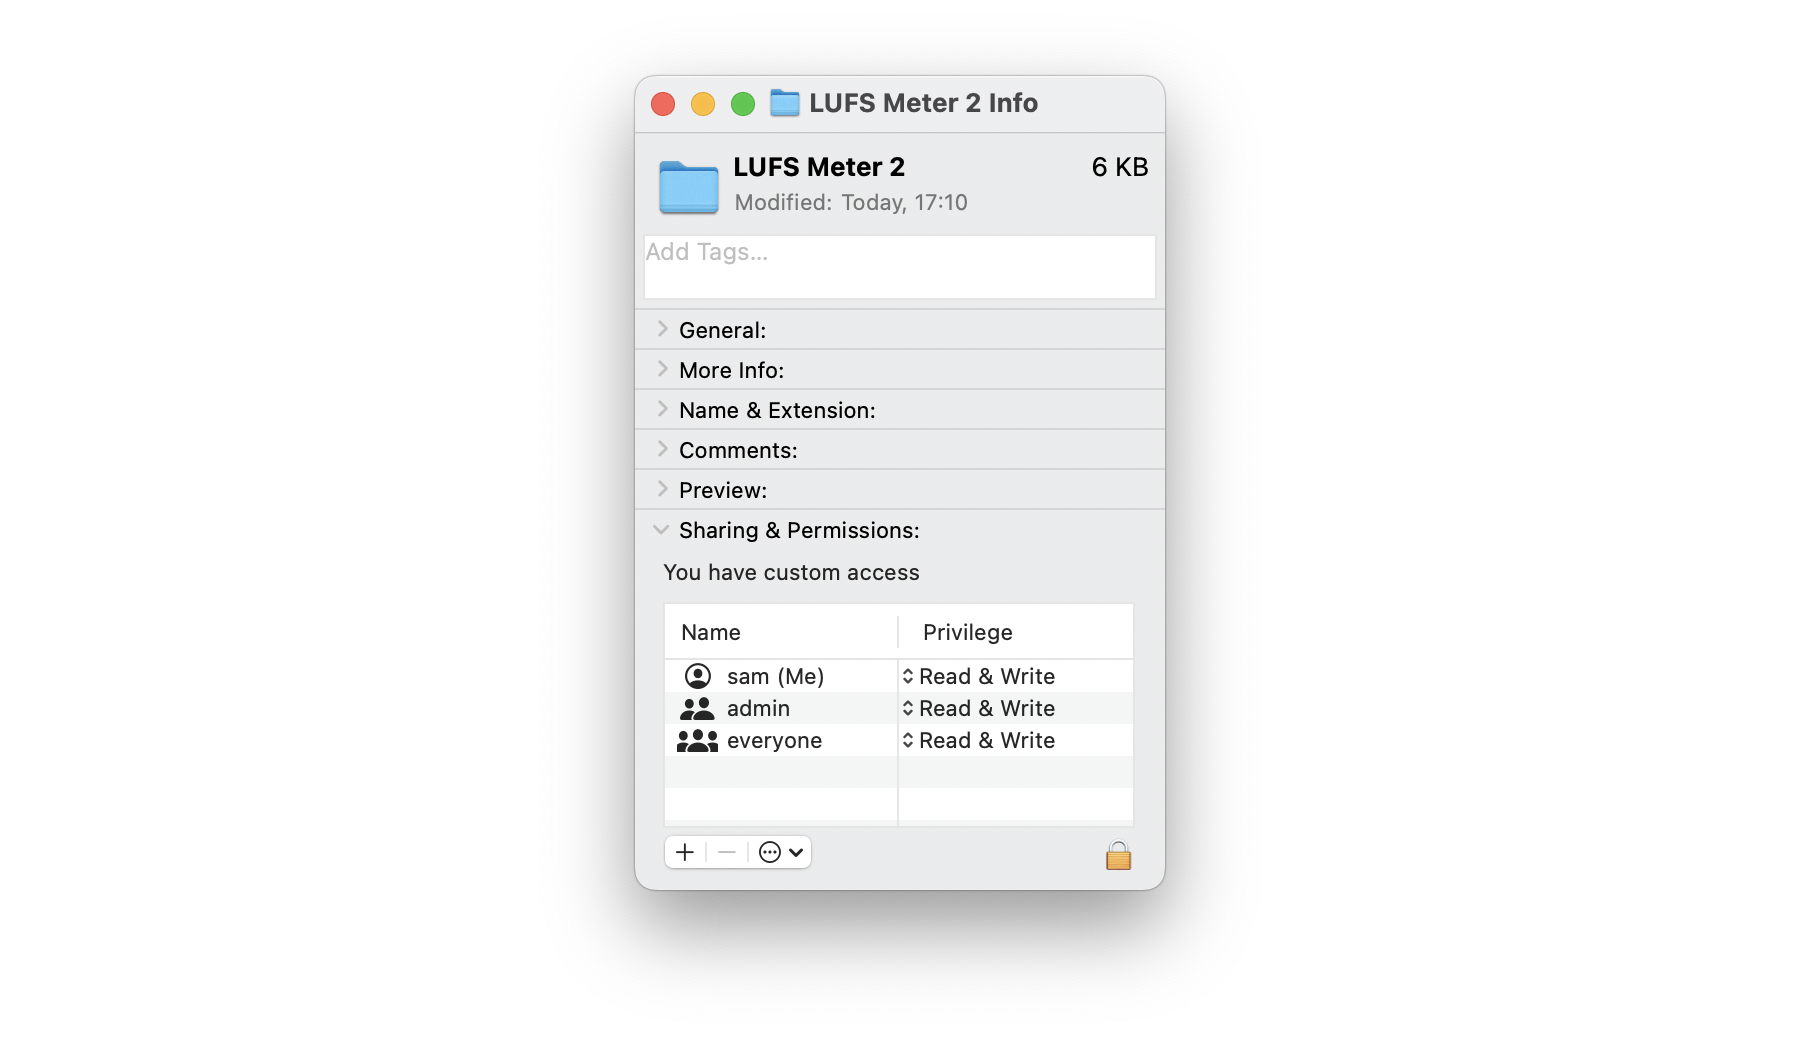
that exists on your system. For example, if /Users/Shared/Music/ is available but 'Audio Music Apps' isn't, navigate to /Users/Shared/ and select the 'Music' folder. Press Command-i and open the 'Sharing & Permissions' section at the bottom. To be able to change the permissions, the padlock icon at the bottom right must display an open padlock. If it doesn't, click it and enter your password. If your user name is listed, change its privilege from 'Read only' to 'Read & Write'. If it isn't listed, click the '+' at the bottom left, choose your user name and set the privilege to 'Read & Write'.
Switch back to the Multimeter and hit the 'Retry' button. Or restart the Multimeter. This creates the folder structure as needed.
Restore write access under Windows
To restore write access for the key file, such that the Multimeter can be unlocked, open the Explorer (Windows Key + E). Navigate to the deepest folder in the path
- C:\ProgramData\Klangfreund\Multimeter\
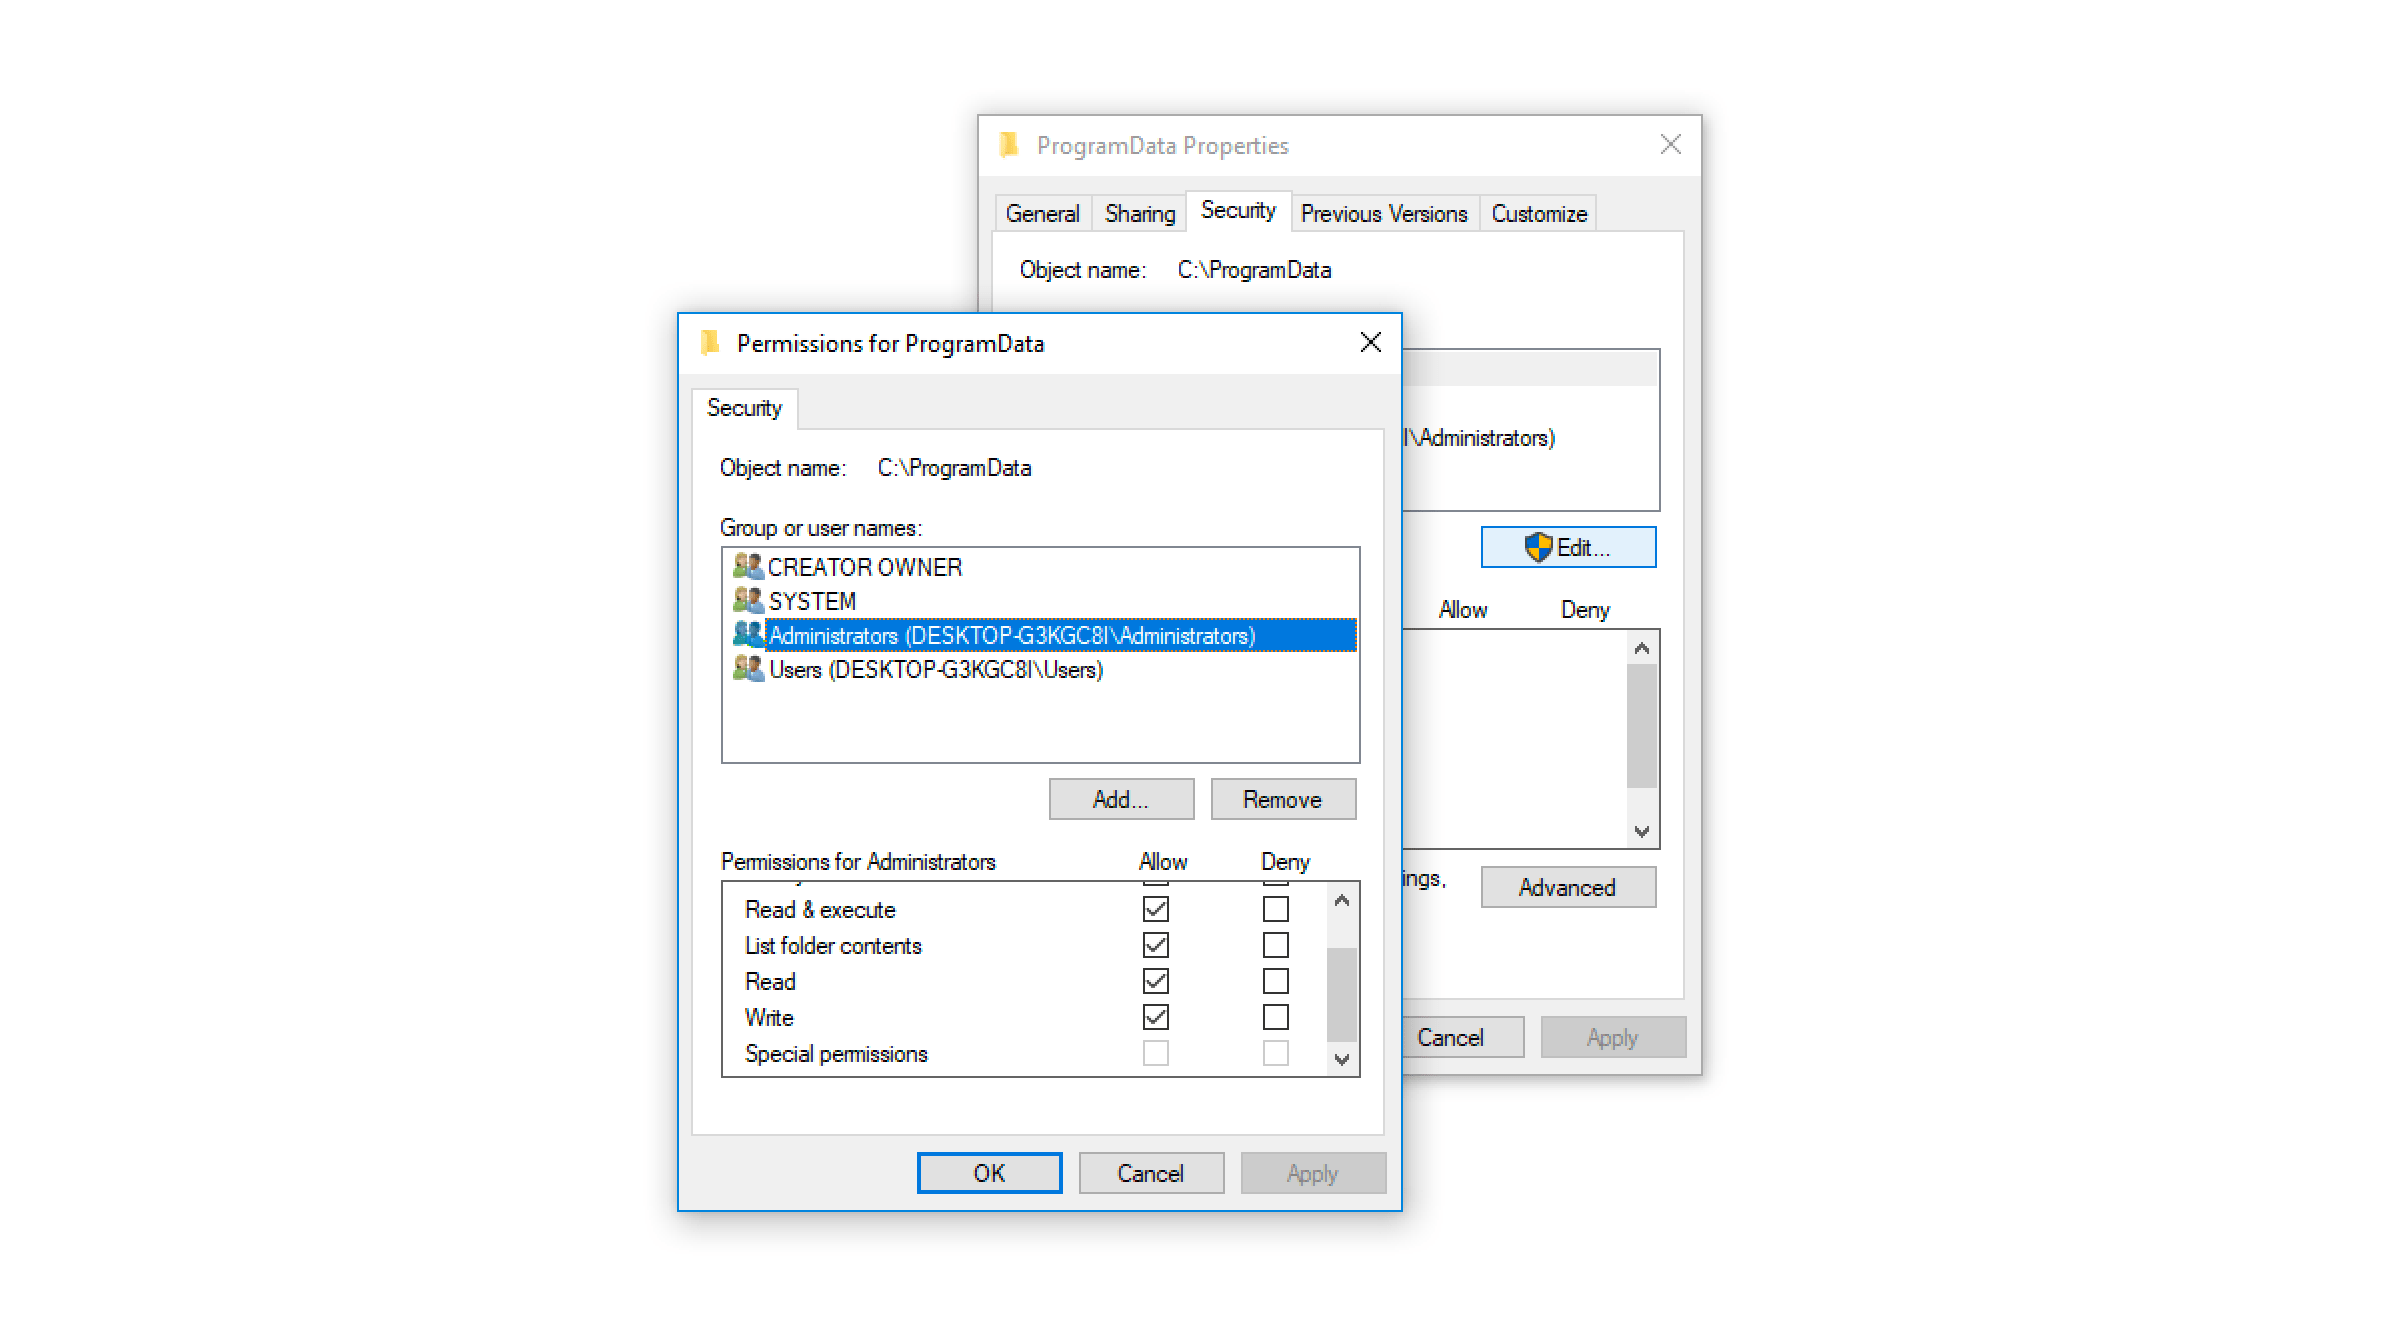
that exists on your system (If you are using Windows XP, the path is different). For example, if 'C:\ProgramData\' is available but 'Klangfreund' isn't, navigate to 'C:\'. Ensure that the Explorer displays hidden files and folders, such that 'ProgramData' is visible. Select the 'ProgramData' folder and press Alt-Enter to open the properties. Switch to the Security tab and click the 'Edit...' button located in the middle right to open the Permissions window. Select 'Administrators' in the top list and enable the Allow-box for 'Write' in the bottom list. Repeat this for the 'Users' entry.
Switch back to the Multimeter and hit the 'Retry' button. Or restart the Multimeter. This creates the folder structure as needed.
Alternatively you could start your DAW or the Multimeter standalone application by right clicking on it and selecting 'run as administrator'. This way the Multimeter should be able to create the key file and store the unlock information to it. Once created, the Multimeter only needs read access for the key file - 'run as administrator' won't be needed any more.
Restore write access under Linux
To restore write access for the key file, such that the Multimeter can be unlocked, open a terminal and navigate to the deepest directory available in the path
- ~/.config/Klangfreund/Multimeter/
For example '~/.config/' might be available, but '~/.config/Klangfreund' isn't. In this case use for example 'chmod 755 ~/.config' to restore write permission.
Switch back to the Multimeter and hit the 'Retry' button. Or restart the Multimeter. This creates the folder structure as needed.
Revalidate all Audio Units
If a plug-in doesn't appear in Logic or GarageBand it might help to clear the Audio Unit cache. This will enfore revalidation of all Audio Unit plug-ins which might take a few minutes, depending on the number of plug-ins you have installed.
- Close all audio unit hosts (like Logic and GarageBand).
- In the Finder, press Command-Shift-G.
- Enter "~/Library/Caches/" and press return.
- Move the file com.apple.audiounits.cache and the folder AudioUnitCache to the Desktop.
- Relaunch Logic or GarageBand, all Audio Unit plug-ins will be revalidated.
- Delete com.apple.audiounits.cache and AudioUnitCache from your desktop.
Final Cut Pro X: Audio skimming
Final Cut Pro X together with audio plug-ins is more sturdy if audio skimming is turned off. This also holds true for the Multimeter.
Final Cut Pro X: Failing AU validation
If Final Cut Pro X shows a dialog on launch that says that the Multimeter hasn't passed the AU validation and is therefore disabled, the AU validation process can be retriggered to solve this issue. Be aware that this will scan all your audio unit plug-ins again which might take a few minutes, depending on the number of audio plug-ins you have installed. To proceed:
- Open the preferences in Final Cut Pro X.
- Go to General an click the 'Audio Units: Validate on Next Launch' button.
- Relaunch Final Cut Pro X.
If you have an older version of Final Cut Pro X without this option available
- Quit Final Cut Pro X.
- Move the file /Users/sam/Library/Preferences/com.apple.audio.InfoHelper.plist to the Desktop.
- Relaunch Final Cut Pro X.
- Delete the file com.apple.audio.InfoHelper.plist from the Desktop.
as described in more detail here.
Audacity: VST recommended over AU
If you use the Multimeter in Audacity under macOS, it is recommended to exclusively use the VST version of the Multimeter. The VST implementation of Audacity works better than its audio unit implementation.
Uninstall
macOS
OS X does not provide an uninstall mechanism. You have to manually delete the Multimeter files.
Windows
Run the uninstaller. Either directly from
- C:\Program Files\Multimeter\unins000.exe
or select the Multimeter in the Windows Settings -> Add or remove programs.
Acknowledgements
Samuel from Klangfreund is deeply grateful for all the feedback and support received by many wonderful users!
Honorable mention of outstanding beta testers:
Chi Kim,
Damian Wilbur,
Dennis Wilkins,
FL Studio Bits,
Mark Heleniak,
Matthew Palmisano,
Michael McCue,
Rob Stewart
and Till Steinmetz.
Copyright notice
The End User License Agreement (EULA) describes your rights and the conditions upon which you may use the Multimeter and all related documents provided by Klangfreund.
AAX and Pro Tools are trademarks of Avid Technology.
Apple, Audio Units, Final Cut Pro X, Finder, GarageBand, Logic
Pro X, Mac and macOS are trademarks of Apple Inc.
ASIO and VST are trademarks of Steinberg Media Technologies
GmbH.
Reaper is a trademark of Cockos Inc.
Windows is a trademark of Microsoft Corporation.
PDF manual
This manual is also available as a PDF manual